|
Gloster Meteor F.8
by John
Valo
|
|
|
Gloster Meteor F.8 |

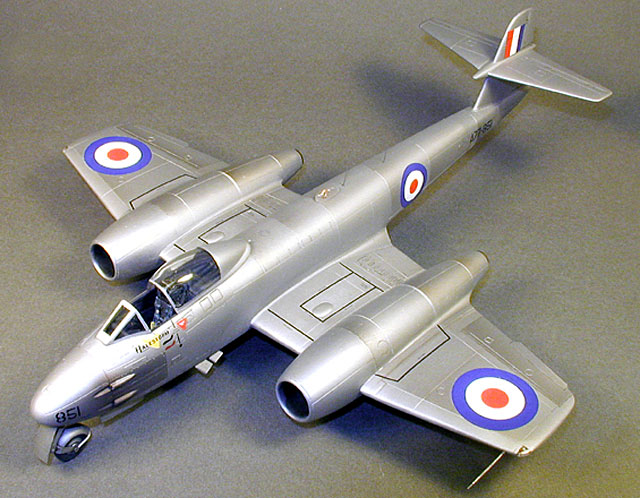
Classic Airframes' 1/48 scale Meteor F.8
may be ordered online from
Squadron
I rather doubt the Meteor F.8 needs any introduction
- this is a 'classic airframe' if there ever was one. Thanks to Jules and
Classic Airframes, modelers finally have an injection-molded version in
1/48 scale.
The kit consists of the usual resin cockpit and details; major components
are injected plastic with nicely recessed panel lines. A beautiful
two-piece injected canopy is provided. Depending on which release you buy,
the canopy and engine intakes vary from 'early' to 'late' versions. The
resin is beautifully cast, and the ejection seat is wonderfully complex
and complete.
As usual for a limited-run kit, I cut out and cleaned
up the parts first, then bagged these according to assembly sequence. I
also removed all ejector pin marks on the plastic parts, which is an
absolute must on this particular kit. I just like to get these steps out
of the way right off the bat, so I don't lose enthusiasm halfway through
assembly. The wheel wells have two very obvious pin marks, but in the
interest of laziness, I covered one, and used a bit of solder to convert
the other one into a 'hydraulic accumulator'.
Although mentioned in the kit instructions, I must emphasize that you must
dry-fit every assembly before committing to glue! The CA Meteor series is
engineered to use as many common parts as possible to keep production
costs reasonable, which inevitably leads to some minor fit variations
between parts. These issues are quite minimal on the Meteor, and simple to
fix - just take the time to test fit the parts.
I began assembly with the cockpit, the floor of which is glued to the
nosewheel strut support. The front cockpit bulkhead and nosewheel strut
support is a very delicate and spindly piece of resin work. Referring to the instruction
drawings, I reinforced this assembly using plastic rod to replace the resin struts,
and wound up with what I could only assume is a stronger framework.

The fit of the nosewheel bay/cockpit is a bit of a challenge, as the
assembly seems 'short' to cover the distance from the nosegear bay to
where the rear of the cockpit should be. I elected to glue the nosegear
bay portion into one fuselage half, the fuselage walls having been
tack-glued to the floor. After gluing the fuselage halves together, I
pushed the floor upward into position, then spread and glued the sidewalls
in place. The rear bulkhead was then glued into place, and the rear deck
part sanded to fit. I then sealed the bulkhead and deck parts with a thin
bead of epoxy, and poured birdshot mixed with epoxy into the fuselage
through the hole where the lower wing fits. Fearing a tail-sitter, I went
a little nuts with the birdshot, and now have about a two-pound model!
I deviated from the kit instructions with regard to the wing assembly. The
instructions show the typical sequence of mating the lower
wing/nacelle/lower fuselage part with the upper wing/nacelles. I elected
to glue the lower wing/lower fuselage part in place, then dry-fit and
tweak the upper wing parts to fit at the roots. This worked very well, and
I would highly recommend this approach to anyone building this kit.
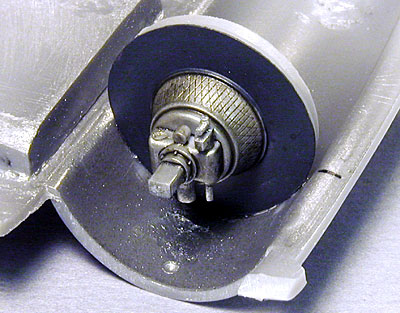 The
resin engine faces need some sanding to fit within the nacelle assemblies.
I glued mine in place to the lower nacelle, then proceeded to sand the
upper portion to fit at the same time I was tweaking the wing root fit of
the upper wing panels. I once again deviated from the instructions here,
by not gluing the resin exhausts in place before attaching the upper and
lower nacelle/wing halves as suggested. I assumed I could simply slide the
tubular engine exhausts into the rear nacelle opening after completing
major assembly. I figured this would allow me to sand the rear of the
nacelles if necessary, as well as not have to mask off the exhausts when
painting. Well, when all was said and done and it was time to slide them
in, I greased one up with a bit of superglue, slid it into position, then
watched as the weight of the resin kept pulling it into the nacelle! The
resin engine faces need some sanding to fit within the nacelle assemblies.
I glued mine in place to the lower nacelle, then proceeded to sand the
upper portion to fit at the same time I was tweaking the wing root fit of
the upper wing panels. I once again deviated from the instructions here,
by not gluing the resin exhausts in place before attaching the upper and
lower nacelle/wing halves as suggested. I assumed I could simply slide the
tubular engine exhausts into the rear nacelle opening after completing
major assembly. I figured this would allow me to sand the rear of the
nacelles if necessary, as well as not have to mask off the exhausts when
painting. Well, when all was said and done and it was time to slide them
in, I greased one up with a bit of superglue, slid it into position, then
watched as the weight of the resin kept pulling it into the nacelle!
Luckily, I had tweezers handy, and that combined with
some spontaneous promises of various reforms to my Higher Power, I managed
to grab the glue-coated part before it disappeared into the nacelle. On
this step, I think it's best to go with the instructions...
The various releases of this kit have alternate engine intakes, each of
which is two main pieces with a small two-piece wing leading edge insert.
These provide the perfect example of the necessity of dry-fitting
assemblies. I needed to sand the wing root areas on both the intakes and
the wings to get a good fit. I wound up with a very small gap on the
underside intake/nacelle joint, but the fit on the upperside was very
good.
A smear of filler solved that issue, and better on
the bottom than on the upper side!
The next step was assembling the outer wing panels, which when offered up
the the necelle root indicated a rather bad fit, with steps from the
nacelle root to the outer panel on both wings. After a bit of head
scratching, I inserted a small chunk of plastic in the opening of the
outer panels, about one-third back on the chord. This increased the
thickness of the airfoil to match the nacelle roots, and with a little
sanding, I had a nice tight fit at the nacelle joint.
The balance of assembly went problem-free for me. The landing gear is
nicely done, but demands quite a bit of tedious cleanup. I also deepened
the locating holes for the main gear struts for a more solid fit. The
nosegear doors have little 'hinge' tabs which I dispensed with, and glued
the doors directly to the fuselage.
Paint, Decals
and the Invisible Belly Tank
|
I elected to build the MiG-killing RAAF Meteor 'Halestorm',
flown by Sgt. George Hale in Korea. Of course, this obligated a silver finish which necessitated a little extra smoothing and polishing of
the surface before painting. That having been done, I sprayed SNJ aluminum
on the aircraft, then accented panels with ComArt Transparent Smoke (much
akin to Tamiya Smoke). The kit decals went on beautifully, and were sealed
in with a very light satin clear coat. A plunge-molded clear D/F loop
cover and wire DF loop completed the model. For such a simple marking
scheme, I think the model is incredibly attractive (of course, I may be
somewhat biased...).
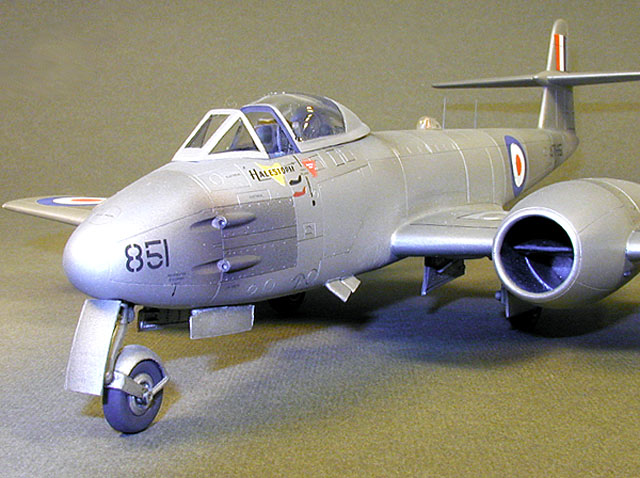
I am aware of the fact that this particular aircraft should be carrying
the conformal belly tank, and I am quite sure my kit came with one.
However, somehow in the course of assembly, it went missing! It will be
added later.
The new Classic Airframes Meteor F.8 is a very nice
kit, and bodes well for the rest of the series, as the fit issues truly
are rather minor, and the finished kit is really quite eye-catching and
convincing. Although I am no Meteor expert, I think it really captures the
look and feel of the real airplane. Like any CA kit, the results are
directly proportional to the amount of patience and time you put into the
kit, and truth be told, the Meteor was actually a rather fast build.
Recommended to experienced builders.
Click the
thumbnails below to view larger images:
Model, Images and Text Copyright © 2003
by
John C. Valo
Page Created 02 October, 2003
Last Updated
17 March, 2004
Back to
HyperScale Main Page |
 Home |
What's New |
Features |
Gallery |
Reviews |
Reference |
Forum |
Search
Home |
What's New |
Features |
Gallery |
Reviews |
Reference |
Forum |
Search
