|
Gloster Meteor F.8
by Steven "Modeldad" Eisenman
|
|
|
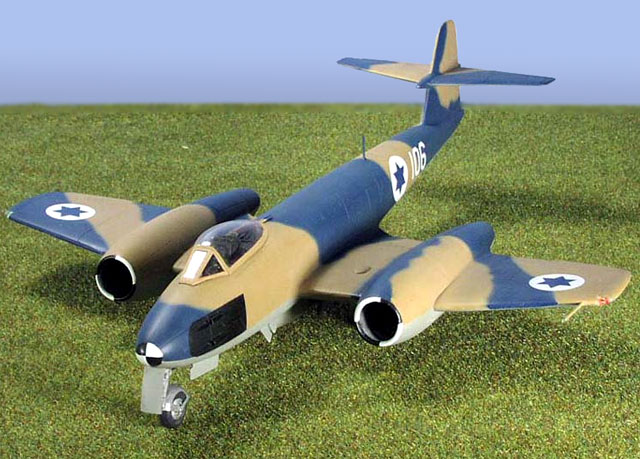
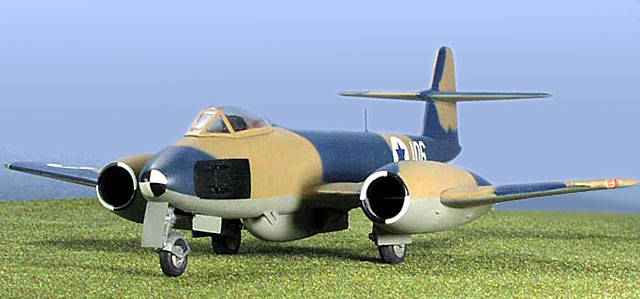
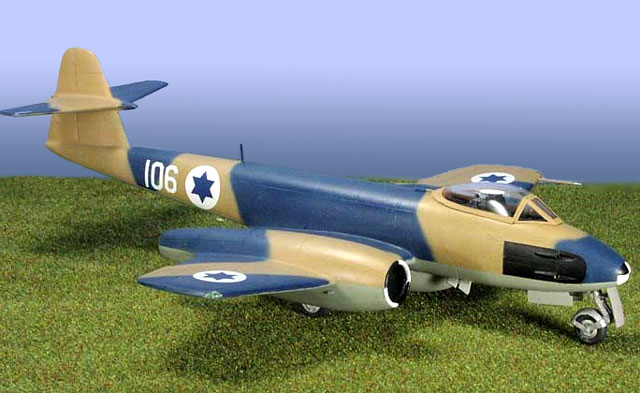
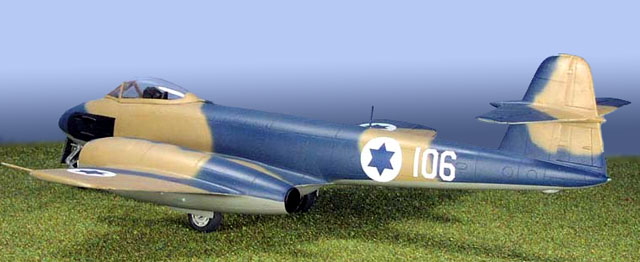
Gloster Meteor F.8 |

Classic Airframes' 1/48 scale Meteor F.8
may be ordered online from
Squadron
Jules Bringuier is clearly a risk taker. A great
number of releases under his Classic Airframes label would never have seen
the light of day from a more mainstream company, such as Tamiya or
Hasegawa.
Face it, would anyone but Jules have released a
Polikarpov I-15bis on skis in Finnish markings!
Now Jules has taken another risky step, Classic Airframes has entered the
jet age with the release of the Gloster Meteor F.8. But what makes me
question his sanity is not the subject matter, which has been woefully
overlooked by other companies in 1/48 scale and is beautifully done by CA,
but rather the fact that he asked me do a build review . Jules
thought I would enjoy doing the camouflaged Israeli F.8, and he was
correct. Thank goodness he did not ask me to do it in natural metal. And
after taking a sneak peak at John Valo's fine job, I'm convinced that
Jules is certifiable indeed for asking me.
The Meteor entered Israeli Air Force (IAF) service on
June 17, 1953 with the arrival of two T.7 trainers. These were the IAF's
first jet aircraft. The F.8 did not arrive in Israel until August 1953,
and were assigned to the newly formed 117 Squadron. Not until January 1954
did 117 Squadron began to reach operational strength with the Meteor. The
Meteors arrived uncamouflaged, and stayed that way until the arrival of
the French Ourangans in late 1955. It seems that it was the practice of
the IAF, until the late '60s, to leave the top of the line fighter
uncamouflaged to save weight, reduce drag and increase self-confidence.
When a better fighter entered service, the previous
top fighter was then camouflaged. By the conclusion of the Sinai Campaign
in 1956, it was clear that the Meteor was obsolete, and was relegated to a
training role as it was replaced by Ourangans and Vautours. Although
significant as the IAF's first jet, only a total of 34 Meteors reached
Israel, this was a mix of T.7, T.7/8, F.8, FR.9 and NF.13.*
Now that you have seen Brett's in-box review, and
John Valo's fantastic (as usual) build, I will now regale you with my tale
of adventure in building this great model kit. I must warn you that the
kit sent to me was a pre-production sample, so I cannot comment on the
final molding.
Given all the issues surrounding the accuracy of kits, I did my "rivet
counter's duty" and tried the best I could to determine the dimensional
accuracy of the CA Meteor. According to Classic Airframes, in addition to
drawings, the company that made the molds crawled all over a Meteor in a
museum in Czech for measurement.
Using the drawings from the Warpaint monograph on the Meteor and scaling
them up to 1/48, The CA meteor seems virtually spot on! The only thing
that caught may attention was the shape of the top of the fin and the
rudder. The drawing shows the trailing edge of the rudder as being
slightly more vertical. I then went back and looked at all the pictures of
F.8 (and similarly designed) Meteors I could find in my books and on the
web. What I came away with was a sense that the trailing edge looks just
fine.
The first thing that one must do is clean up all the
molding stubs on the surface of many of the part. A chisel blade on a
modeling knife works well, as does simply using a #11 blade as parallel to
the surface as you can. Some of the molding stubs do require a bit of
effort. As John mentioned, there are molding stubs in the middle of each
wheel well. I cleaned mine up the best I could and then tried to recreate
the well structure using small pieces of stretched sprue.
The other thing I did right off was to dip the canopy and windscreen in
Future. Mine came slightly dull looking. It cleared up beautifully.
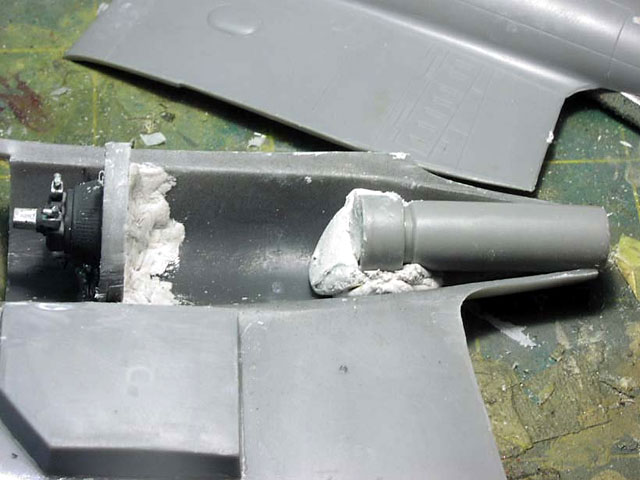
I actually followed the instructions, and dealt with the engines and
center wing section first. As John pointed out, and with which I heartily
concur, you should test fit all parts before putting glue to resin or
plastic. For me the main challenge here was setting the engine face and
exhaust properly within the nacelle.
The engine face should just touch the back of the leading edge of the wing
that goes through the nacelle, and the exhaust should just peak out from
the end of the nacelle. I first test fitted the top and bottom of the wing
section (parts 3,25,26) and cleaned them up as best I could. I tried slow
setting super glue for the engine face to position it, as there are no
markings for its placement. The engine face aligned perfectly with the
back of the leading edge in the cowl, but was too tall to fit within the
nacelles. I also noticed that I was confronted with an exhaust can that
had no real attachment points
One of the problems I encountered was that the super glue gel was not
working for me. It seemed either to set-up too slowly or too fast as I
tried to get the proper alignment on the engine, and when I went to sand
the top of the engine face, the bond broke. My solution was found in my
tool box, Plumber's Epoxy (also called Marine Epoxy; I have been told that
Milliput is similar.). This is a two part modeling clay like substance
that comes in a single role. Not until you kneed the Epoxy does it begin
to harden. I stuck a lump behind the engine face, and it allowed me
sufficient time to align the face and the bond was strong enough to hold
as I sanded the top of the face.
The Plumber's Epoxy also solved the attachment of the exhaust can. Note
that you do not need to cut the molding block off the back. I stuck a lump
of epoxy in the nacelle and put the back of the exhaust in the Epoxy. I
had more than enough time to test fit the top of the nacelle and adjust
the exhaust vertically, horizontally and set depth. I found that the tops
of the wheel wells required some sanding at the back so that the top
halves of the center section would fit at the trailing edge.
I then attached the nacelle cowling (I used the larger opening cowls) to
the center wing section. I discovered that one cowl was bigger in diameter
than the other. It did not matter if I switched them, one remained bigger,
which of course involved sanding to fit and shape. The cowls are handed in
that there is alignment with the taper of the wing's leading edge. Some
notes on the cowl. Although the cowls fit together with a mid-line
horizontal seam, the Meteor did not have this seam, so careful seam work
will be necessary (John did a beautiful job for his finish). Also, the
inside seam must be dealt with. If you are really compulsive, you may want
to put in a lining of thin sheet stock on the inside of the cowl.
I next went on to the cockpit, as per the instructions. Unlike the CA
Hornet, there are no alignment markings for the cockpit pieces. Unlike
John and the instruction, I assembled to cockpit differently. I tried to
align the cockpit and set it in one half of the fuselage. Alignment is
very tricky, as the nose wheel well forms part of the cockpit and must be
aligned with the well opening in the fuselage. In aligning the nose well,
note that there is a step-in in at each corner. These are openings in
which the nose gear doors are attached. So a bit of all four must show in
the fuselage opening.
The first disaster now occurred. The nose wheel retraction gear (part R11)
forms the bulkhead . The retraction arms are beautifully cast, but there
is a thin casting block on the back of the bulkhead. A slip of the old
thumb, while dealing with that block, shattered the that fine molding and
sent piece flying. I could not put Humpty back together again! I was
forced to improvise and used scarp from a car kit to make a new nose gear
attachment. So be careful with this part.
I then glued the fuselage halves together and slipped in the remaining
side wall. With work, it all fit. Once again, test fit the fuselage halves
for proper alignment of the two parts. I did notice however, that there
was a space between the instrument panel and the forward opening of the
cockpit. After going to the book, I realized that this should not be. I
used a piece of thin sheet stock to close this in. The cockpit, and
particularly the seat, is quite nicely done. The weak point is the very
plain instrument panel. The kit also does not include a gun sight. I made
one by cutting down a sight from the Tamiya P-47.
I next put the finished center section of the wing up in the fuselage. But
before I did this, I put in a couple ounces or so of lead fishing weights
fixed with Plumber's Epoxy just under and behind the cockpit. After I got
the landing gear on, I discovered it was not enough weight. This bird is a
real tail sitter. My advise don't be stingy with weight and put it as far
forward as possible. After test fitting the center section, I needed to
take a little off the rear wing root on the fuselage and lengthen the
opening in the fuselage to get a good fit. I turned to the outer wing
panels. After putting the top and bottoms together (Note that the
instruction have parts 21 and 24 reversed, or is it the other way around -
but the aileron actuator arms should be on the bottom.), I cut out the
tips for the lights. Note: do not follow the scribed lines in the wing for
cutting out this area. Start with a small cut out and test fit as you file
them larger. The wing tip light look a bit big, so you may want to shorten
them. Also, I drilled (but not through the wing) for the landing light.
All that is necessary is to make a shallow concave opening with a drill
bit ( I used an 11/64).
When I went to attach the outer wing panels to the center section, I found
that the middle of the outer section was shallower than the nacelle root.
I simply took a small piece of sprue from the kit, put it between the wing
halves and adjusted until it lined up. The outer panel then fit tightly to
the center section. It should be noted that that the outer wing section of
the Meteor had a dihedral of about six degrees. After fiddling with a
protractor, I simply adjusted the outer wings until I thought they gave
the right impression. Artistic license.
I next finished off the tail, but cannot understand the reason for resin
part R9, which forms the right side of the rudder trim tab. Construction
continued with the attachment of the belly tank, as it appears IAF F.8
Meteors used them. As usual I did not attach the landing gear until after
painting. But a note on the main gear. It appears that the attachment
point on the gear leg and the attachment point for the leg in the well are
geometrically opposite, so there is no positive attachment point. You may
want to strengthen the attachment with a piece of wire, I did. It is no
problem to do it, and given the way the Meteor sits, it is a good idea.
Okay, so fitting the cockpit gave me a twitch and
aligning everything didn't always work out for me. But the end of it all
almost came with the painting.
I had ordered Polly Scale's Israeli Early Camouflage Tan and Blue paint
from Squadron. The bottom was painted in Model Master Acrylic Light Sea
Gray (FS36037), which I had. I panted the bottom, no real problem there. I
then loaded my airbrush with the Israeli Tan. It was horrible. Before my
eyes, the model was turning a ghastly pink! Barbie Doll Pink, Dana Bell's
infamous "Titty Pink" as seen on North African B-24s. It looked nothing
like what was applied to IAF fighters. (Although, with a bit of brown or
tan added it could be the basis for painting a weathered B-24 or B-25 in
Desert Pink.) The thought of that color combined with the Blue made me
shudder. A child's toy was all I could imagine. I cleaned the paint off
quickly.
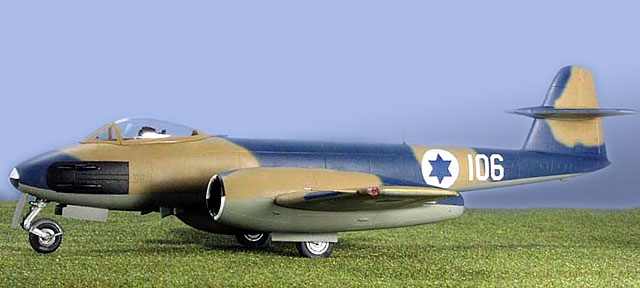
I did not panic. I stared at pictures of the preserved Meteors at the IAF
museum, and went back through my paints. The color of the museum aircraft
had a tan color similar to RLM 79, of all things. In the back of my paint
shelf I found one bottle of RLM 79. An unopened bottle of Aeromaster
enamel (Guess how old!). I did a test paint and it was not quite right;
too dark perhaps, but close. Luckily, I also found an old bottle of
Testor's Model Master enamel Light Gray. A little mixing and eventually, I
had it (IMHO). Next came the Blue. I thought no more problems. But for
whatever reason, the Polly Scale paint turned my usually well behaved
airbrush into a Wagner Power Painter. No matter what I did the Blue
atomized so much, I had overspray everywhere. Painting became a nightmare
of cleaning up and re-spraying. It seems that some bottles of paint do
contain gremlins. By the way, Polly Scale's Israeli Early Camouflage Blue
is almost an exact match for their RLM 24.
I finished the painting by masking and painting the black and white
markings on the nose and lip of the engine cowls and the black gun panels.
Compared to the real aircraft, I noticed that my black panel area seemed
longer. I believe that the model's gun troughs may be a little too long.
But it is not enough to matter.
I used the kit's Microscasle decals which went on beautifully. The white
background on the Israeli marking was sufficiently opaque. I looked at as
many pictures of camouflaged meteors as I could, and it seems that the
stenciling was painted out when the camouflage was applied.
No question about it, and just as the instructions
make clear, this kit is not for the inexperienced, even though in the box
it looks quite easy.
But with a bit of effort it builds into quite a very
nice model of the Meteor.
I usually don't build jets, but I believe I have been
seduced into building the entire line of CA Meteors.
I can strongly recommend Classic Airframes' Meteor to
any modeler who has some experience with limited run kits and who wants an
excellent scale model of the RAF's and IAF's first operational jet
fighter. And, oh yes, the RAAF's second operational jet fighter jet. How
could I've forgotten!
Review sample compliments of Classic
Airframes.
*The Jet Age: Gloster Meteor in Israeli
Service; by Shlomo Aloni. Air Enthusiast ( Issue and date unknown).
Gloster Meteor; by Tony Butler; Warpaint
Series No. 22; Hall Park Books.
Meteor in Action; by Glen Ashley,
Squadron/Signal Publications.
http://www.geocities.com/CapeCanaveral/7934/iafm_meteor.htm
http://www.stormpages.com/skythe/meteor.htm
http://www.flight.host.sk/lietadla/anglicke/meteor-f4.htm
http://freespace.virgin.net/michael.baldock/meteor.htm
http://www.acfavi.hpg.ig.com.br/gloster.htm
Model, Images and Text Copyright © 2003
by Steven "Modeldad" Eisenman
Page Created 06 October, 2003
Last Updated
17 March, 2004
Back to
HyperScale Main Page |
 Home |
What's New |
Features |
Gallery |
Reviews |
Reference |
Forum |
Search
Home |
What's New |
Features |
Gallery |
Reviews |
Reference |
Forum |
Search