|
MiG-19PM Farmer E
by Tom Dungan
|
|
|
MiG-19PM |

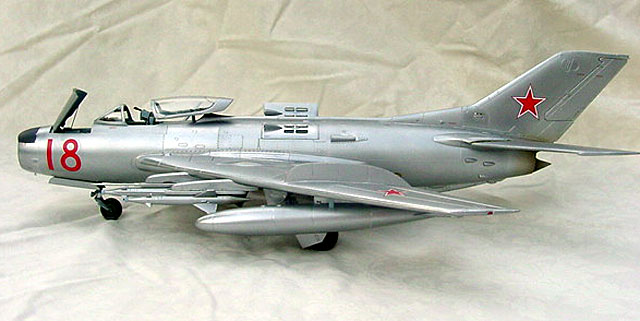
Trumpeter's 1/32
scale MiG-19PM Farmer E is available online from
Squadron.com
The MiG-19 was the outcome of the Soviet program
begun in 1948 to design and produce a supersonic fighter. By 1952 the
development program had settled on designs descended from the MiG-17,
but with 2 engines. By 1953, a speed of Mach 1.33 had been achieved
using new AM-5F engines in a prototype, and production as the MiG-19 was
begun in 1954.
The definitive MiG-19S (NATO code name “Farmer-C”),
featured improved flight stability, armament of three 30mm cannon,
provision for light bombs and rockets, and Mach 1.44 speed in a dive.
Almost 2,300 aircraft of these initial series were built, and were used
by the PVO (Air Defense Force), Frontal Aviation, as well as Warsaw Pact
allies.
Next in line was the radar-equipped MiG-19P
(“Farmer-B”), which added a primitive Izumrud radar in a lengthened
nose. Gun armament was reduced to two 30mm cannon, retaining the light
stores hardpoints.
The Soviet RS-2US (AA-1 “Alkali”) air-to-air missile program had borne
fruit in the meantime, and it was logical to upgrade the MiG-19P to
accommodate this new technology. The resulting MiG-19PM (“Farmer-D”)
featured an improved Izumrud-2 radar in a nose that was again lengthened
and fattened. Four APU-4 launch rails were provided for the AA-1
missiles, with each rail having an integral control antenna at the
leading edge. Capacity to carry rockets and external tanks was retained,
but the gun armament was removed. Production began in 1957, but only ran
for 400-odd aircraft. All of the PM aircraft were issued to the PVO.
Other versions of the MiG-19 included the PMU with
improved missile capability, the SV high-altitude interceptor, and
numerous experimental rocket-assisted aircraft.
Altogether, some 3,700 aircraft in the MiG-19
family were built by the Soviet Union, which also licensed production to
Poland (as the LiM-7) and Czechoslovakia. China copied the MiG-19S as
the J-6, and exported it to several countries, notably Pakistan.
Pakistani MiG-19’s were modified to fire western AIM-9 Sidewinder
missiles. China also developed a 2-seat trainer version (JJ-6), a use
that was not required by the Soviet Union.
Maneuverability, and climb rate were the chief
attributes of the MiG-19. As with most Soviet aircraft of the period,
range and all-weather performance suffered. The use of two engines
within the small airframe also created maintenance problems, and safety
issues. Loss of one engine would generally damage the other engine. Fire
was also a problem, due to pooling of fluids, and lack of heat-resistant
protection.
In the end, the service life of the MiG-19 was cut short by the rapid
pace of aircraft development, with its famous descendant, the MiG-21
replacing it on the production lines by 1959.
Trumpeter's 1/32
Scale MiG-19PM
|
Trumpeter has released an entire family of 1/32
MiG-19 derivatives, including the MiG-19S, the missile-equipped
MiG-19PM, and the Chinese JJ-6 trainer. There is also a growing stable
of 1/48 kits, which look like scaled-down copies of their larger
brethren.
The MiG-19PM kit comes in the typical large,
durable Trumpeter box. I really like these heavy-duty cardboard boxes as
they prevent shelf wear. All parts are in plastic bags, and the clear
parts are in a separate bag to prevent scuffing. The decal sheet is also
sealed, and the resin parts for the two engines are protected in bubble
wrap. Nice job.
The 16-page instructions are clear and detailed. It
is clear which parts are used for which version (Soviet or Chinese). The
only drawback is the lack of FS color references, although most parts
are labeled as to their generic color.
The kit contains an ungodly number of sprues, many
of which are common between the three Trumpeter kits. There are four (!)
common sprues for the engine parts (plus the resin), five common sprues
for the rear fuselage and wings, and four sprues specific to this
version of the aircraft.
The kit comes with several sprues for the AA-1
missiles, as well as underwing stores which are not used on this
aircraft. Save these for your MiG-19S, as this kit doesn’t have the
stores, but needs them!
Detail is very well done – panel lines and molded details. It will be a
very detailed model right out of the box, especially if you opt to
display the engines. More on that later.
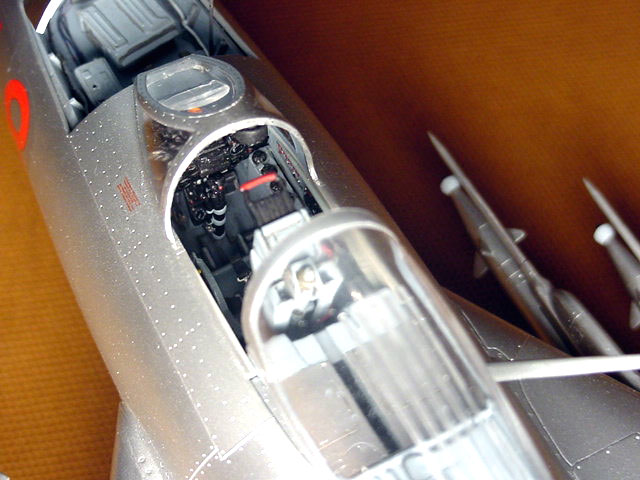
Assembly begins with the cockpit. The ejection seat
is made up of 10 pieces, and I only added a set of Airwaves harnesses
and some bits of wire to complete it. Cutting Edge makes an SM-2 resin
seat that is superior only in scale thickness of some parts. The
instrument panel is supplied as an acetate sheet that is glued to the
back of a clear panel. The cockpit was painted with a lightened Testors
USN Intermediate Blue, per reference photographs. The cockpit is very
detailed, and I only added various sizes of wire to the sidewalls.
Members of the local club asked if the cockpit is resin, but it’s not!
 Next
comes the nose and splitter intake assembly. Next
comes the nose and splitter intake assembly.
The nose requires significant weight to prevent the
MiG from being a tail-sitter. I forgot and had to drill and load in lead
beads after the fact, so add your weight of choice before cementing the
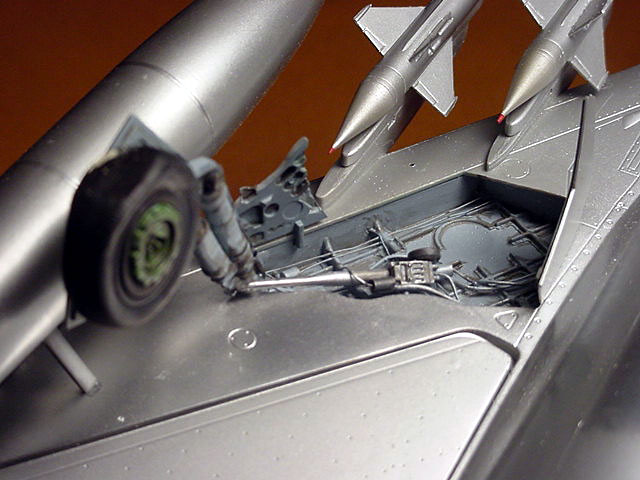
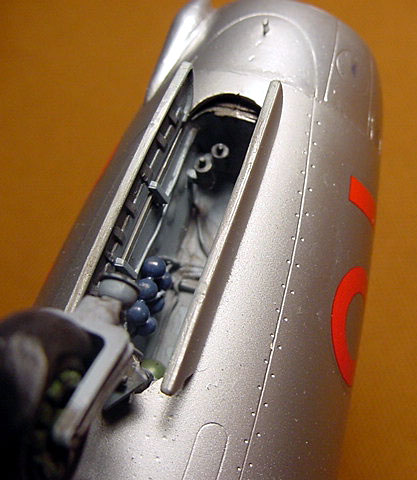
two intake splitter halves together! The detailed nose gear bay and the
avionics cabin are included in this section. I added plumbing to the
gear bay, drilled lightening holes in the framing around the avionics
bay, and wired up all the cool little boxes inside
The engines are next, and these are models unto
themselves! Hunks of resin and a multitude of plastic parts for hoses,
fans, etc. await your attention. However, tough choices also await! The
only way to have a proper engine exhaust on the tail end of this thing
is to install both entire engines in the fuselage – otherwise, Trumpeter
provides a set of the traditional Soviet red FOD covers for the holes (a
better solution would be to provide a set of exhaust inserts for those
that don’t want to install a complete engine). The problem is that there
is no possible way that BOTH engines will fit into the fuselage once
completely assembled. I fiddled with this aspect of the kit for about a
week, test fitting, and it just won’t work. So the options are:
-
Assemble just the engine
bodies (no resin parts or hoses), and install them so that proper
exhausts are visible, but leave the upper fuselage engine access doors
closed.
-
Assemble the engines,
leave them out for display, leave the access doors closed, and install
the FOD’s.
-
Install one complete
engine, open one access door, and install a FOD on the other side.
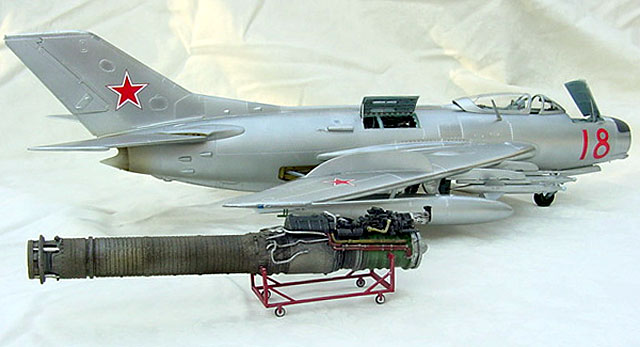
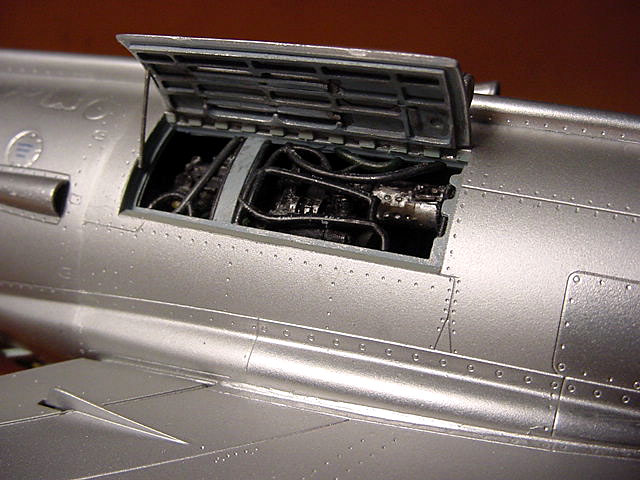
I fudged and went with option #3, having already
assembled 2 beautiful engines, and wanting to maximize their use. One
engine went into the fuselage, and the other went onto a service cart
that Trumpeter provides in the box. The installed engine was made
visible by opening the access door. The access doors has ejector pin
marks on the interior that need to be removed if you choose to open
them.
At this point, I strongly recommend digressing from
the instructions. To provide three different MiG-19 versions from
essentially one set of molds, Trumpeter provides the fuselage in four
halves: two halves for the rear section common to all kits, and two
halves for the front section unique to the kit. I recommend gluing the
two halves for each side together BEFORE assembling the opposite halves.
Otherwise, you will have to deal with a painful seam around the entire
circumference of the fuselage. This will likely improve fitting of the
engines, and now the attachment of the tail cone is moved to later in
construction.
Another recommendation is to use strip styrene to
create backing tabs inside the front section fuselage halves, on the
bottom. Later in construction, version-specific panels are inserted into
the complete fuselage section here, and positive stops will help in
preventing a nasty puttying and sanding job. This is also a good point
to add additional weight into the forward section.
The remainder of assembly is a snap. I added some
hydraulic lines to the three speed brakes, and chose to display them in
open or semi-open positions. Based on photos, they don’t necessarily
open when the aircraft is powered down, but were likely opened as needed
for maintenance. I added a lot of plumbing to the wheel wells. The
texture inside the wheels wells is faithfully reproduced, but the
plumbing adds a lot in this scale. Mold marks had to be removed on the
inside of the gear doors. All wheel wells were shot with USN
Intermediate Blue, and speed brake interiors with a mustard yellow,
based on photos.
Other Details
Flattened and non-flattened wheels are provided in
the kit. I chose to add bulging to the flattened wheels using Milliput.
Note that the stabilizers on the tail rest in a
slightly upward angle when the MiG-19 is parked.
There is no good reason not to attach the APU-4
launch rails before painting – they won’t interfere with painting or
decaling. Just be careful of the fragile director tips!
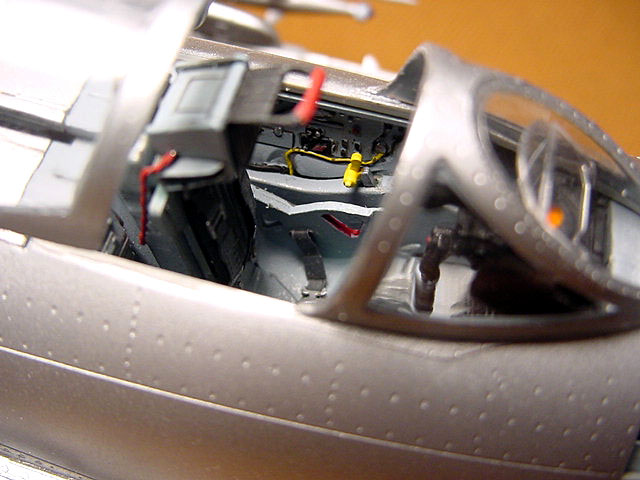
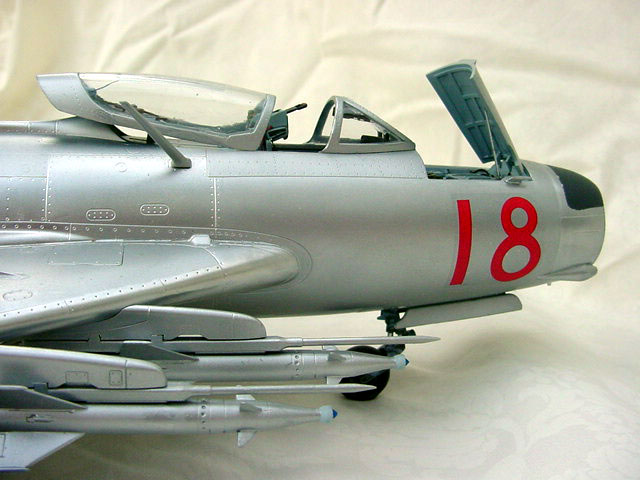
I added wire to the canopy section, and plumbing to
the relatively bare deck behind the cockpit, based on reference photos.
The canopy has a faint molding seam down the
center. I sanded lightly, polished, and dipped the canopy in Future,
eliminating the defect.
For the MiG-19PM, the modeler has but one choice –
natural metal. Kit decals are for Soviet, East German, and Chinese
examples. I chose the Soviet machine.
I used SnJ buffing metalizer for the first time,
and was pleased with the result. It was durable for masking, and dried
quickly. Slightly darkened RLM66 Schwarzgrau was used for the radar
cover, and a light spray of Tamiya Clear Orange was added to the exhaust
area.
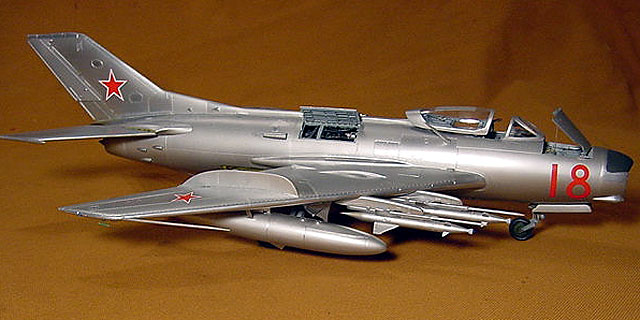
I chose to paint the four AA-1 missiles in a
slightly darker natural metal color, instead of white as modern missiles
are painted. Some art has shown them in all-red, but period photos look
like natural metal to me.
The kit decals went down well. I did not coat them, as experimenting
with various available coats seemed to dull the metal finish too much.
Anyone with experience or ideas in this area, please contact me!
Overall, this was an enjoyable model to build,
other than the agonizing over the engines. The lessons learned will
certainly make the other MiG-19’s waiting in the hangar (er…closet)
easier to build. Next up…one of the many colorful MiG-19S’s!
-
“Encyclopedia of Russian
Aircraft”, B.Gunston, Osprey, 1995 (history, version line drawings)
-
“MiG-19 Farmer in
Action”, H.Stapfer, Squadron/Signal, 1994 (line drawings, B&W photos,
good coverage of MiG-19S & J-6)
-
“Samolot mysliwski
MiG-19”, P.Bartoszewski, Wydawnictwo, 1980 (profiles, color & B&W
photos, exploded & detail diagrams)
-
IPMS Stockholm Website:
http://www.ipmsstockholm.org/magazine/2001/02/stuff_eng_detail_mig19.htm
(MiG-19S walk-around photos)
Click on the thumbnails
below to view larger images:
Images and Text Copyright © 2003 by
Tom Dungan
Page Created 20 July, 2003
Last Updated 17 March, 2004
Back to HyperScale
Main Page
|
 Home |
What's New |
Features |
Gallery |
Reviews |
Reference |
Forum |
Search
Home |
What's New |
Features |
Gallery |
Reviews |
Reference |
Forum |
Search