|
MiG-29 Fulcrum Prototype
in 1/32 Scale
|

|
|
MiG-29 Fulcrum Prototype |
by Frank Mitchell

Revell's
1/32 scale MiG-29 is available online from Squadron.com
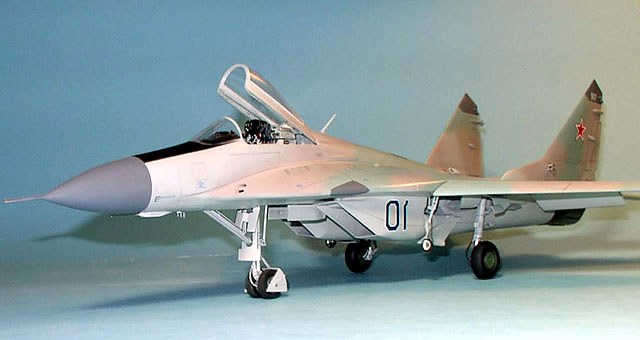
I have always liked the looks of the prototype
MiG-29, probably because the forward-placed nose gear gave it a stance and
look that no other ’29 has. Therefore, when I got the urge to do another
32nd Fulcrum (I have previously done a MiG-29 UB; see the HS archives),
the search began for information on the Number 1 aircraft.
Although there are a number of photos of the
prototype as it currently exists at the Monino museum, I ran across two
color pictures of the aircraft which were probably taken either at, or
near, roll-out. I based that conclusion on the lack of an IR sensor and
gunsight, several different antenna placements, no belly or underwing
stores or tanks, shortened tailfin extensions, and a different color
scheme (a light brown was added to the more usual gray and green).
As is generally known, the 1/32 Revell kit of the
MiG-29 has some shape problems. While I didn’t attempt to correct all of
them, I did make several modifications which may be of interest to anyone
wanting to give the kit a try.
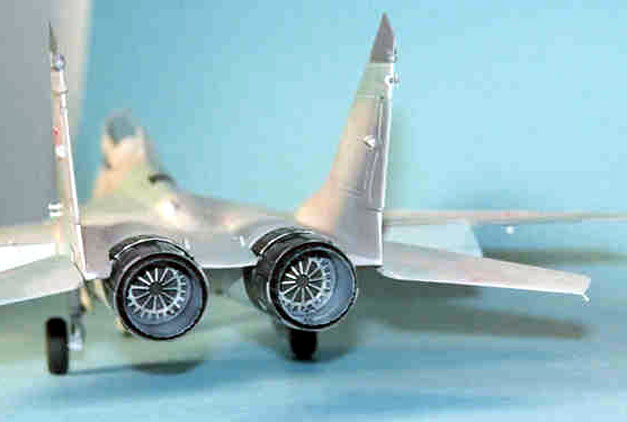
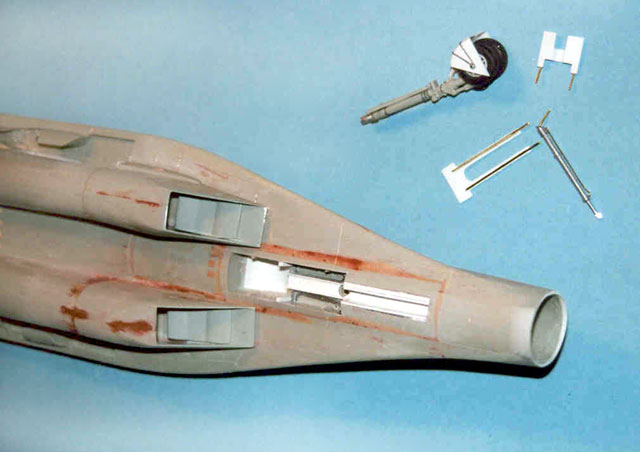
The first, and probably most important problem is the size of the engines.
They are grossly too small in the kit. I essentially used the same
technique as on the ‘UB, but tried to add a bit more detail this time. As
on that model, the outer exhaust outlets started life as 35mm film cans.
The inners are exhausts from the old, original Revell F-4. This
combination gives a result that is much more dimensionally accurate, even
if the shape of the “leaves” is not quite correct. On the bottom of the
fuselage, the shapes of the two engine housings were enlarged with styrene
and epoxy putty. Attempts were also made to include the proper “rig” of
the outlets.
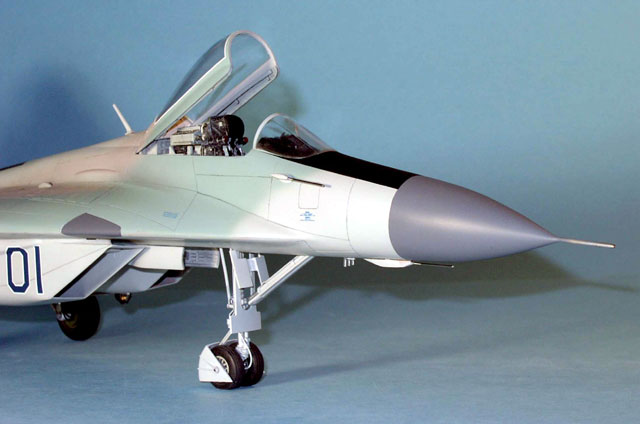
Another obvious shape problem is that the kit’s forward wing extensions go
all the way to the radome. This, in combination with an incorrectly shaped
radome, throws the whole appearance off, at least to me. After using epoxy
and styrene to fill in the inside of the extensions, they were Dremeled to
a more accurate size and profile.
I had previously made a mold for a new epoxy radome for the production
MiG-29, so one of those was simply re-shaped to the smoother outline of
the prototype (I never have used one of those new noses for a later
bird--). These two changes made a great improvement in the appearance of
the fuselage.
The most obvious difference between the prototype and
later MiG-29s was the location of the nose gear; it was 4 feet 11 inches
forward of the later position. This change turned out to be fairly easy to
model because of the horizontal split of the Revell fuselage. The entire
wheel well area was carefully removed with the Dremel, along with a margin
of about 1/32 all the way around. The resulting hole was enlarged forward
the amount necessary, and the wheelwell was simply moved forward and glued
into place in the forward position. A bonus was the fact that the piece
removed from in front of the kit wheelwell fit perfectly to fill up the
hole behind the new position. While I was in the bottom fuselage half, I
also opened up the main wheelwells, which are far too shallow on the kit.
The landing gear needed a lot of detailing to look more like the real
thing and to add the various hoses, etc. The nose gear also required new
doors which were completely different and more complex. A large splash
guard (which, by the way, didn’t work on the real airplane) was made up
and nose wheels from the scrap box were also used which more closely
resembled the prototype’s spoked ones. The main gear doors also had to be
re-shaped so that they would fit closely against the fuselage.
The kit fins need to be moved to the outer edge of the fuselage and faired
in to the vertical fuselage sides. The horizontal stabilizers should be
re-mounted and small wedges removed from the forward, inner edge. These
wedges are glued to the fuselage. The drag chute covers have to be
re-shaped (the round part needs to be removed).
From here on, the model was built pretty much as any other, although there
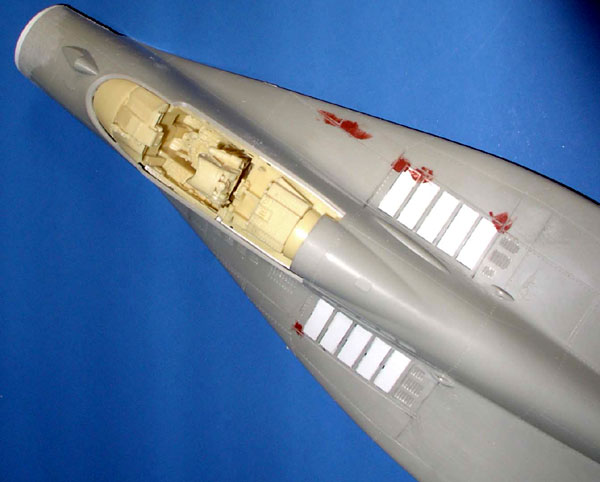
were a number of smaller changes. I used a CAM cockpit set (great) and
filled the single gun opening and vent on the port side and drilled in the
two openings that were present at this stage of development. The small
intake on the rear dorsal surface also needs to be moved more to the port
side.
As with any prototype, every available picture shows some detail changes
such as antenna locations, etc., but I tried to always use the earliest
pictures, if there was a choice.
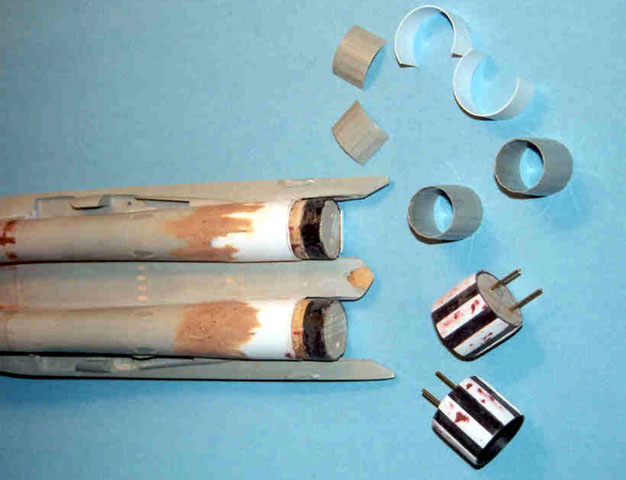
I did cut out and lower the flaps and slats (there are pictures of parked
Fulcrums in that condition), filled all the holes on the bottom of the
wing for pylon attachments, etc. The wingtips were changed to have only a
small navigation light.
As one might expect, this model required lots of priming and sanding (I
use automotive lacquer primer; have for years) and, therefore, lots of
scribing and re-scribing was also necessary since a number of panels were
not the same on this airplane.
 The paint was Testor’s Fulcrum Gray and Fulcrum Green
along with a made-up light brown that came as close as I could to that in
the color photos I had. The paint was Testor’s Fulcrum Gray and Fulcrum Green
along with a made-up light brown that came as close as I could to that in
the color photos I had.
Once the color coats were complete, the model was
sprayed with Future and decals for the stars and maintenance markings
(mostly from various CAM and Microscale sheets) were applied.
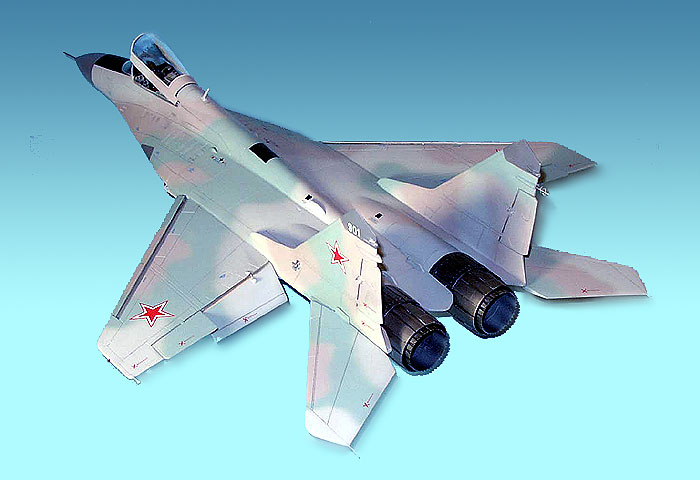
A final coat of Floquil Flat Finish was then sprayed,
with Testor’s Dull Coat being used on the antiglare panel.
Click the
thumbnails below to view larger images:
Model, Images and Text Copyright © 2002
by Frank Mitchell
Page Created 12 April, 2003
Last Updated
17 March, 2004
Back to
HyperScale Main Page |
 Home |
What's New |
Features |
Gallery |
Reviews |
Reference |
Forum |
Search
Home |
What's New |
Features |
Gallery |
Reviews |
Reference |
Forum |
Search