|
P-38J-15 Lightning
by Floyd S. Werner, Jr.
|
|
|
Lockheed P-38J-15 Lightning |
Photos by the author and Rafe
Morrisey

Academy's 1/48 scale P-38
Lightning is available online from Squadron.com
The P-38 was a leap forward in fighter design when it was introduced
in 1939. Capable of speeds in excess of 400 mph, the P-38 could speed
away from anything flying. When war came to the US, the P-38 was just
being introduced. Its performance in the European Theater was
disappointing, however, the P-38 came into it’s own in the Pacific.
Its combination of firepower, range and confidence of the second
engine led to the P-38 being deployed throughout the theater until the
end of hostilities.
Possibly best known for its part in the attack on Admiral Yamamoto,
the P-38 was the mount of the top three American aces. The Lightning
was also the mount of many other lesser-known aces. Captain Sammy
Pierce of the 49th Fighter Group is one such ace. Having flown the
P-40E and P-40N with the 8th Fighter Squadron, 49th Fighter Group,
Pierce had shot down three Japanese aircraft during his first tour
with the group. During his second tour in the P-38, Pierce shot down
four aircraft in one day in his P-38J-15. This aircraft is the one I
modeled. Sammy flew a P-38L in his final flights of the war.
For those of you who don’t remember my Revell P-40E article, I met
Sammy at a unit function in Germany where I was flying Cobras with his
son, Rick. He was very unassuming and it took a little time to get him
to open up, but we are glad he did. He didn’t fit the image of a
fighter pilot. He was short of stature, but looks can be deceiving. He
was quick-witted, friendly and could spin an enthralling tale. His
stories and his demeanour endeared the ace to us. Being from South
Carolina and having a southern drawl, Sammy spun tales of combat that
silenced an entire room of drunken Army pilots. Sammy was an absolute
joy and a quick friend. I’ve since lost contact with him and Rick. If
anyone has any contact with either one please contact me.
Academy's 1/48
Scale P-38 Lightning
|
Do you remember growing up when Monogram’s P-38 had the option of
building any number of versions? Well, Academy has brought that
concept into the new millennium. This kit allows you to build one of
four versions, the standard P-38J, the Droopsnoot, Pathfinder, and
F-5E Photo Recon.
I said that you could build one of four versions, that isn’t exactly
true. You can build more! The kit as boxed is actually an L model.
This is a good thing. You can build any version of the J or L
depending on which features you decide to leave or remove. Do nothing
and you have an L. If you don’t cut the leading edge landing light and
add a light on the underside of the wing and fill the adjustable trim
tabs you have a J-25. Get rid of the compressibility flaps, fuel pump
bulges and you have a J-15. Leave the adjustable trim tab and you have
a J-10. So that gives you the option of three different versions of
the “standard” J alone, making eight different versions.
This latest offering is deceivingly mundane in it’s packaging. For
those of you who bought the original boxing of the P-38J, the box top
art looks almost exactly the same. The thing that sets this kit apart
from it’s older release is the size of the box (this being larger) and
the small lettering informing the modeler that it can be built into a
number of versions.
Upon opening the box, you are greeted by lots of light gray plastic
with engraved panel lines and a few sprues of clear parts. The tires
are made of P.V.C. Complete under wing stores are provided. The decals
are nicely in register, thin, and opaque. The instruction sheet is the
typical four-fold style that we’ve become accustomed to. I did notice
that there are two step “4”s but this is just an oversight and doesn’t
complicate things.
True Details Cockpit Set
The Academy offering is adequate and looks very nice right out of the
box, but I can never live with just that. The True Detail set is
nicely detailed and best of all, inexpensive. Cutting the parts off
the pour blocks is kept to a minimum. The cockpit goes together
without any problems.
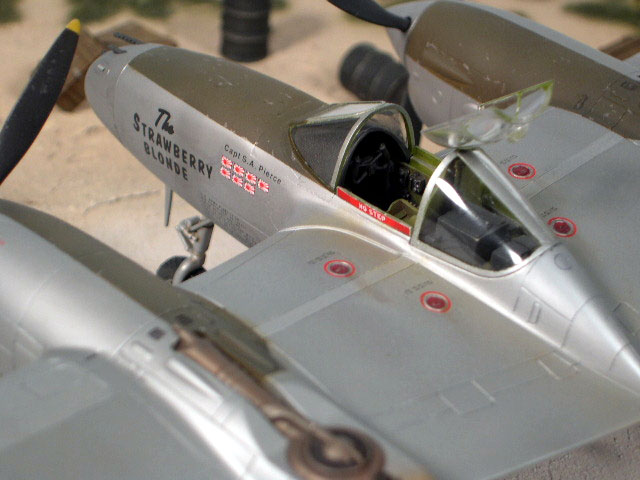
I painted mine with Testor’s Interior Green, Interior Black, and
washed it with burnt umber. Finally dry brushing with silver to bring
out the detail. The instrument panel was painted black and touched up
with white. Krystal Klear was added to the dial faces. This made for a
winning cockpit. I recommend this set whole-heartedly.
Which version?
The P-38 is not like a normal airplane and this kit is not set up like
a normal kit. The wing includes the fuselage pod and the top of the
wings. This set up is convenient, as it ensures proper alignment of
the wings and minimizes filling. If you haven’t decided which version
to build or what under wing stores you want to use, you have to do it
before assembling the wings. As I was modeling a J-15, I did not cut
out the leading edge light. I opened up the holes for the drop tanks
only. I forgot to open the area for the step at the aft end of the
pod. I had to remove all the fuel pump covers, removed the
compressibility flaps, drilled a landing light hole in the right wing,
and filled the aileron trim tab.
The Booms
Assembly of the booms begins in the wheel wells. I painted mine the
same Interior Green as the cockpit, but could have painted it aluminum
as I found examples of both. The piping and the landing gear struts
were painted Floquil Old Silver and the oleo portion received some
Bare Metal Foil Chrome. The booms assembled without any problems. Next
time I would add some screen in the intercoolers. I left the intake
scoops under the wing off until after painting.
Terry Dean Nose Weights
One issue with any P-38 model is how to get it to sit on its nose
wheel. Terry Dean has figured it out. Terry provides two weights for
the front of the booms. These fit so well that they literally snapped
into place and they are exactly what you need. The weights are great
and my model now sits perfectly on its gear.
The boom to wing/fuselage join was very nice on the bottom. The aft
portion required a little, and I do mean little, putty. The boom front
portion (which has the prop shaft) fit was a little off but nothing a
little sandpaper couldn’t handle. This portion should be smoothed into
the boom. I have seen it as a separate piece on some models but it is
not separate. Check the references.
The upper and lower wings fit just as well as the booms. The True
Details cockpit was added now and it fit without even having to glue
it in place. Now having decided to build a standard J model I added
the nose area. The only issue was at the cockpit front area, but this
again just required a little putty. I added the nose cone now and
smoothed everything in.
The horizontal tail surfaces fit perfectly and if your booms are
straight they will align perfectly in the slots.
Sammy’s aircraft was not the flashy aircraft that some aces flew. It
was understated like the man himself. The paint job would have to
carry the model and not gaudy markings. After getting the model
prepped for paint by washing in Dawn dish detergent and Polly-S
Plastic Prep, I decided to paint with Alclad II. I sprayed the entire
kit with Future. Letting it dry for 24 hours, I painted the entire
model Alclad Aluminum. I spray Alclad at 15-20 psi using an
overlapping, slow and deliberate pattern, front to back on the wings,
and top to bottom on the fuselage. Once it dried, I ended up finding
some flaws, imagine that. I fixed them and painted again. Fixed more,
painted more… Well you get the idea. In the end it took about 5-6
coats to get it correct. Thank God that Alclad doesn’t build up too
much.

I rub the model down between coats with cotton balls. This ensures
that the paint lies down and is smooth for subsequent coats. Using
photos found in Brodie’s book, I masked off with Tamiya masking tape,
selected panels for the different colors. I painted the areas with
Alclad White Aluminum. The nose cone was given a coat of Alclad Dark
Aluminum and then over sprayed with Aluminum to help blend it.
When everything was dry, I masked with Tamiya Masking Tape and sprayed
Tamiya Olive Drab on the anti-glare panels. I lightened the color with
white and then sprayed various panels.
The prop blades were painted with Testor’s Insignia Yellow and then
masked at the tips. Interior Black was used on the blades because it
is not too black. This was then lightened even more with some flat
white and streaked across the chord of the blades (front to back).
The True Detail Wheels were removed from the pour block and cleaned
up. I thought they were a little flat, but they looked really good
especially after being weathered. The area in the front wheel between
the spokes needs to be opened up so that you can see through it. Some
aircraft will require disks on the front and back of the wheels, but I
liked the open spokes look. These were painted with Gunze Tire Black
and Alclad Dark Aluminum.
The canopy was masked with Bare Metal Foil and painted with Tamiya
AS-12 over a coat of Interior Green.
The superchargers were given a coat of Alclad Aluminum. Then a coat of
flat, followed by a wash of burnt umber. Then the assembly was given
some pastel chalk, and finally a light coat of Rub & Buff. I finally
liked the look of the supercharger and attached them.
Repli-Scale Decals
Sammy’s “The Strawberry Blonde” was included on Repli-Scale sheet
48-5053. I used the stencils from the kit and the rest of the decals
are from this sheet. The Strawberry Blonde looked a little small when
compared to the drawings in the Squadron/Signal “49th Fighter Group”
book, but I have never seen a photo of Sammy’s P-38 though so I just
added the decals provided.
All the decals, including the kit’s, fit like a champ and settled down
with Solvaset. They are thin and literally disappear on the model. The
kit decals are so nice that they are even readable.
Weathering
After painting, I had a beautiful (IMHO) paint job. Now I would have
to make it dirty and grungy. Having worked around airplanes and
helicopters for over 20 years I think that aircraft just look better
weathered. I love to weather airplanes, but I’ve never really dirtied
up a NMF before. After checking on Hyperscale it really did seem easy.
The Southwest Pacific Theater was tough on metal causing the metal to
oxidize. Oxidization causes the metal finish to become flat. I used
Testor’s Acrylic Flat thinned about 50-50. This produced the sheen I
was looking for, but my shiny paint job was now muted. The different
color of the various panels still shines through.
The next thing I did was apply a wash of Payne’s Grey to all the panel
lines. I find this color is not too dark, but adds depth. It also adds
to the metallic look of the aircraft. This was followed up by using
Dark Grey India Ink in the control surface areas, to darken them up
like a shadow.
Next after checking with the Aircam book, there were two whole page
shots of the underside of a P-38 and one of the topside. I used these
to weather the aircraft. Starting out with Burnt Umber Artist Oils, I
“flowed” the “oil streaks” back from the panel lines under the engine
areas going in the direction of airflow. I added some Burnt Sienna for
some color and repeated the process.
The next step is to add the exhaust stains. The P-38 exhausts are not
the sooty brown/black that you normally see on other aircraft. They
are a light brown, almost white, color. This is a combination of good
gasoline and proper leaning of the engines for long endurance. I used
various shades of Model Master US Armor Sand. When I was done with
that some pastels were added to subtle variety to the exhaust. Seeing
that my aircraft was well worn, the exhausts trail all the way back
down the tail boom.
Silver pencil was used on various parts of the Olive Drab panels. Then
some pastels were added to the wing walk areas and some access panels.
This was followed by one more coat of flat and that was about it. My
Lightning looked very dull and used, as it should.
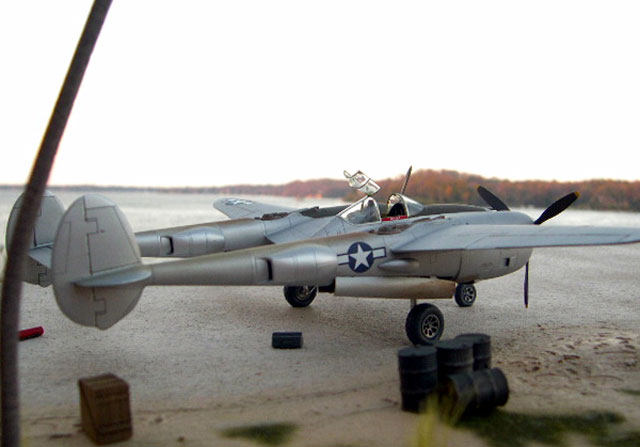
I attached the scoops, landing gear, wheels, doors, mass weights,
guns, pitot tube and nose antenna. When adding the props ensure that
the props are spinning the correct way, outboard. I painted the
navigation and identification lights with Tamiya clear colors. The
drop tanks were attached and with the canopy added the model was
finished.
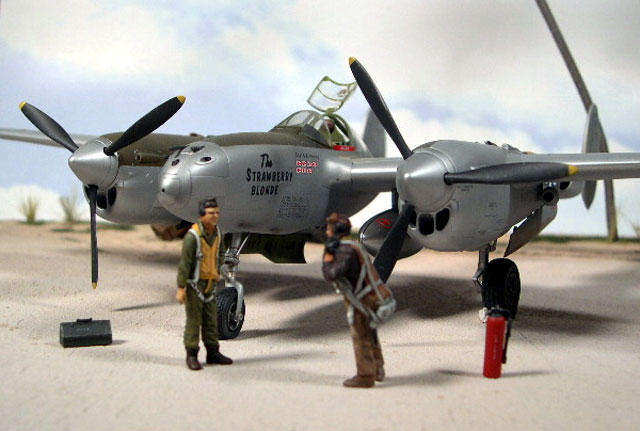
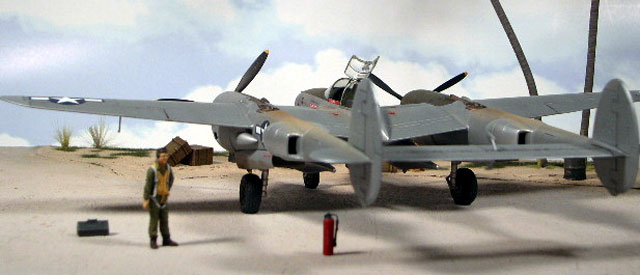
The diorama was built by Rafe Morrisey. The figures were painted by
the both of us. My two being New Hope Design figures and Rafe’s is
from the Monogram B-26 kit. The palm trees were a kit in themselves
that look very convincing. The accessories and crates are from
Verlinden. Thanks goes to Rafe for his help with the base and with the
photos.
The Academy P-38 is a very nice kit that looks great and is actually
buildable. There were no big surprises and the details looks great. It
does require a little putty, but it is well within an average
modeler’s ability. The kit is a great value as you can build it into
any number of P-38s and with the addition of aftermarket decals, the
options are almost endless.
For those into something different, think about YIPPEE an all red
P-38J. I think Sammy would like my results, I know I’m happy with the
model. This kit makes a wonderful addition to my collection. I used
just about every technique to obtain a NMF, except SNJ on this model.
I think I may actually have this NMF down, finally.
I highly recommend the kit. The P-38 is available at your local hobby
store. Thanks goes to MRC/Academy for the review example.
The Kit
Academy 1/48th Scale P-38 Lightning (J, J Droopsnoot, L Pathfinder,
F-5E Photo Recon)
Kit #2215
Suggested Retail- $29.00
Accessories
Terry Dean Nose Weights (nightiemission@aol.com)- Highly Recommended
True Detail Lockheed P-38 Lightning Cockpit Detail Set- Stock Number
48455- Highly Recommended
True Detail Wheels (Checkerboard tread) - Stock Number 48063- Highly
Recommended
Repli-Scale Decals- Stock Number 48-5053- P-38J/L Lightning 49th
Fighter Group #2- Highly Recommended
References
“The Lockheed P-38 Lightning”, Warren M. Bodie, Wide Wing
Publications, 1991, ISBN 0-9629359-5-6 (The best book on the
Lightning, plus a good story on Sammy Pierce towards the end)
“Protect & Avenge”, S.W. Ferguson & William Pascalis, Shiffer
Publishing, 1996, ISBN 0-88740-750-1 (Great unit history of the 49th
FG in WWII)
Arco-Aircam No 10, Lockheed P-38 Lightning, Ernest McDowell, Arco
Publishing, 1969, ISBN 668-02113-6 (Great belly and overhead shots for
weathering)
49TH Fighter Group, Ernest McDowell, Squadron/Signal Publishing, 1989,
ISBN 0-89747-221-7 (All known photos and drawings for Sammy’s
aircraft)
Aero Detail 28-Lockheed P-38 Lightning, 2000, ISBN 4-499-22727-5
(Priceless for detail nuts)
P-38 Lightning- Detail & Scale Vol. 58, Bert Kinzey, Squadron/Signal
Publishing, 1998, ISBN 1-888974-10-9
P-38 Lightning in action- Aircraft Number 109, Larry Davis,
Squadron/Signal Publishing, 1990, ISBN 0-89747-255-1
P-38 Lightning in action- Aircraft Number 25, Gene Stafford,
Squadron/Signal Publishing, 1976
Model, Images and Text Copyright © 2003 by
Floyd S. Werner Jr.
Page Created 20 December, 2003
Last Updated 17 March, 2004
Back to
HyperScale Main Page
|
 Home |
What's New |
Features |
Gallery |
Reviews |
Reference |
Forum |
Search
Home |
What's New |
Features |
Gallery |
Reviews |
Reference |
Forum |
Search