|
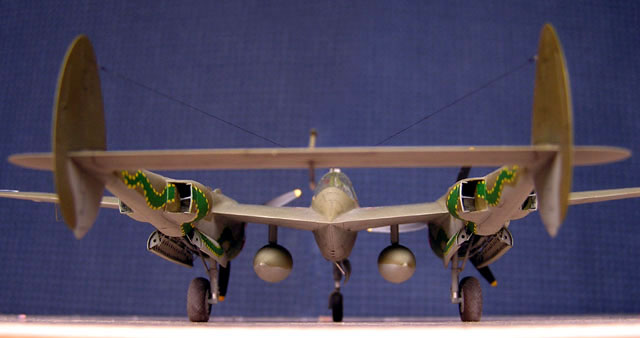
Lockheed P-38J-5-LO
Lightning “Haleakala”
by
Igor Svetlov
|
 |
|
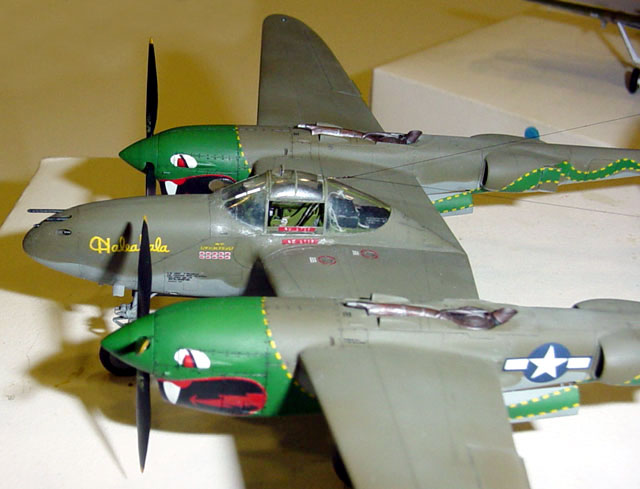
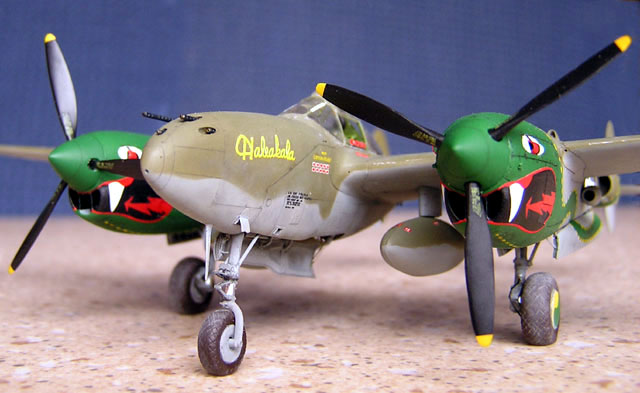
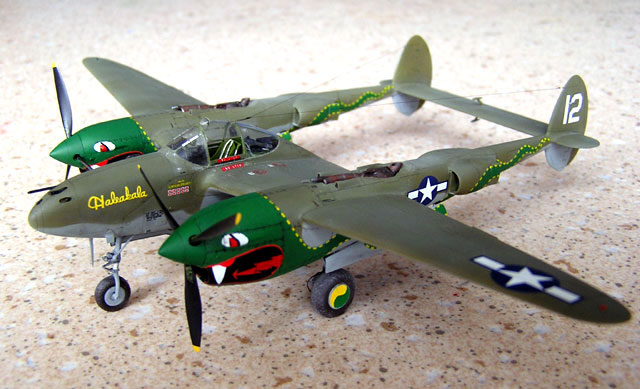
Lockheed P-38J-5-LO
Lightning “Haleakala”
s/n 42- 67291,459th FS, 80th FG, Lt. H.H. Sealy,Chittagong, India,
1944 |
1/72 model (partially
scratchbuilt) based on Hasegawa and Dragon kits

HyperScale is proudly supported by
Squadron.com
The P-38 was always one of my favourite airplanes.
So, when I picked up the 1/72 scale Dragon kit (then still relatively
new), I just couldn’t resist starting working on it as the parts. The
model looked just great in the box.
|
Kits |
1/72 P-38J/L
- Hasegawa
- Dragon
- Frog/Novo
|
|
Aftermarket Sets |
- Aires P-38J/L
cockpit set,
- Eduard P-38J/L
detail set,
- Squadron P-38 F
vacuformed canopy
- Hobby Plus
navigation lights, landing light, wire
|
|
Decals |
- Aeromaster #
72-027 „Lightnings in battle olive dress”
- Travers P-38
Lightning
- Hasegawa and DML
kit decals as well as from Revell P-51B
|
Well, as the work was in progress, I gradually
realized, that the kit is unfortunately not such a pleasure to build as
one could think looking at the nicely packaged plastic parts.
Although rather well detailed, it is poorly
engineered and really a great trouble in assambling. OK, it could still
have been done, if I have not finally ended up with the fuselage
asymmetrical in the frontal view. Since all my desperate efforts to fix
this problem weren’t succesful, I was forced to abandon that project ,
although a lot of detail work was already done.
However, it should be noted, that the DML fuselage
and canopy are too narrow anyway, even if I maybe did make a mistake
while assembling. So, this unlucky chapter was closed and a new project
phase (actually an entirely new project) was started.
So, a kit-bashing would be the only solution now and the only choice was
the Hasegawa kit – surely not the state of the art, but still reasonable
as a basis. Here is an attempt to describe, how it was done.
Corrections,
Modifications and Improvements
|
Fuselage
The fuselage of the Hasegawa kit was not very
accurate in plan view. Namely, an area just in front of the cockpit
should be slightly wider than the widest cockpit cross section, i.e.
there should be a little bulge. In fact the widest place of the kit
fuselage was just on the instrument panel level.
In addition, the entire rear area of the upper
fuselage part was much wider than it should be as well as that of the
lower fuselage half. So, the fuselage was extensively reshaped to get
the correct outline.
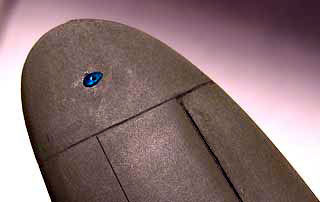
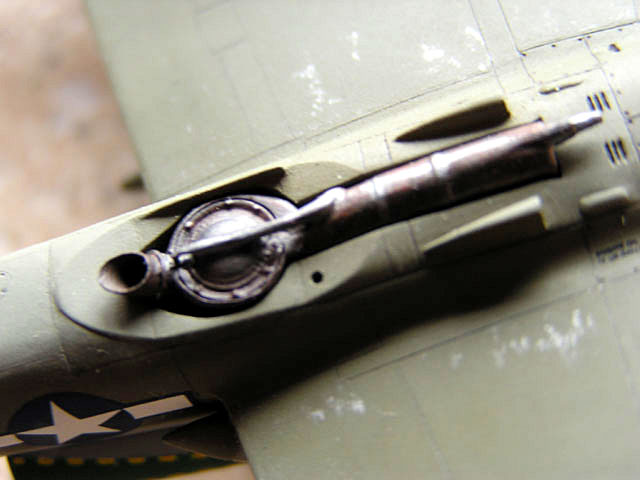
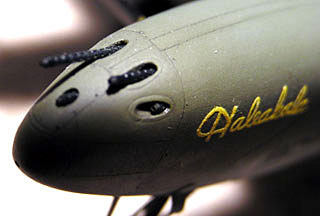 The
nose cone was improved as well, since it was too blunt and matched
poorly the rest fuselage. The gun ports were filled in and then new ones
were made, correct shaped and on the right place. The empty shell
ejection ports were also proceeded this way. The
nose cone was improved as well, since it was too blunt and matched
poorly the rest fuselage. The gun ports were filled in and then new ones
were made, correct shaped and on the right place. The empty shell
ejection ports were also proceeded this way.
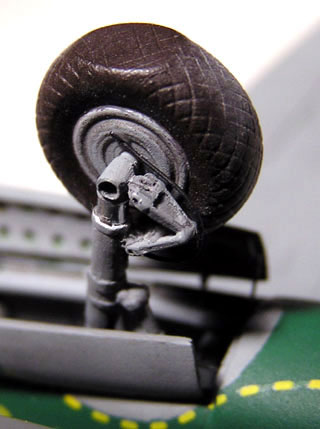
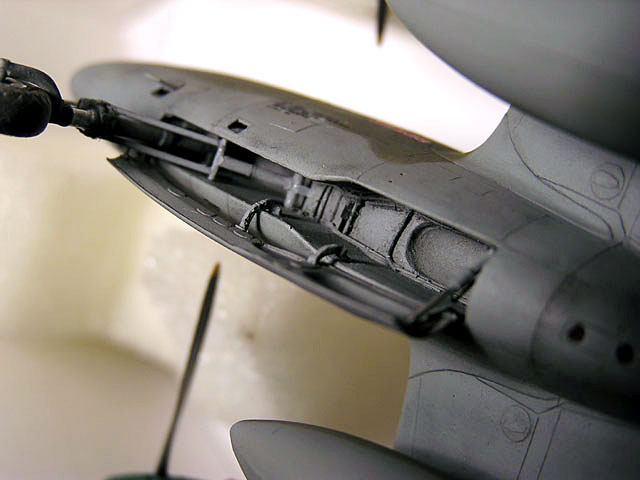
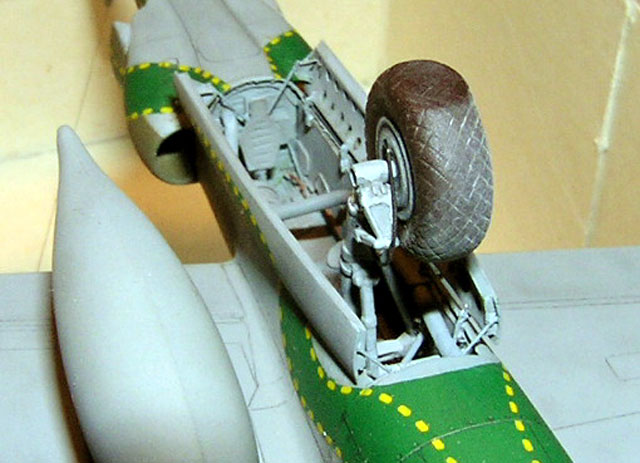
The nose wheel well from the DML kit was cut out and inserted into the
Hasegawa fuselage to be used as a basis. After that following
improvements were made: different sections of the wheel well were made
of different height as it should be ( first of all the front section had
to be made much deeper) , a bulge for the nose wheel was deepened and
widened too, some detail as well as canvas simulation on the rear wall
were added and the nose landing gear leg mounting was modified how it
should look like on the real aircraft.
Cockpit
The Aires detail set was used for the cockpit with
some minor modifications, mostly regarding the radio equipment. The
armour panel was thinned down to scale and some small details were added
to the cockpit as well.
The gunsight had to be scratchbuilt, since this
particular aircraft had still an earlier N-3 type not provided by Aires.
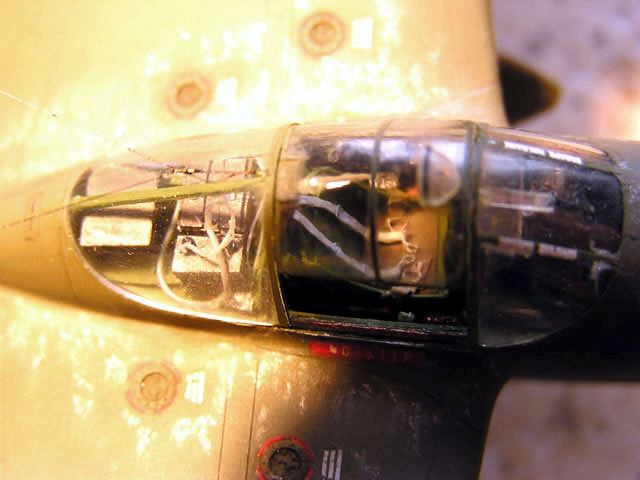
Canopy
Beeing a J-5 subversion, the „Haleakala” had a
curved windscreen instead of more common one with integrated bulletproof
glass used on later J models. Although Hasegawa did provide both canopy
versions, the kit part is slightly less rounded in frontal view than it
should be and its base is a bit too narrow. Not too much, but just
enough to get a wrong appearence. In addition it is too thick for the
opened canopy anyway. So, this part was replaced by one cut out from the
Squadron vacuformed canopy for P-38F. Thereby I sanded off the raised
framing as it was not only a bit crude and totally needless , but also
wrong, since the framing lines should be parallel on the real thing and
it just wasn‘t the case. However, I still believe, Falcon/Squadron vacu-canopies
are probably the best products available, but they would be just
perfect, if they had no framing at all... After it was done, the entire
piece was polished and mounted to the fuselage. Well, I made it with
Superglue as I needed a strong bond at that place, though it could have
been dangerous...
The rear canopy section from Squadron could not be used, since it was
made to fit to the Hasegawa kit . So, it was just too wide and therefore
didn’t fit to the corrected fuselage any more. In addition, it would
again require sanding off the framing, as the rear canopy section of the
J-5 block was the same as on the P-38H, i.e. there was neither a thin
transparent stripe along the canopy inside (as on the erlier models) nor
a wider metal one thereon (as on J-10 and later). The outer framing of
this section was like on the earlier models too and differed hence
slightly from later models as well. So, the only choice here was a kit
part from Hasegawa. Of course, firstly it had to be made a bit narrower,
reshaped to fit to the fuselage and then polished. Finally the thickness
of that piece was just to scale, since the rear framing was rather thick
on the real a/c.
The next problem was a top central section of the canopy. The Squadron
piece was at least less than perfect because of poor representation of
the rear view mirror fairing and incorrect shape as well. The Dragon kit
part was too narrow and the one from Hasegawa was just as inaccurate as
the Squadron replacement item ( the sides bulged in plan view insted of
being straight as it should be) and also too thick for the opened
canopy. So, the appropriate piece was cut out from the Hasegawa canopy,
reshaped to get the right form, sanded and polished to be used as a
template for thermoforming. After it was done this way, I made a
template for the rear view mirror fairing and the same procedure was
repeated one more time. One more thing to be totally scratchbuilt was
the armor glass mounted inside the cockpit. Despite the extensive
detailed cockpit, I decided still to represent the canopy in the closed
position as an opened one would somewhat ruine (of course just in my
subjective opinion) the sleek appearence of the Lightning. Instead I let
the side windows totally open (in down-position). They were just cut out
from thin transparent styrene and inserted into the thin slits made
specially for this in the cockpit walls.
Wing
Hasegawa provides wings and fuselage as an entire
part and I find it much better than the way it Dragon done, splitting
them in several pieces (especially regarding their usual poor fit). The
wing ( at least of my sample) had a bit wrong dihedral and looked
somewhat „broken” in frontal view. It was however easy to correct by
adding strengthening stripes inside. Wing tips were rather poorly
moulded and a bit undersized in plan view, so some superglue was applied
onto their edges to enlarge them. After that they were correctly shaped
and sanded.

The throats of the wing fuel tanks are pretty well done by Dragon, so I
cut them out and inserted in the corresponding holes drilled in the
Hasegawa wing. Some P-38J-5 had already additional fuel tanks in their
outer wing leading edges and some still didn’t. It is stated that those
one with additional tanks should have a cross in the fuselage data
block. So, as this data block is clearly seen on the photo and there are
no cross, I decided to make the wing without additional tanks and
therefore without two more throats there.
Booms & Engine Nacelles
Here I had to extensively combine parts from
different kits.
As by the time of my fiasco with building the
Dragon kit the main wheel wells were already done and the radiator
fairings were corrected too, it would be ( to say the least) a shame to
abandon them and scratchbuild new ones, so it was really a must to use
the central boom sections from Dragon. In addition, their joint with the
wing is more correct, although there were some troubles with the
adjusting to the Hasegawa wing.
 The
engine nacelles were retained from Dragon as well, because despite of
being a bit crude ( it was then fixed anyway), they are much better
detailed and have even something remaining interior of the cooler area.
Well, some additional detail was still required. The top parts of the
engine cowlings were replaced by ones cut out from Hasegawa, as they had
better shape than Dragon ones ( mainly because of the somewhat wrong
cross section in that area caused partially by poor fit and therefore
much sanding, they got just too flat atop ). On the other hand, I had
nearly no problems with putting these replacement pieces together with
the Hasegawa wing. The
engine nacelles were retained from Dragon as well, because despite of
being a bit crude ( it was then fixed anyway), they are much better
detailed and have even something remaining interior of the cooler area.
Well, some additional detail was still required. The top parts of the
engine cowlings were replaced by ones cut out from Hasegawa, as they had
better shape than Dragon ones ( mainly because of the somewhat wrong
cross section in that area caused partially by poor fit and therefore
much sanding, they got just too flat atop ). On the other hand, I had
nearly no problems with putting these replacement pieces together with
the Hasegawa wing.
The tail boom sections (upwards from the radiator fairings) were
replaced by the corresponding Hasegawa parts as well, in the first place
because of a too short distance between Dragon booms an hence too short
elevator and stabilizer as well, while Hasegawa got it right.
The vertical tails had a bit wrong outline and totally wrong
cross-section and were also too thick, so they had to be corrected (or
the new ones made?). The joint between the stabilizer &elevator and the
vertical tails was really poorly engineered by Hasegawa, so a lot of
filling, (re)shaping and sanding was required at this place.
The shape of the radiator cooler fairings had to be extensively
corrected in outline as well as in cross-section. The outlet flaps were
used from the Eduard detail set, but the Eduard inserts representing the
radiators were too small and intended to be located in the wrong place,
so I replaced them by plates of mesh.
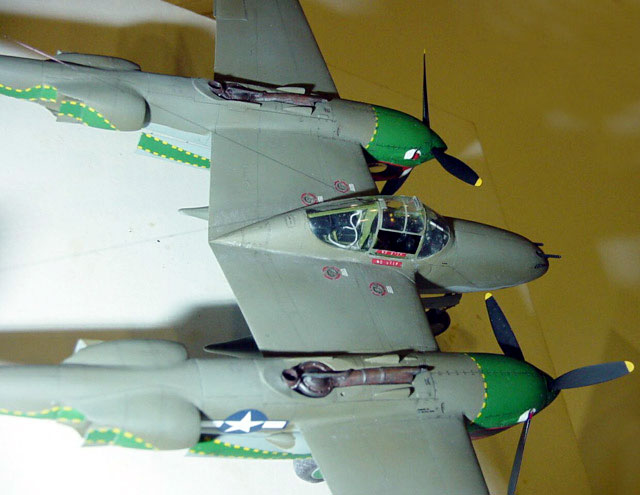
The propellers of the Dragon kit are OK just with one exception: both
are identical as they would rotate in the same direction, but in fact
they were counter–rotating. Hasegawa did it correctly, so I had to
attache the separate blades and glue them into the holes of the Dragon
spinners.
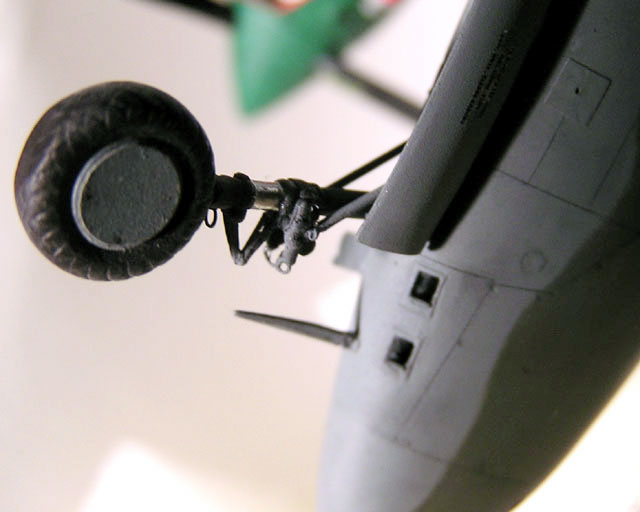
Landing Gear
As already mentioned above, the main wheel wells
were totally scratchbuilt. The only thing I managed to use from the
Dragon parts were small pieces cut out from their top panels, also
modified though. The inner surfaces of the main and nose landing gear
doors were newly made too.
The undercarriage legs were used from the Dragon kit with some detail
added. Their mounting in the wheel wells was however totally redesigned
as it was on the actual plane.
Despite the rather wide variety of wheels available, the only reasonable
choice was using the Dragon ones, since the Hasegawa wheels have
oversized diameter of the wheel hubs, True Details is just a flattened
(too much) copy of Hasegawa and Hi Tech is very nicely done, but a bit
undersized. The Dragon wheels have nearly perfect dimensions and well
represented thread. I flattened them slightly on the electric stove and
added hub coverings cut out from (not too thin) foil, as the kit parts
had no covers (like it was on later models) and the “Haleakala” still
had them.
Click
the thumbnails below to view larger images:
Superchargers
The supercharger covering panels, better made by
Dragon, were cut out and inserted into the corresponding places atop of
the booms on the Hasegawa model. The Dragon superchargers were slightly
widened, shortened, corrected in shape and some more details were added.
Their exhaust pipes were replaced by metal ones
from a large syringe needle of the appropriate diameter.
Drop Tanks
Neither Dragon nor Hasegawa got the shape of these
parts right, but the ones from the ancient Novo kit were surprisingly
correct ( probably the only usable parts of this kit).
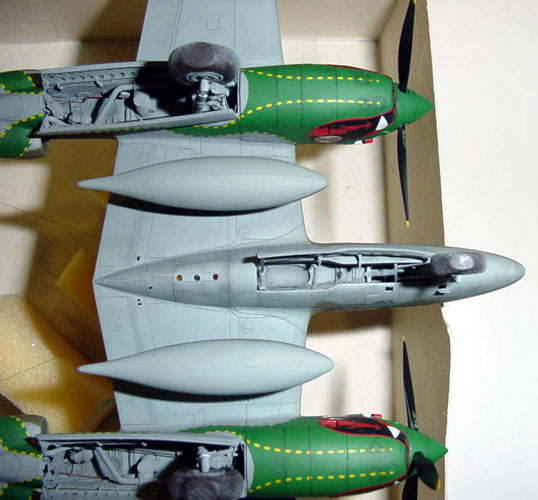
The pylons (Dragon) had to be extended by a thin
piece of plastic.
Armament
Hypodermic needles wrapped by Eduard perforated
plates were used to represent the gun barrels.
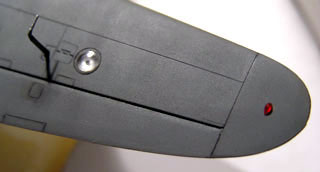
Panel Lines
Of course, the model had to be totally new
rescribed. Where required, overlapping and some more details were added
to complete the constraction: navigation lights, different outlets and
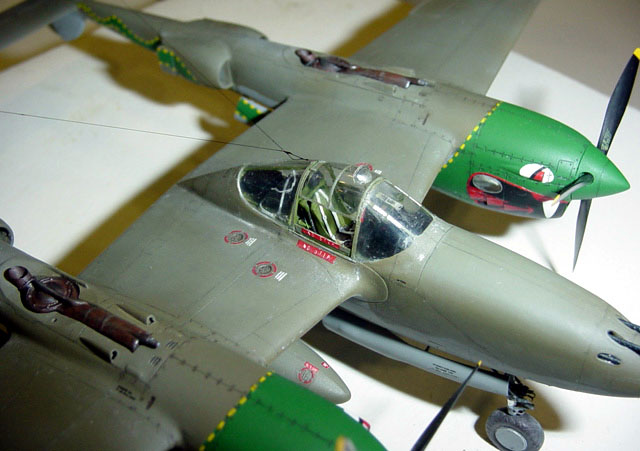
intakes, tubes, wire etc.
Photo: P_38_LARGE _4.jpg
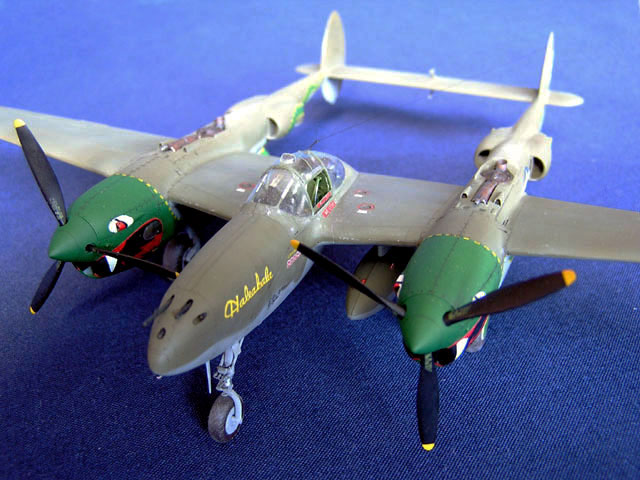
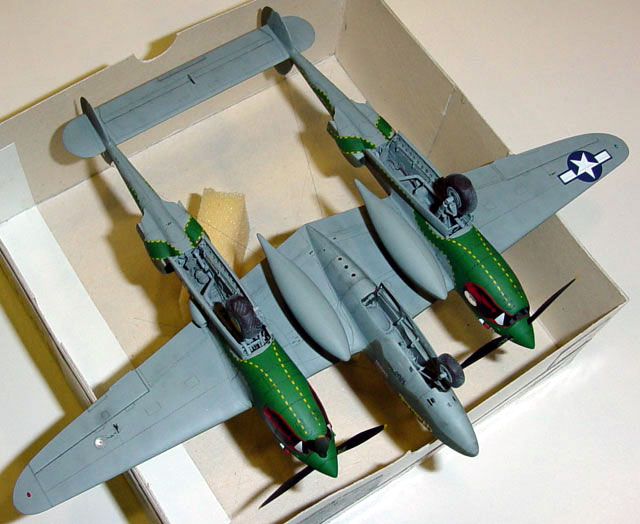
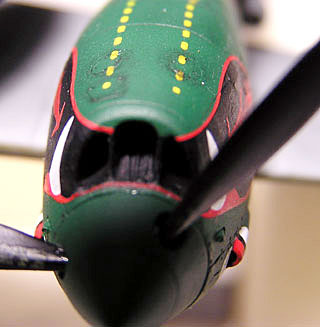
Paint
 The model was painted with Testors/Model Master
enamel paints. Firstly, bright green as a mix of green, blue and a
couple drops of some other colors (just to match the desired color) was
airbrushed on the places where the dragons should be painted on. Then
the dragon motifs were cut out from the Tamiya masking tape and applied
onto the model surface following by the airbrushing with Neutral Grey
and further with Olive Drab. Firstly the entire upper surface of the
model got a regular OD FS 34087 coat from the Model Master range. After
that I sprayed randomly some mixes of OD and Model Master 2 Faded Olive
Drab on the upper surfaces to simulate weathering. A few drops of grey
were added in some of the mixes while the others were applied without
that addition . This was followed by irregular spraying the upper
surfaces with a light coat of pure Faded Olive Drab. The model was painted with Testors/Model Master
enamel paints. Firstly, bright green as a mix of green, blue and a
couple drops of some other colors (just to match the desired color) was
airbrushed on the places where the dragons should be painted on. Then
the dragon motifs were cut out from the Tamiya masking tape and applied
onto the model surface following by the airbrushing with Neutral Grey
and further with Olive Drab. Firstly the entire upper surface of the
model got a regular OD FS 34087 coat from the Model Master range. After
that I sprayed randomly some mixes of OD and Model Master 2 Faded Olive
Drab on the upper surfaces to simulate weathering. A few drops of grey
were added in some of the mixes while the others were applied without
that addition . This was followed by irregular spraying the upper
surfaces with a light coat of pure Faded Olive Drab.
Decals
I used Testor's Metalizer Sealer as a gloss base
for decals. however, I still trimmed excessive clear film of most decals
to achieve better results.
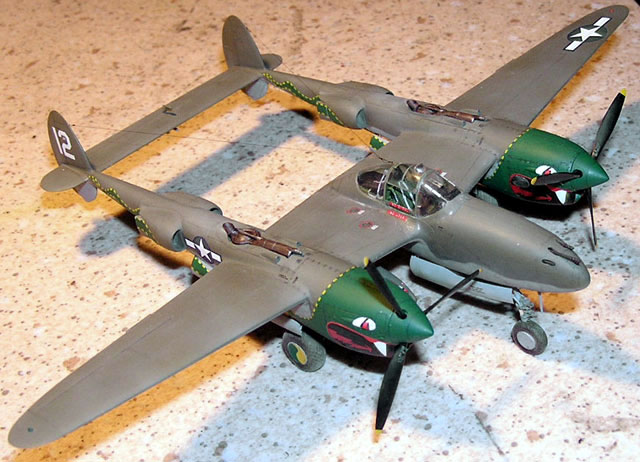
The Error... (pardon) Aeromaster markings for this
particular aircraft are unfortunately not very accurate. So, the
dragons‘ tongues have totally wrong shape and the mouths are too small
and wrong shaped as well. I had to replace them by custom decals cut out
from some spare sheets. The yellow outline of the dragon tails was
slightly adjusted to their actual shape. Further inaccuracies are rather
strange as this area of the real aircraft is clearly seen on the photo
in the „In Action” monography listed by the way in the decal references
as well. Anyway, the aircraft was named by Aeromaster for some reason „Haleakala
II” (probably, because Lt. Sealy did fly a P-38H named „Haleakala” as
well) and 11 kill markings are provided while it should be just „Haleakala”
and only 10 victories (at least what one can see on the known photo).
Well, as the general size of those decal parts was luckily correct, I
just cut off the unnecessary pieces. Only „H” from „Haleakala” wasn’t
very acurate, so it was modified how it should look like.
The biggest trouble was however the logo „pilot
LT.H.H.SEALY” written above the victory markings ,since it was too
small. As it would be clearly visible compared with the Japanese flags,
I replaced this peace or, more exactly, just painted a new one. The
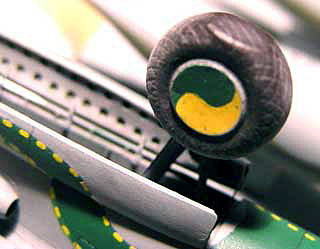
small dragons painted on the wheel hubs are really very beautiful, but
the „Haleakala” just haven’t them! They seem to be applied on another
Lightning from the 459th FS. So, the correct, though not as nice motif
was painted on the wheel hubs using again the templates cut out the
Tamiya masking tape.
The national insignia, white tail tactical numbers as well as the
manufacturer data block on the fuselage were pretty good , but no more
stencil markings were provided. I got them from the Travers decal sheet.
It seems, all service data are represented there, and I’d rather say
more than it actually should be, at least on the camouflaged machines,
so I used wartime photos as a reference material. Some markings were
taken from Hasegawa and Dragon kit decals as well, in case they were
more accurate than Travers pieces or if a needed item just didn’t exist
anywhere else. So, I had an opportunity to select always the best
markings from 2 or 3 sheets.
The only marking which wasn‘t represented by any of 4 P-38 decal sheets
I’ve got, was a lettering of the wing fuel tanks. On OD/NG P-38s it
should be white, but all available decals represent them in black. In
addition, the text layout was wrong too. I used the appropriate
substitutional markings ( of course, trimmed as needed ) from the P-51B
by Revell.
After decaling had been done, the model received one more coat of the
Metalizer Sealer. Then the usual weathering job was made. Although I did
partially use acrylic black and brown washing (mainly for the seams
between the engine acces panels) , the most of panel lines were
emphasized with a mechanical pencil lead as it gives more subtle effect.
A small amount of rubbed pencil lead was used also for modest shading of
the lower plane surfaces. The weathering on the upper surfaces was
completed by some gray and brown pastel chalks of slightly different
shades and the chipped paint was represented with partially a silver
pencil and partially by drybrushing. After it was done, the entire model
was sealed in with Model Master flat clear coat.
The canopy framing was made of the stripes cut out from the clear decal
film sprayed firstly with Interior Green and then with the OD mixes,
together with the entire model to ensure the 100% color matching. For
this purpose the same clear coats as on the rest model were applied on
the decal film to be used as a framing.
What can I say about this “project of the century”?
Well, it was really challenging and a lot of work
was required. Certainly not an average model and I believe, my next
projects will be somewhat easier and faster.
However, when the model was completed, I was happy
to possess somewhat really looking like Lightning, a decent kit of which
is still to be released. I would like to be wrong, but I don’t think,
that the announced 1/72 Academy model will be much more accurate than
Hasegawa, as their previous releases (F4U-1, P-40N etc.) were just
updated (and to be honest, not always improved!) Hasegawa kits.
References and
Acknowledgements
|
1. Modelpres P-38 Lightning ISBN 80-91328-8-X
2. P-38 Lightning in action, by Gene Stafford, ,
Squadron Signal Publications, 1976
3. P-38 Lightning in action by Larry Davis,
Squadron Signal Publications, 1990
4. P-38 Detail&Scale Pt.1, by Bert Kinzey, Squadron
Signal Publications, 1998
5. P-38 Detail&Scale Pt.2, by Bert Kinzey, Squadron
Signal Publications, 1998
6. FAOW # 30 P-38 Lightning by Bunrin Do
7. Osprey Aircraft of the Aces # 14 P-38 Lightning
Aces of Pacific and CBI
8. Aeroteam P-38
9. Martin Caidin „The Fork-tailed Devil”,
Ballantine Books, 1971
10. Magazines: Replic, Modelarz
11. Internet resources
Special thanks to fellow modellers from HyperScale forum as well as from
other message boards, who answered some of my questions regarding this
project and helped me with their kind assistance to reproduce this
particular aircraft as accurate as possible.
Click on the thumbnails
below to view larger images:
Model, Images and Text Copyright ©
2004 by Igor Svetlov
Page Created 03 February, 2004
Last Updated 17 March, 2004
Back to HyperScale
Main Page
|
 Home |
What's New |
Features |
Gallery |
Reviews |
Reference |
Forum |
Search
Home |
What's New |
Features |
Gallery |
Reviews |
Reference |
Forum |
Search