|
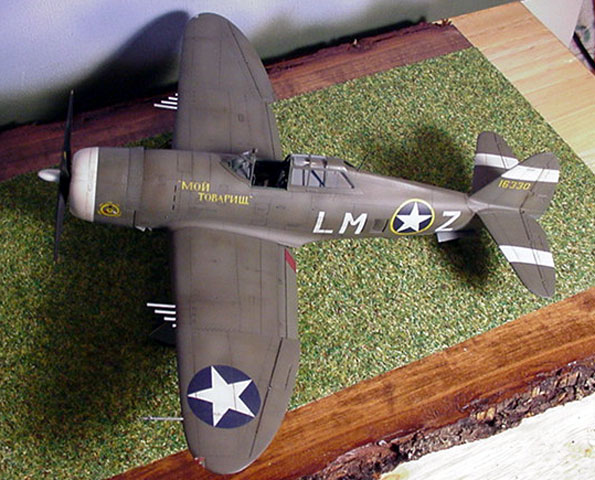
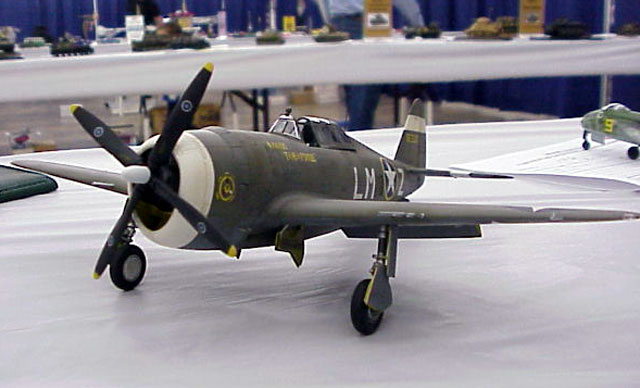
P-47C Thunderbolt
by
Scott Brown
|
|
|
P-47C Thunderbolt |
images by John Greiner

Tamiya's 1/48
scale P-47D Thunderbolt "Razorback" is available online from Squadron.com
This project began, as all of mine do, in a neurotic fit.
Mere moments after I opened the box of this kit, my mind started
working, analyzing how I could alter it, and convert it. You see, I am
infected with the affliction known as AMS (Advanced Modeler's Syndrome)
I am not satisfied to build the version that comes in the box....no, you
see I must have the earlier, or later version of whatever it is. I think
maybe it's genetic or something.
Anyway, of course, after opening the finest plastic model that has
yet been created, my feverish brain said to me "C model....build a C
model".
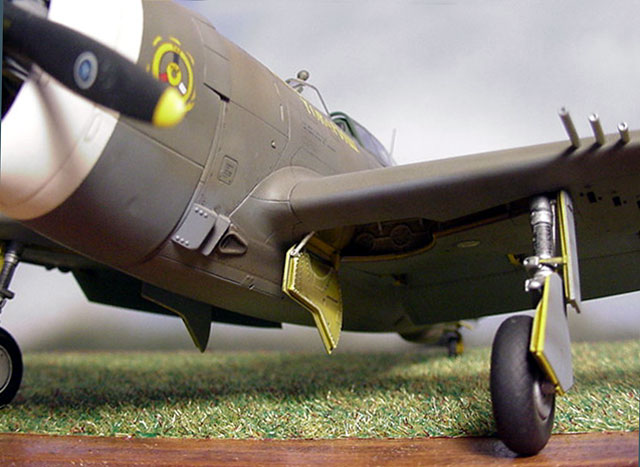
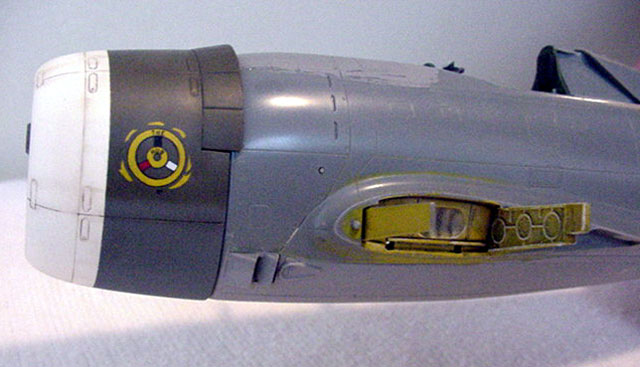
That Cowl...
My knowledge of P-47s was somewhat limited, in that I could recognize
one, say, in a group of P-51s. This did not deter me in the slightest. I
knew from my limited reading that P-47 Cs did not have the 2 bottom cowl
flaps. The Tamiya kit comes with 2 sets of cowl flaps, one open and one
closed. This solved my problem. I decided that I would hack the 2 botton
flaps off the closed set, glue them in place and fill them, then cut the
2 bottom flaps off of the open set, et voila, instant C model.
This worked out you see, because I had a set of Three Guys Replicas
decals for Hub Zemke's planes. Hub flew a C model, and I liked the
markings. The plan was coming together nicely.
So, I hacked and slashed on the cowl, and an hour later was rewarded
with a nice C model cowl. Proud of my work, I headed straight for the
HyperScale "Plane Talking" discussion group to announce my plans.
That Keel...
The first inkling of trouble came from Jennings Heilig, who asked
innocently enough, "What are you planning to do with the keel?" I'm
thinking "what on earth is he babbling about.....keel?" Soon, others
joined in, and it was revealed that indeed, C models had not been
produced with the ability to carry fuel tanks on the fuselage, and
therefore were lacking the distinctive bulged bottom fuselage that
covered the piping and rig necessary to carry tanks there. I never
realized that there was a difference in the bottom fuselage, but sure
enough, I had several P-47 books that show this clearly.
Okay, no biggie. I'm thinking "how noticeable can this be"
Well, it is a big deal. The C model fuselage runs straight from the
tail smoothly to the cowl. No bulging at all. Now I am stuck. "Cripes, I
already did the cowl, so I'm committed now." I took the fuselage halves
and stared at them.....a loooong time. Soon, an idea hit. The plastic of
the kit was not thick enough to accomplish the level of surgery
required, so I'd have to fill it somehow.
I ran masking tape the length of the bottom seam, then filled it up
with about 1/4 inch of super glue, hit it with accelerator, and wondered
what the heck would happen. It worked. The bottom fuselage was filled up
with super glue that was roughly flush with the bottom seam. I repeated
the process for the other side. When the fuselage halves are glued
together, it forms a fairly solid mass of glue.
Once everything was set, I began grinding off the keel with a Dremel
motor tool. Once I had it roughly where I wanted it, I took some 320
grit sand paper and did my usual trick of gluing it to a piece of egg
carton. I then started to work on the keel, trying to get it smooth and
even. If you are careful, you can do this without involving the
horizontal panel line that runs the length of the keel.
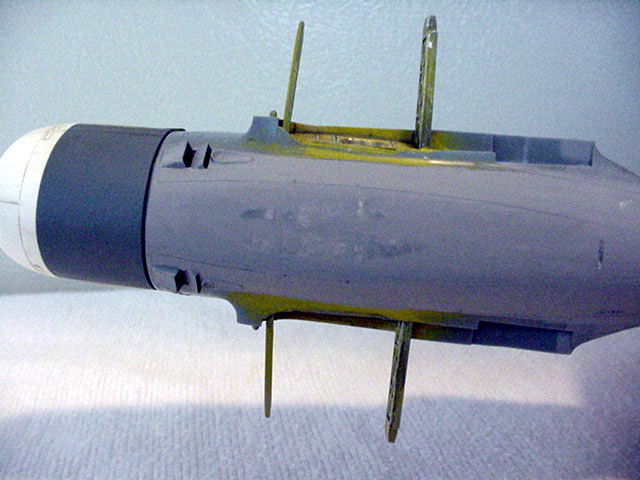
After a couple of hours sanding, it looked fairly straight, and I was
pleased with it so far. The main problem was the myriad of tiny pin
holes in the super glue, and dead spaces where there were bubbles. This
problem was solved with a thick application of Mr. Surfacer 500 and some
600 grit wet 'n dry. Again, proud of myself, I posted to the DG the
process I had used, whereupon I was asked wether or not the plane I was
doing ever received the belly tank modification.
"What? Information useful to me a week ago!"
Yup, seems that the C models and early D models produced without the
belly tank feature, were retrofitted with it soon after reaching the ETO.
The plane I was doing in fact had received the modification......it even
said so in the decal instructions. "Oh for the love of............"
After I peeled myself off the ceiling, I realized that I actually
liked the smooth lines of my now much less jug-like jug.
Cockpit. And That Colour Debate...
So, on to the cockpit. I purposely left this until the last minute.
I have been justifiably accused of just doing the pit, then losing
interest in the kit. The 50 or so completed cockpits in my collection
that do not reside in completed models attest to this fact. "Okay", I'm
thinking "This is a piece of cake" Everybody knows that P-47 cockpits
are dull dark green. This is not a point of contention. Thus has it
always been. So, on goes the dark green, and a few hours later, it's
done. This is the best OTB pit I've ever seen. It's one of the best pits
I've ever seen, period, and I am a resin junkie. I used my Waldron punch
set to punch out the kit decal instruments and applied them on the kit
panel in the bezels. A drop of Future on each one makes it look
outstanding. I used a Jaguar seat and gunsight, and that's the only
resin in the entire cockpit.
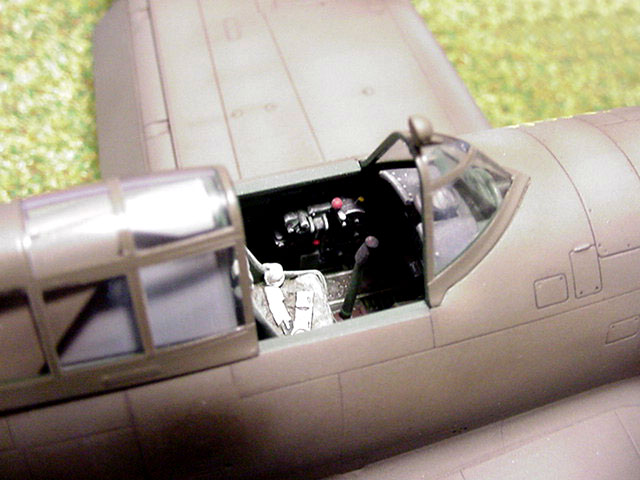
After admiring my handiwork, I struck out for the Plane Talking
discussion group to boast and brag....only to run across a post by Lynn
Ritger purporting to show a cockpit color for P-47s that isn't dark
green.
"WHAT?"
Sure 'nuff, there is a photo of a C model with what looks like yellow
zinc chromate on the rear wall of the cockpit. "WHAAAT?.........OH FOR
THE LOVE OF........!" So, off goes the great P-47 cockpit color debate,
only it's too late for me 'cause I'm already done with mine. I'm just
astounded at this point that I'm really involved in a discussion of the
cockpit color of a P-47. This project was supposed to have been
easy-breezy, bada-bing, bada-boom, wham-bam thank-you ma'am, now I find
myself embroiled in one of those storied color arguments. No matter,
it's too late now, and there aren't 30 people on the planet who would
know or care. There is still conjecture on this point, but I have seen
enough evidence to cause me to believe that P-47 Cs and early Ds have
yellow zinc chromate cockpits. My next one will be thus.
The Rest of the Kit...
The rest of the kit went flawlessly, and it is one of those viceless
builds that you just enjoy working on. You can call me "assembler" all
day long, but I just had a ball with this kit.
Soon, it came time for paint. I couldn't believe that this model was
really ready for paint and I hadn't lost interest yet.
I looked at my colors, then headed to the Discussion Group to get
some confirmation regarding what I was about to do. Is it ANA 613, is it
34087, I mean, how many colors of OD can there be? It's green and gray
for cripes sake!
 I chose Testor's Model Master ANA 613 because it looks like the dark,
waxed green I am seeing in color photos. Gray is Model Master neutral
gray, darkened a bit. I was sitting there fat, dumb and happy when I ran
across a question about the color of the area behind the cockpit, under
the canopy. I had always just assumed that it was dark green like the
cockpit, but noooo! I chose Testor's Model Master ANA 613 because it looks like the dark,
waxed green I am seeing in color photos. Gray is Model Master neutral
gray, darkened a bit. I was sitting there fat, dumb and happy when I ran
across a question about the color of the area behind the cockpit, under
the canopy. I had always just assumed that it was dark green like the
cockpit, but noooo!
Thus began the great "what's the color of the area behind the
cockpit" brou-haha.....Sigh.
Again, much conjecture, but I am reasonably certain that the area is
neutral gray, and so that color was sprayed on.
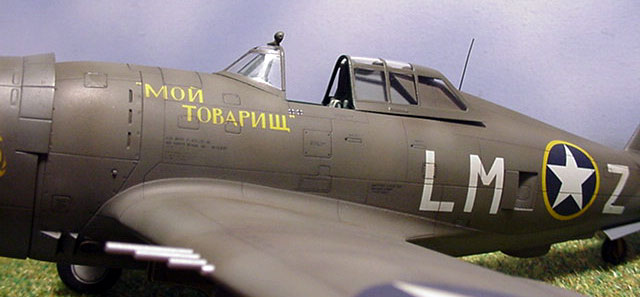
The painting and decaling had a few exciting moments, but all ended
well. I use Testor's Metalizer sealer to gloss cote. I tried Future
once, but despite the fact that it gave my house a nice, pleasant smell,
I managed to get runs and glops in it. Metalizer sealer is Scott-proof,
so that's what I go with. It is rock hard, and resists everything but
straight Solva-set left on in puddles over night (ask me how I know
this) This also attacks Future, so there is no advantage there.
The monotone of the OD was broken up by spraying a lightened (about
10%) OD in the middle of each panel. This seems easier to me that
spraying a dark color on the panel lines, then trying to control how
much paint you apply. I just ain't that talented.
I used Burnt Sienna oils thinned with Ronsonol lighter fluid to wash
the lines and kinda grunge it up.
Flat coating is Pactra Acrylic Flat.....wonderful stuff. It is out of
production, so I buy every bottle I run across. Polly Scale runs a very
close second in terms of flat.
Final weathering is in the form of pastels for little streaks and
some further panel lightening. I tend to keep such things conservative,
having come up before the Verlinden method of hyper-stylized weathering
took hold. Final assembly was saved until the day before a contest, and
except for shooting the port formation light someplace in my room with a
pair of tweezers, all went according to plan. I placed the last piece,
the rear view mirror, at 4 am the morning of the San Antonio
contest....when such things are destined to take place, and all was
right with the world.
I had a completed model staring at me.
I had almost forgotten the feeling of pride and accomplishment that
comes with finishing a model. It is a small thing, but it feels good.
The best part, for me anyway, was that the project had involved many
hours of research and discussions with people who are as sick as I am.
There are those here, and other places who insist that since things like
accuracy and trying to get as close to the real thing as possible aren't
important to them, it shouldn't be important to me. What they are
missing is that the academic process involved in doing the research on
something as minor as a cockpit color, at least for me, is part of the
fun. It's not life or death, but the way I look at it, I am much richer
in spirit for getting to discuss it with other people instead of just
shutting out discussion and having the experience be a solitary one. I
really enjoyed learning about P-47s and talking about it with the people
at this site. It made it just that more satisfying, and my knowledge
base has expanded.
I thank everybody who took the time to help me.

The piece isn't perfect, but to me it represents what is good about
the community of HyperScale. The guys who jumped in and helped me all
have a piece of themselves in this model. I will incorporate what I
learned into another P-47. My plan is another C model, but I'm leaving
the belly alone!
I hope you like it. I had a blast doing it. Thank you guys again for
the assistance. Please feel free to post any comments or criticisms. I
know Brett frowns on unsolicited nit picks, but if somebody knows
something that I don't, I'd like to hear it, and it might help somebody
else in the process.
Special thanks to Josh Bowling, who called me every day to bug me
about my progress, and John Greiner who shot the photos.
Click the thumbnails below
to view larger images:
Model and Text Copyright © 2003 by
Scott Brown
Images Copyright © 2003 by John Greiner
Page Created 14 March, 2003
Last Updated 17 March, 2004
Back to HyperScale
Main Page
|
 Home |
What's New |
Features |
Gallery |
Reviews |
Reference |
Forum |
Search
Home |
What's New |
Features |
Gallery |
Reviews |
Reference |
Forum |
Search