|
P-47D Thunderbolt
by
Tony Bell
|
|
|
P-47D Thunderbolt |

Tamiya's
1/48 scale P-47D Bubbletop is available online from Squadron
Much
has been written about the P-47 Thunderbolt by authors far more well read
and far more articulate than yours truly. Most modellers are al least
passingly familiar with the aircraft and its history, so I won’t
regurgitate any of that here. Call me lazy.
For a
thorough description of what is present upon opening the box, I’ll refer
the reader to
Brett’s preview of the kit in the Reviews section.
Aftermarket Accessories
Having built my Tamiya Razorback
P-47 straight out of the box, I elected to build my Bubbletop with a few
minor improvements, both aftermarket supplied and scratch built. Having an
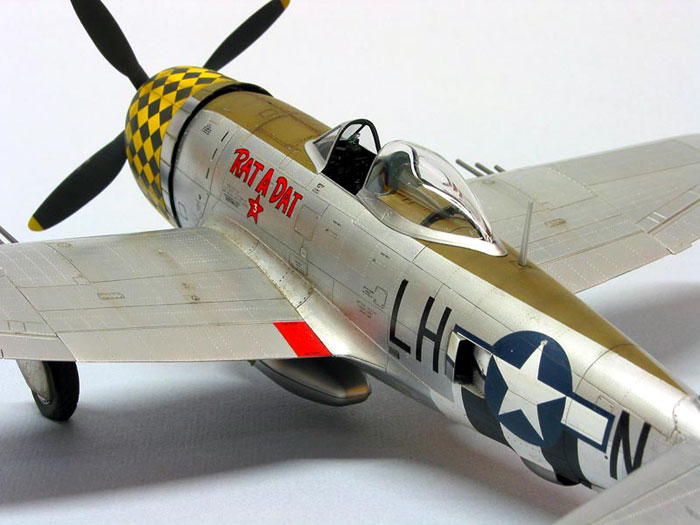
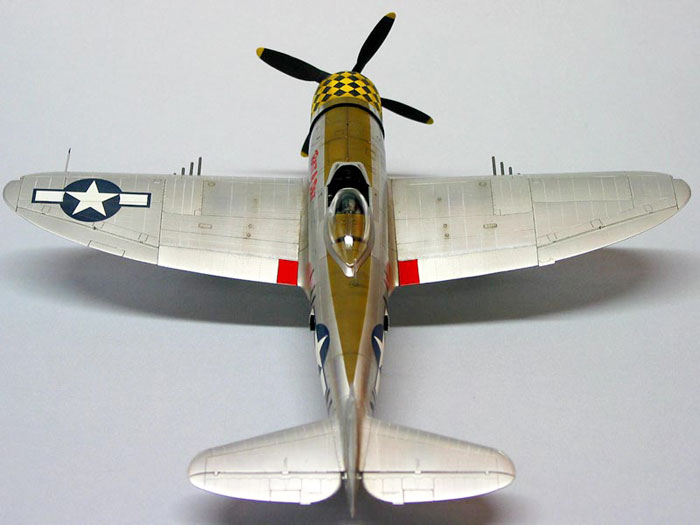
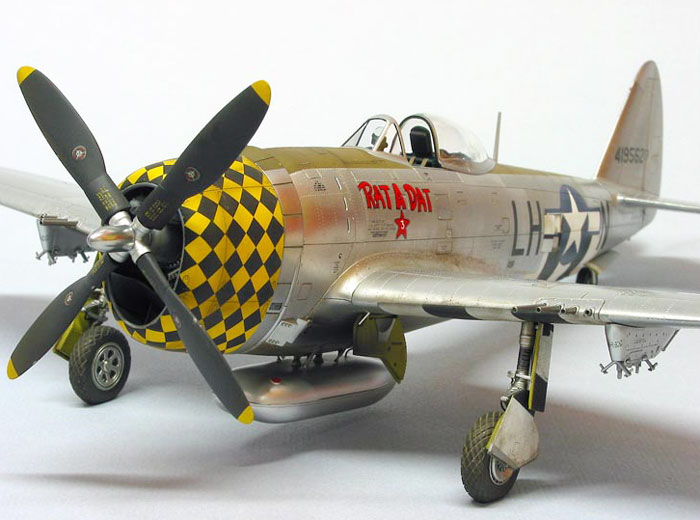
affinity for checkers on my Jugs, I chose to use the markings for “Rat A
Dat”, a 353rd FG, 350th FS machine. The decals came
from Aeromaster 48-538 “Best Sellers, P-47 Thunderbolts, Pt. I”, which
also provided the markings for my Razorback, “Miss Behave”. I definitely
got my money’s worth out of that one.
Aside from the Aeromaster
decals, I elected to use a few resin goodies to enhance the model. These
included a seat and wheels from Ultracast and the ScaleQuest exterior
upgrade set consisting of detailed cowl flaps, oil cooler faces and
shrouds (for the flaps on the lower fuselage ahead of the wing leading
edge), intercooler ducting and radiator faces for the mid fuselage duct
exits and finally the ducting for the interior of the cowl separating the
engine from the carburettor and oil cooler intakes. Both the Ultracast and
ScaleQuest parts are perfectly cast with exquisite detail. Having said
that, if I were to do another Tamiya Jug, I would probably forgo the
ScaleQuest resin set, as it is not very visible and falls squarely into
“at least I know it’s there” type of detail.
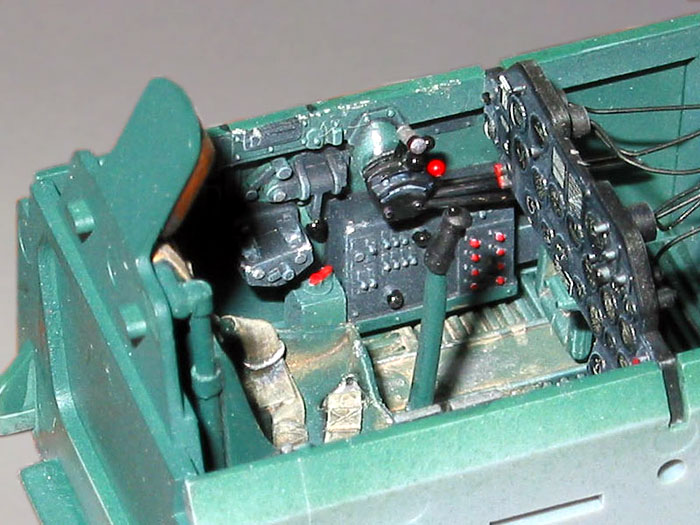
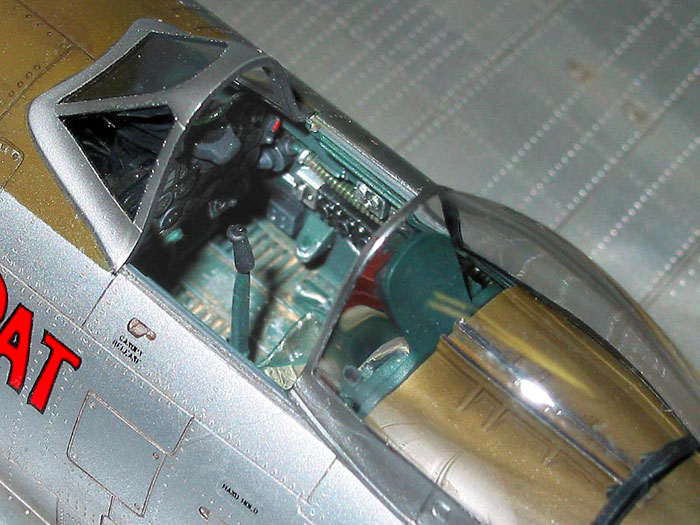
The Cockpit
The
kit cockpit is an absolute gem, rendering any aftermarket resin
replacement totally unnecessary. The Dark Dull Green (DDG) colour was
mixed from Tamiya green, blue, black and white, the exact mix being
eyeballed until it matched the colour photographs in Bert Kinzey’s “P-47
in Detail & Scale”. Future was added to the mix to make it glossy, and
it was used to spray the major components. A wash of Testors gloss black
enamel was applied to add depth to the recesses, followed by a coat of
Polly Scale clear flat. The avionics boxes were painted flat black and
everything was dry brushed with a medium green-grey mixed from artists’
oils. Various switches and knobs were picked out with red, silver white
and gloss black. A silver Prismacolor coloured pencil was used to draw
some scuff marks and chipping.
I had
picked up some MiG Pigments and decided to experiment with them. I mixed
up a slurry of “European Dust” and water and spread this around on the
cockpit floor. After it dried I wiped away the excess with a damp Q-tip,
leaving an accumulation of dirt in the recesses.
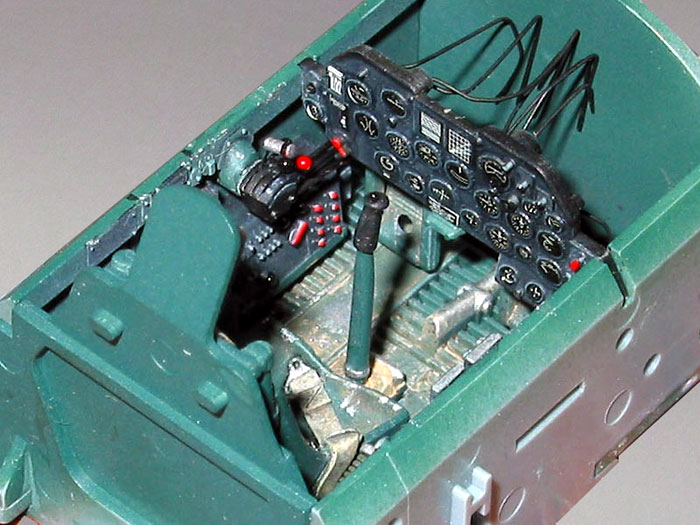
The
throttle quadrant is a bit basic, so I trimmed the knobs off and cut three
slots in the top with a fine razor saw. Scraps of brass strip from an old
Eduard photoetch set with superglue knobs formed the replacement levers.
The one handle was made from a piece of stretched sprue painted silver
with a thin strip of black decal. The quadrant was finished off with some
steel wire for the linkages.
I
replaced the kit seat with the beautiful resin one from Ultracast. The
seat was painted overall DDG followed by XF-60 Buff for the shoulder
harness and Aeromaster faded OD 41 for the lap belts. The belts were then
given a wash of burnt umber oil paint, followed by a light drybrushing
with white. Finally the buckles were picked out with Humbrol 11 silver.
The
instrument panel was painted flat black and then dry brushed grey, with
each instrument punched from the kit decal, applied individually and
finished with a drop of Future. I drilled small holes into the backs of
the instruments and inserted bits of fine wire.
The
oval gun sight reflector glass was filed off and replaced with a new one
cut from 0.010” clear styrene. The reflector glass was painted with Gunze
clear green on the edges and attached to the sight with Future. A Tally-Ho
photoetch ring sight was superglued to a piece of brass wire and strip and
attached to the reflector sight.
Click the thumbnails below to view larger
images:
The Engine and Cowling
The
engine is also very nicely detailed, with separate front and rear cylinder
banks, gear housing and magnetos, two styles of which are provided.
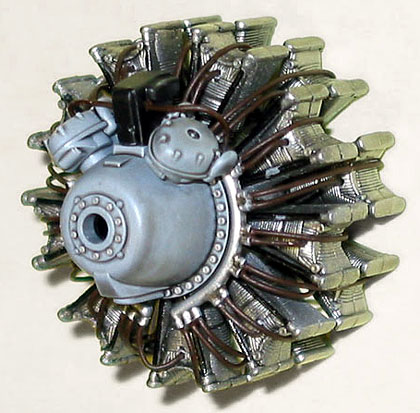 I
detailed the ignition harness by adding the stubs for the leads. These
were made by gluing two lengths of Evergreen 0.020” styrene rod together
and cutting 18 slightly oversize pieces. These were then glued to the
ignition ring and trimmed to the correct length. I then drilled holes in
each one into which were inserted lengths of fine solder for the ignition
wires. Corresponding holes were drilled in the cylinders to accept the
wires. I
detailed the ignition harness by adding the stubs for the leads. These
were made by gluing two lengths of Evergreen 0.020” styrene rod together
and cutting 18 slightly oversize pieces. These were then glued to the
ignition ring and trimmed to the correct length. I then drilled holes in
each one into which were inserted lengths of fine solder for the ignition
wires. Corresponding holes were drilled in the cylinders to accept the
wires.
The
reduction gear housing and cylinders were airbrushed with Mr. Surfacer
1000 thinned with automotive paint reducer. I then airbrushed the
cylinders with a 50/50 mix of Alclad II Duralumin and Steel and brush
painted the pushrods with Testors gloss black enamel.
The
bolt heads and the ignition harness ring were brush painted with Humbrol
11 silver, and the ignition leads were brush painted with a 75/25 mix of
Testors Burnt Sienna and black.
For
the weathering I mixed about 1/2 oz of Future with a half dozen drops each
of India (i.e. black), green and Van Dyke brown inks and then painted this
over everything with a nice soft brush. Once this was dry I airbrushed the
gear housing with a 50/50 mix of Polly Scale Satin and Flat
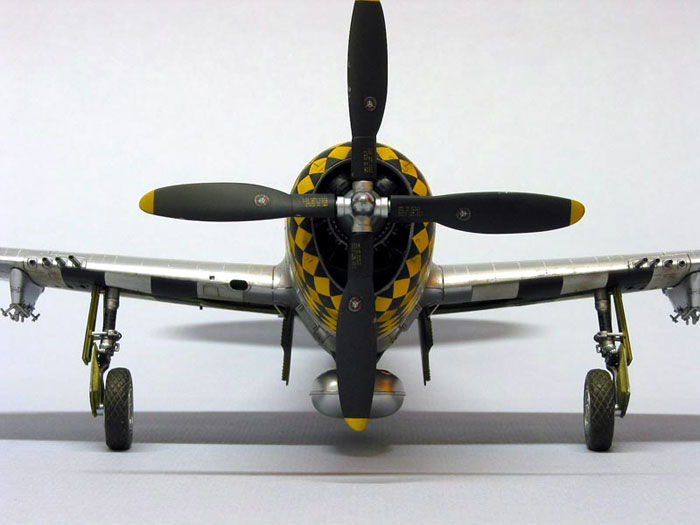
The
Curtiss Electric prop was painted Tamiya flat yellow and flat black, with
Alclad II Duraluminum being used for the prop hub. For some variety, the
spinner portion of the hub was painted SnJ and buffed to a high shine with
the aluminum polishing powder. Is it accurate? I doubt it, but it looks
cool.
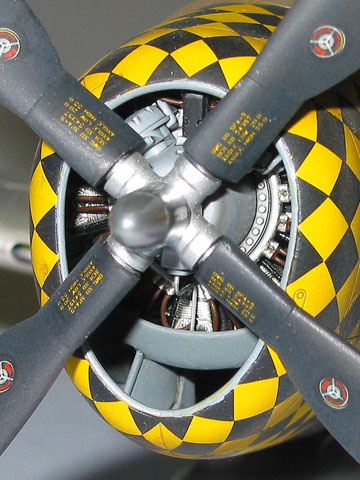 The
cowling is a cleverly cast single piece with nice crisp panel and fastener
detail around its entire circumference. The
cowling is a cleverly cast single piece with nice crisp panel and fastener
detail around its entire circumference.
The
interior was painted neutral grey (made by mixing Gunze Mr. Surfacer 1000
and MiG pigments Smoke Black) and the exterior painted Tamiya yellow. The
interior was dirtied up with the same Future and ink mix as used on the
engine and the exterior was treated to a coat of Future followed by a wash
of Burnt Umber artists’ oils in the panel lines.
The
Aeromaster checkerboard decals (left and right) were slit at various
points on the forward edge to help it fit around the compound curves. The
decals were applied with some soapy water to allow for easier positioning
and once in place, several applications of Solvaset setting solution made
the decals settle down nicely. Only after the first had been applied and
had a chance to dry for at least a day was the second half attempted.
After
both checkerboard decals had dried properly the remaining gaps were filled
in with the spare checkers that were provided on the sheet. There were
gaps on the underside and at the very forward lip, which was to be
expected given that the decals were optimized for the slightly smaller
Hasegawa cowl. After the decals had been allowed to dry for a few days,
the entire cowl was sprayed Polly Scale flat.
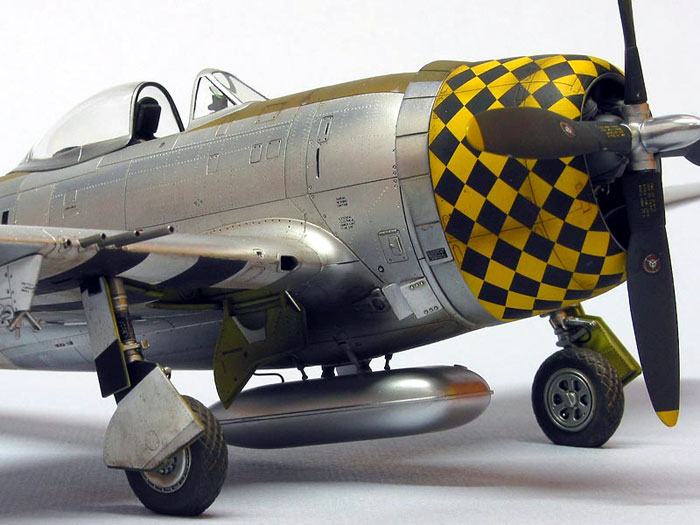
The
ScaleQuest resin cowl flaps feature thin edges with nice (and visible)
interior detail. The only shortcoming is that some of the scribed lines
separating the individual flaps are a bit on the rough side. While this
would have been acceptable had I been doing a camouflaged machine, it
would be too obvious on a natural metal finish. Instead,
I thinned the kit part and detailed it with bits of styrene strip and rod.
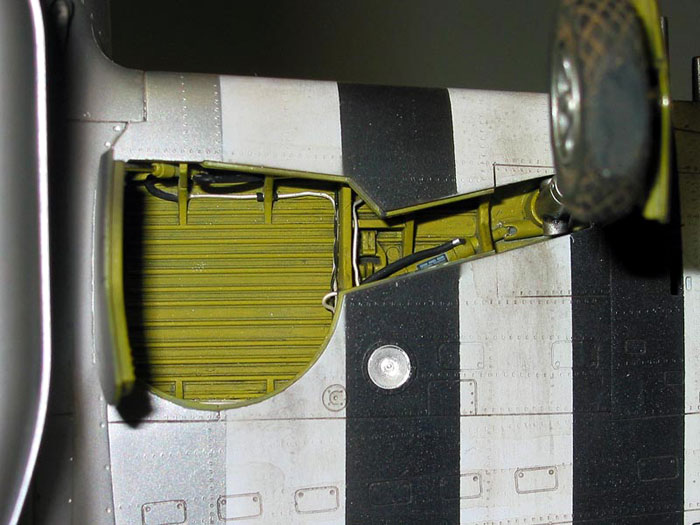
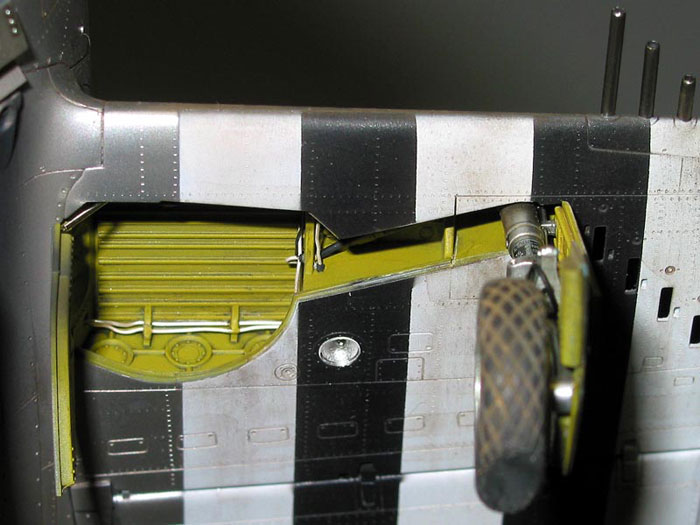
Wheel Wells
The
kit wheel wells are very nice indeed, providing all the structural detail
and good depth, while avoiding the unsightly seam at the wing root that
has plagued other kits (Monogram, Academy). Thankfully the folks at Tamiya
chose not to mold on any of the plumbing which would require tedious
removal and cleanup for those of us who would like to add it ourselves.
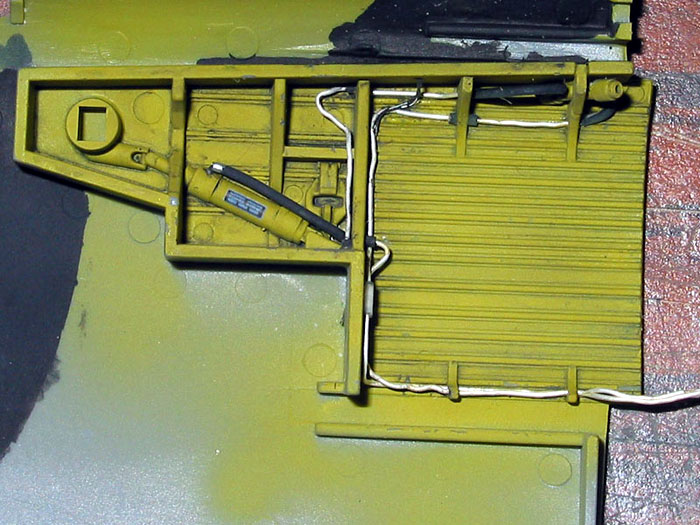
I
started by pre-drilling all the holes in the ribs, etc. through which the
wiring would pass. I then airbrushed the wells Tamiya XF-4 Yellow Green
mixed with Future, followed by a wash of Testor's
gloss black enamel. For the plumbing, I used electronics wire wrapping
wire stripped of its insulation.
Using
the Detail & Scale book as a reference, I routed the wires in and around
the well and through the pre-drilled holes. For the connectors and
couplings I used small pieces of the wire insulation threaded on and
painted the appropriate colour.
Click the thumbnails below to view larger
images:
Nit Picking
While
fit and engineering is nearly flawless, there are nonetheless a few minor
areas to watch out for. The fit of the leading edge inserts for the
machine guns was a bit off, requiring a bit of trimming and dry fitting to
achieve a perfect fit. Likewise, the panel inserts on the lower wing
needed a bit of fiddling to get them just so. In order to get the panel
lines for the inserts consistent with the rest of the wing, I brushed some
Gunze Mr. Surfacer 1000 on, wiping the excess away with rubbing alcohol
after it had dried for about 10 minutes.
The
most surprising flaw in my kit was a somewhat prominent sink mark along
the roots of the horizontal stabilizers and on the wing tips. I filled
these with Mr. Surfacer 500 and sanded them smooth.
Flaps
Although Tamiya provides parts
for dropped flaps, I decided to pose them in the retracted position, as I
prefer to keep the attractive lines of the elliptical wing unbroken.
Reference photographs show parked aircraft with the flaps in either
position, so no matter what you choose to do, it will be accurate. The
ailerons are molded with the upper wing with nice thin trailing edges.
However, because the flaps are broken down into upper and lower halves,
the trailing edges are noticeably thicker. This is not really all that
apparent if the flaps are lowered, but I decided to depict them raised and
so had to thin the trailing edges to be consistent with the ailerons.
I carefully sanded the mating
surfaces of the trailing edges and glued them together with superglue. I
then gently pried the leading edged apart enough to fit the hinges in and
then glued the leading edges together.
As a result of this fiddling
about I introduced a bit of a twist to both flaps which caused minor
misalignment at the outboard edge. I corrected this by first filling a
small saucepan with water and bringing it to a boil on the kitchen stove.
I sealed the saucepan with a piece of aluminum foil and poked a 1/8th
inch hole in it to produce a narrow jet of steam. I steamed the flaps and
gently and twisted them back into shape, rinsing them in cold water to set
them quickly. The inboard edges of the flaps and the corresponding
portions of the wing root also had to be filed and trimmed to get them to
sit perfectly flush.
Fuselage Assembly
Tamiya
has broken the fuselage down into four main parts in order to produce the
filleted tail of the later –D and –N versions. Thus they have molded the
upper portion of the fuselage from the rear of the cockpit back separately
with the vertical stabilizer. The parts are broken down along the panel
lines and fit very well (as opposed to the Hasegawa Typhoon, for
instance).
The
instructions would have you glue the fuselage halves together first,
followed by the insert. I decided that, in the event of a less than
perfect fit, it would be easier to deal with one seam at the top of the
fuselage rather than two seams on the sides. I therefore assembled each
fuselage half separately, taking care to line the parts up precisely and
applying superglue to the join from the inside to avoid marring the
exterior.
I
joined the fuselage halves together with superglue, trapping the wing
spars and cockpit. I find that it is best not to use liquid cement here
because it has a tendency to shrink over several weeks leaving a “ghost”
seam that is quite noticeable under a natural metal finish. As it turns
out, my approach to the tail fillet paid off, as there was a slight gap on
the top of the fuselage that I filled with superglue and sanded smooth. I
added some stretched sprue to the cockpit sills to represent the canopy
guides.
At
this point all of the major airframe components were carefully sanded
smooth with 2000 grit wet & dry sandpaper and plenty of soapy water.
Rivet, Rivet, Rivet
One
thing I’ve noticed when studying my P-47 references is that in clear
photographs, both period pictures and those of restored warbirds, the
flush rivets of the skins are distinctly visible.
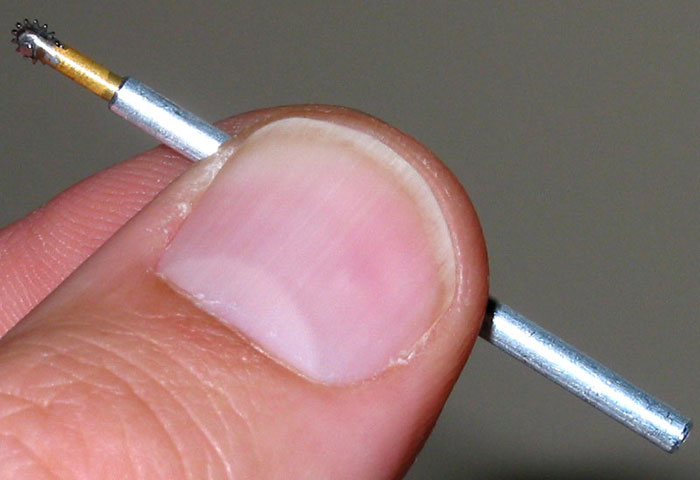
In
order to reproduce the rivets I made the pounce wheel from a piece of
1/16" brass rod, with a steel sewing pin for the axle and a watch cog from
a dead Timex with a diameter of approximately 1/8" and a tooth pitch of
about 0.75mm (I’m Canadian, can you tell?).
I
drilled a hole in the brass rod for the sewing pin axle and then cut a
slot lengthwise into the rod perpendicular to the axle hole. I annealed
the sewing pin and mounted the cog in the brass rod with the pin and cut
it almost flush with the rod. I then mushroomed the ends of the pin by
tapping the axle with a hammer.
To
guide my home-made pounce wheel, I laid a piece of electrical tape over
top a piece of Tamiya masking tape and cut a 4” by 3/16” strip. The
electrical tape provides the thickness and flexibility to guide the pounce
wheel, while the mild adhesive of the Tamiya tape allows it to be applied
and removed over and over again without leaving any sticky residue.
Armed
with a set of plans from “Aero Detail #14: P-47 Thunderbolt”, I set
about embossing each line of rivets. The wings and stabilizers had not
been attached to the fuselage at this point, making it easier to get at
their respective root areas with the pounce wheel.
I
worked in sections, first outlining each panel and then filling in the
middles, constantly referring back to the plans. For each rivet line, I
positioned the tape guide and ran the wheel along at about 2-3 r.p.s.
(rivets per second), being careful to reduce the pressure as I crossed any
panel lines. Much to my amazement I only had one minor slip up which was
fixed with Mr. Surfacer 1000 and 1500 grit sandpaper.
I
managed to cover the whole airframe over the course of five or six
pleasant evenings spent in front of the television watching mindless fare
(Survivor, Matrix Reloaded, etc.) and chatting with my wife. Once
finished, I took some well worn 2000 grit wet & dry sandpaper and soapy
water and rubbed the entire model down in order to make the rivets a
little less prominent.
After
carefully removing any mold separation lines at the wing and stabiliser
roots that might interfere with a perfect fit, these were attached to the
fuselage with liquid cement applied very sparingly with a fine brush so as
to avoid any glue marks that would be visible under the Natural Metal
Finish (NMF).
Before
spraying the NMF, the wheel wells and cockpit were masked off with tape
and tissue paper and the wing and fuselage D-Day stripes were masked and
sprayed with Tamiya acrylics, as was the anti-glare panel which was
painted PollyScale faded Olive Drab 41. These areas were in turn covered
with masking tape and the whole airframe sprayed with several light coats
of SnJ brand aluminum enamel paint and gently buffed with their polishing
powder. This powder is an amazingly fine aluminum pixie dust which is
rubbed into the painted surface to give a lovely, if somewhat delicate,
natural metal look. After rinsing the model under the tap to wash away the
excess powder, I masked and sprayed a few panels with SnJ darkened with a
few drops of Testor’s gloss black enamel.
The
transparencies were dipped in Future and set aside to dry for a day, after
which they were masked inside and out with Tamiya tape and airbrushed
inside and out with Tamiya flat black and Alclad II White Aluminum
respectively. When fitted to the fuselage there was a slight gap around
the windscreen of about 0.25mm. Never having seen nor heard of this on any
other builds of this kit, I can only assume it was something I had
inadvertently introduced.
I had
already painted both the fuselage and windscreen, so I was at a bit of a
loss as to how to fill the gap without damaging the paint. I ended up
mixing up a small ball of Milliput yellow-grey epoxy putty, into which I
kneaded some smoke black MiG pigment, turning it a dark grey. I then
worked a small amount of the putty to the gap with a toothpick and cleaned
up the excess with a wet Q-tip. No sanding was required, and the dark grey
colour is next to invisible against the olive drab of the anti glare
panel.
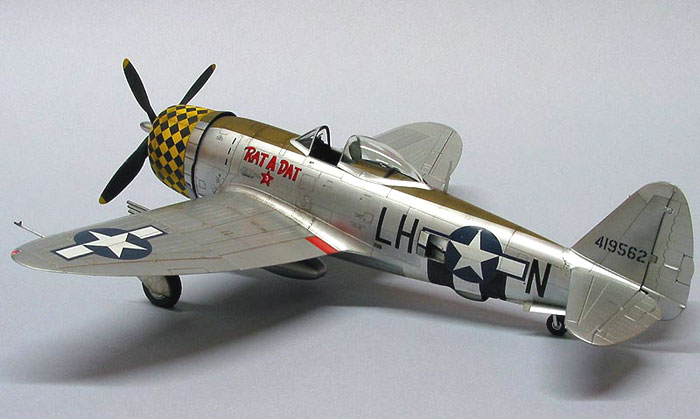
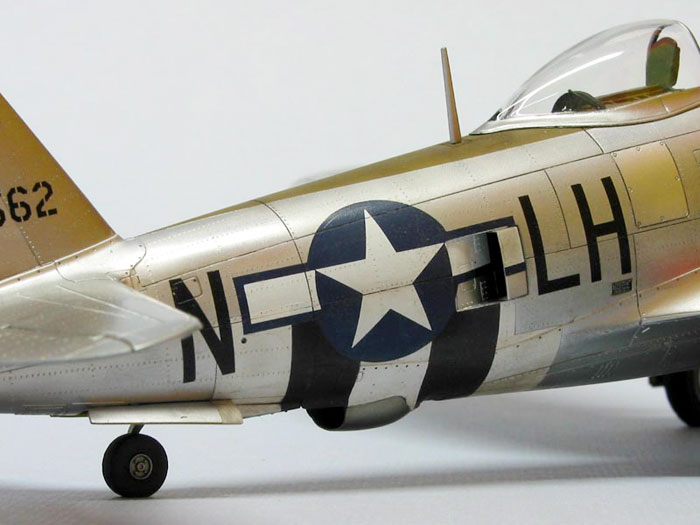
The decals came from
Aeromaster’s sheet number 48-538, “Best Sellers, P-47 Thunderbolts, Pt.
I”. These were applied right on top of the SnJ and went on without a
hitch, responding well to Microsol and Solvaset and conforming to every
detail, including the rivets. The fuselage national insignia were cut into
several pieces to fit around the intercooler doors.
As ever, hiding decal film on
natural metal finishes can be a challenge. To leave the decals alone means
visible carrier film, whereas clear coating the model will kill the look
of the NMF. The solution to the problem is a little bit of both. To hide
the film I freehand airbrushed each individual decal, from the large
national insignia down to the itty bitty “Hand Hold” stencils, with Polly
Scale satin heavily thinned with distilled water, taking care to spray
only the decal and a small portion of the surrounding finish. Finally I
went over the national insignia with Polly Scale flat in a similar fashion
to dull them down a bit.
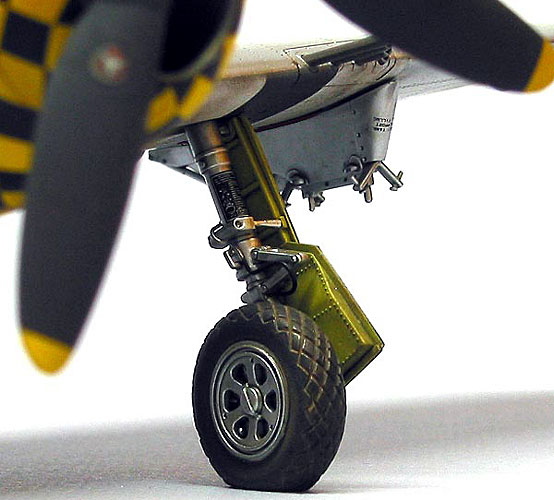
There were some small ejector
pin marks on the landing gear legs and doors which I filled with Mr
Surfacer 500 and sanded smooth.
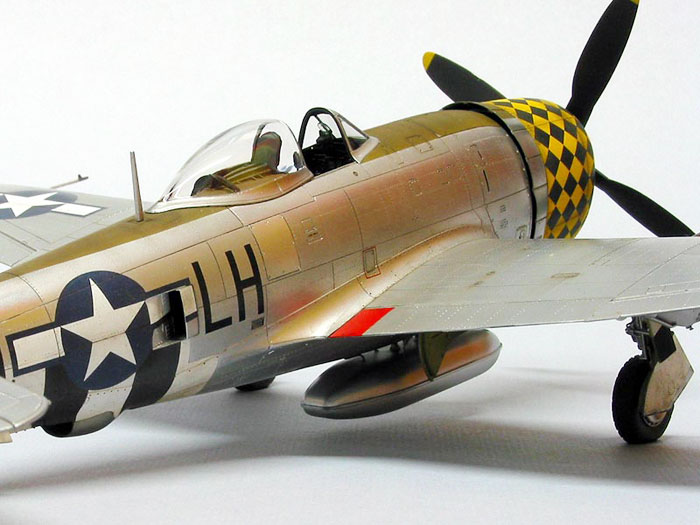
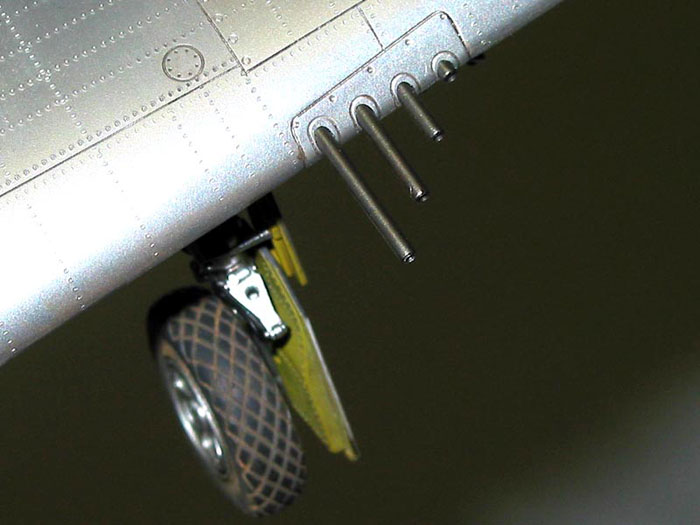
The gear legs and the hubs of
the Ultracast wheels were airbrushed with Alclad II Duraluminum and
treated to a Future and ink mix to highlight the detail. The tires were
brush painted Aeromaster tire black and then dusted with MiG pigments
European dust. The treads were blackened by applying Smoke Black pigment
to them with my finger. About 0.5mm had to be trimmed off the ends of the
axle shafts in order to fit the resin wheels. Aside from that, the fit of
the wheels was so good that all that was necessary to attach them was a
small amount of Future applied to the join. Brake lines from fine solder
finished off the landing gear.
If it weren’t for the fact that
there was a minuscule amount of play in the fit of the gear legs into the
wings, I would have not bothered to glue them on. As it was, a bit of
liquid cement was all that was needed to ensure a solid assembly.
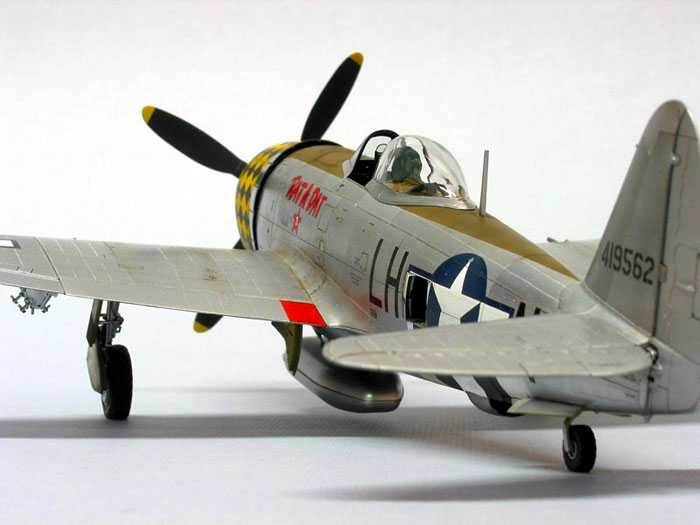
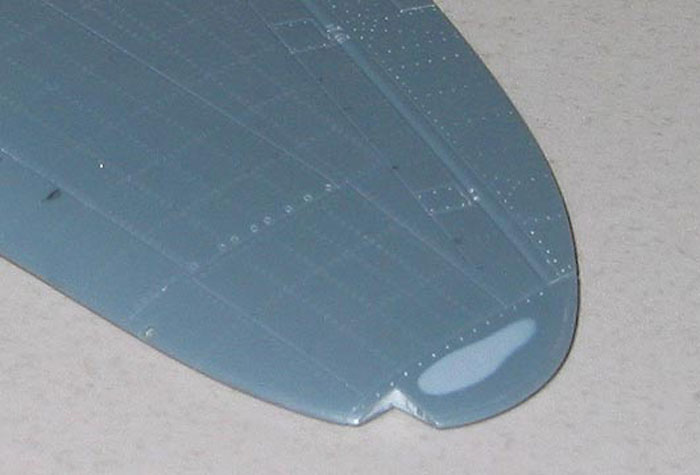
The belly tank and wing pylons
were primed with Future and sprayed with Alclad II white aluminum. The
wingtip formation lights are molded separately and feature little dimples
for the bulbs. These were painted clear red (left) and clear blue (right)
and attached with Future. Even though right hand wing tip lights on all
aircraft are green when illuminated, a close look at an unlit starboard
bulb reveals that they actually appear blue. Tamiya’s painting directions
capture this little detail correctly.
The machinegun barrels provided
with the kit are cleverly molded without any seam lines and a nice deep
dimple at the muzzle end. I drilled them out to give them a bit more depth
and painted them Alclad II Steel. Once more, the fit was so precise that
all that was required to hold the barrels in place was a teeny amount of
Future brushed around the base of each tube.
To highlight the panel lines I
applied a wash of dark brownish grey mixed from burnt umber, black and
white Liquitex artist’s acrylics, thinned with distilled water and a good
dollop of dish detergent. The detergent is needed to reduce the paint’s
ability to adhere properly, allowing the excess wash to be wiped away with
a clean, damp paper towel.
To give the model a grubbily
operational appearance, a mixture of MiG Pigments’ European Dust and Smoke
Black was brushed around the gear doors, wing roots, access panels and so
forth. I poked and prodded at the pigment with a damp Q-tip to achieve the
final appearance.
Post-shading of the anti-glare
panel was done with the same mix of pigments applied to the panel and
rivet lines and blended with a short, stiff paint brush.
Once
more, Tamiya has produced a kit that is as close to foolproof as possible.
While
a bit more complicated that the Razorback due to the upper fuselage
insert, it is nonetheless an exceptionally easy build with few, if any,
vices. Whether you choose to do it out of the box or with some added
extras, whether you are a novice or experienced builder, you would really
have to make a conscious effort to make a bad model out of this kit.
Click the
thumbnails below to view larger images:
Model, Images and Text Copyright ©
2003 by Tony Bell
Page Created 05 December, 2003
Last Updated
17 March, 2004
Back to
HyperScale Main Page |
 Home |
What's New |
Features |
Gallery |
Reviews |
Reference |
Forum |
Search
Home |
What's New |
Features |
Gallery |
Reviews |
Reference |
Forum |
Search