|
P-51B Mustang
by
Ken
Stanton
 |
|
North
American P-51B Mustang
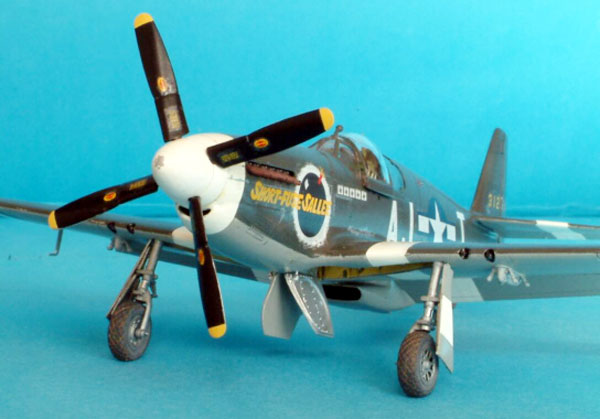
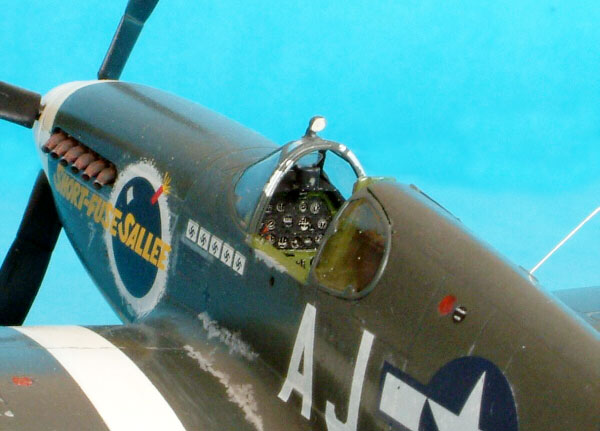
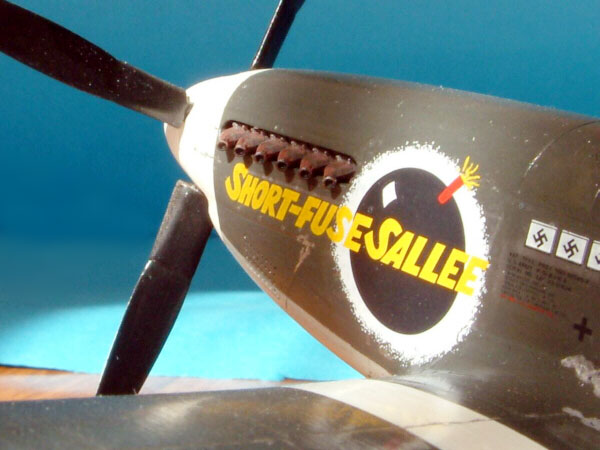
"Short Fuse Sallee" |

Tamiya' s 1/48
scale P-51B Mustang is available online from Squadron.com
This is Tamiya's 'RAF Mk III' Mustang (AKA a P-51B
with a Malcolm hood) in 1/48th scale. It is one of the best
engineered kits I have made in quite a while. I'm not sure I have done it
justice it many areas.
I completed it as Capt. Richard Turner's "Short-
Fuse Sallee" from 356FS / 354FG of the 8th Air Force.
Before I comment on the one area of criticism that I do
have for the kit, I'll list the areas where I think I could have done better.
- Painting
of white areas: Thought I'd be smart and do this first and mask off later. As
a 'brush painter' getting an even coverage of Humbrol matt white over the dark
grey plastic took several coats and obscured some fine detail. I managed to
offset this by re-scribing between coats but I missed some around the nose.
Next time I'll use a spray can of white primer.
-
The 'sit' of an aircraft is important. I spent so much time
trying to ensure that the wingtips were level I lost the plot a little and
I've got some forward rake on the u/c legs. Araldite doesn't allow for a
second go at that one!
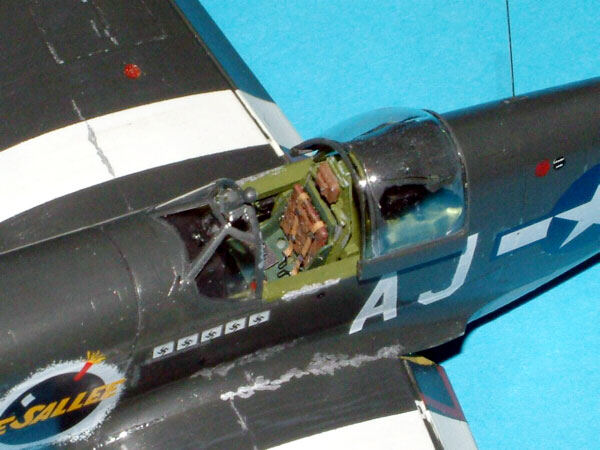
- Check
alignment FIRST, especially with aftermarket parts. The end result of the
cockpit looks really good but I was lulled into a sense of false security by a
good looking resin set. The side panels do not align. Result: a 2mm cut into
one side to straighten up the instrument panel and a seat that is too far
forward. Are they on runners like a car? Thought not, no escape there then!
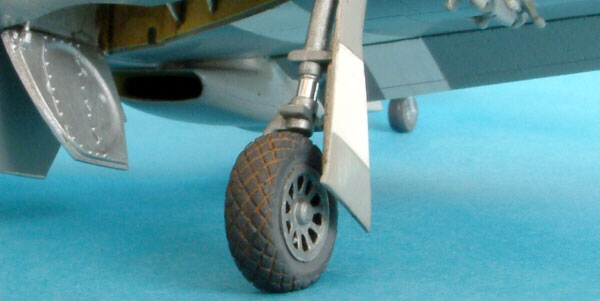
- The u/c
legs look a bit bare. The addition of brake lines would help here.
- Decals. I
could not get them to conform to some features despite multiple applications
of Micro Sol and Micro Set. I could not find in Plane Talking any reference to
anyone else having this issue with this manufacturer's decals so I accept that
I probably need to do something different.
As I said, this is a very nice kit.
Assembly was a dream with just a little filler required
under the nose and under the rear fuselage. I'm no Mustang expert so I won't
comment on its overall accuracy. It looks very good when complete. My only gripe
would be the canopy. The Malcolm hood is moulded in one piece with the
windshield and when I separated it I found (as others have too, I suspect) it
does not fit over the fuselage spine in the way it should. I managed to widen it
a little with boiling water and a spreader but it still looked wrong so I
extended it to emulate the runners. I'm not happy with it. A Squadron vac form
part will fix that at a later date.
I started by removing the ailerons, elevators and rudder
from the kit parts and creating the grooves where required for Ultracast parts
to attach. I also thinned down the edges of the aileron shrouds in the wings.
I then moved to the Aires cockpit. This is a very detailed
set. The casting is very crisp and the etched parts are far finer than my
eyesight can cope with. The carpet manages to swallow them OK though. All resin
parts were sprayed with a grey cellulose primer and Humbrol enamel used to
finish. The cockpit parts were assembled and also attached to the kit using a 5
minute epoxy resin (Araldite®). For what followed I'm glad I used something
substantial. The quality of the casting, which includes cutouts that locate
beautifully on Tamiya's cockpit sills, leads you to just apply them directly to
the fuselage sides. I did just that and when I offered up the floor (with the
instrument panel attached) it was 2mm out on one side. I should have checked, I
know, but I would argue that with this level of expertise in the product I
shouldn't need to. A little shaving to make a good fit is acceptable; I would
say removing 2 mm of material isn't.
The instrument panel etched part is exquisite and the
acetate sheet has the instruments finely printed and also includes the reflector
sight glass with its support frame printed on it. Cutting that out was a
challenge for me! I painted the rebate in the resin panel with gloss white,
dropped the trimmed acetate on to it and lined it up while the paint was still
wet and left this overnight to dry. I ran a fair amount of gloss varnish into
the rebate over the acetate. I dropped the etched panel (previously painted
black and gently 'distressed' to show the metal on the edges of the bezels) into
the wet varnish and pushed on the panel until the varnish partly filled the
instrument apertures and left it to harden. The end result was quite impressive.
When I came to attach the lower wing panel I was prepared
to have to 'fettle' the underside of the cockpit floor but not as much as was
finally necessary.
I have a set of scrapers (clay modeller's tools I think
they are) that I used to remove the resin from the cockpit floor. Had this part
not been firmly fixed to the kit there was no way it would have survived this
amount of punishment. By the time I got the lower wing to fit to the fuselage
the resin looked grey where the black paint was showing through and the upper
part of the wheel bay was wafer thin. This is 'close to the edge' stuff. Perhaps
some artistic licence on scale accuracy could be employed to compensate for the
thickness of the kit parts. If a specific kit is the recommended companion for
an aftermarket set I would expect not to have to almost destroy a part of that
kit to make the set fit. Not a rant, but a personal observation.
From then on the build was fairly straightforward. Any
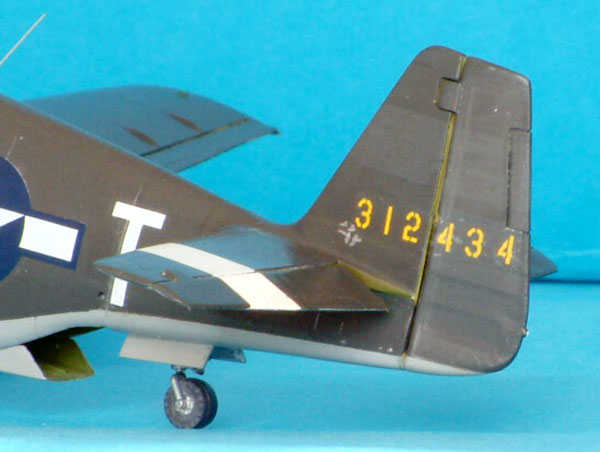
glitches in the assembly were down to me. The decal sheet from Tally Ho shows
Capt. Turner's machine as having a whip aerial. My only reference for its
location was a 1972 Scale Models article with a P51B Plan View. This showed the
location for the attachment plate but stated this could be on either side of the
fuselage. I looked at some pictures of typical aircraft and they all seemed to
be on the starboard side. I made a small oval plate and glued it to the fuselage
side. When dry I drilled it to take a short section of plain guitar string (a B
string from an Ernie Ball Regular Slinky set for those who know about these
things - 0.013" or 0.33mm for those who don't).
I opted to reposition the control surfaces so I obtained
replacements from Ultracast along with exhaust pipes, wheels and cuffed prop
blades.
The quality of Ultracast's products is excellent. I've
used them before and would recommend them without reservation. The picture of
the exhaust pipes for this kit shows more than I could say; I used the
non-shrouded ones (you get both types!) because they look so good. The
control surfaces fitted very well. The longest job was filing the recess for the
elevators in the trailing edge of each horizontal stabiliser. The wheels look
convincing and aren't overly flattened.
For the paint scheme I used Humbrol No. 66,
which is quoted as an equivalent for Olive Drab 42, and No. 64 for
Neutral Gray. The OD came up quite dark after varnishing but as many machines
were polished it seemed OK to me. The discussions over the correct hue for OD
are beyond my depth of knowledge so I'll make no other statement. The aircraft
(except for the prop blades) was then brush coated with Humbrol clear varnish.
Short-Fuse Sallee's markings came from Tally Ho's P51
Mustang Aces Pt1 and the documentation that came with them was sufficient to
place each decal accurately. One area where I had to resort to Plane Talking was
with the signalling lamps under the starboard wing and was the Star & Bar
repositioned to avoid them? Within a few hours I had the answer, this is a Block
1 airframe and it didn't have signalling lamps! Great place is HyperScale.
Can't recall the gent's name but "thank you".
Only one genuine gripe was the slight white line around
part of the dark blue centre of the Star & Bar. I took the first one off the
plane in the hope it was the only one but they are all the same. I could have
edged them with OD or NG to cover it but I felt there was a risk I would spoil
the clean edge of the blue so I lived with it. I suffered quite badly with
silvering. It is evident in picture of the propeller blades yet these had been
sprayed with car cellulose paint and were super glossy! I used Micro Set
and Micro Sol. The final coat was Micro-Flat, again brush painted.
This kit was my 'get back into it' project and I was
determined to finish it before I started something else. I'm already
more than half way into an Eduard Tempest V.
Note to Jim Kiker, I still have the PRXIX Spitfire
to finish. It will get done.
Model, Images and
Article Copyright © 2003 by Ken Stanton
Page Created 19 October, 2003
Last updated 17 March, 2004
Back to HyperScale Main Page
Back to Features Page |
 Home |
What's New |
Features |
Gallery |
Reviews |
Reference |
Forum |
Search
Home |
What's New |
Features |
Gallery |
Reviews |
Reference |
Forum |
Search