|
North
American P-51D-15
by
Cesidio Bonanni
|
 |
|
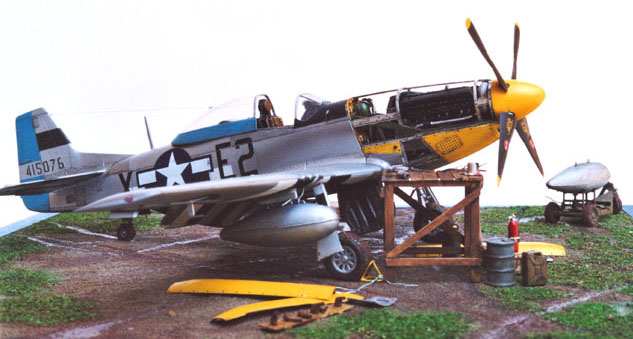
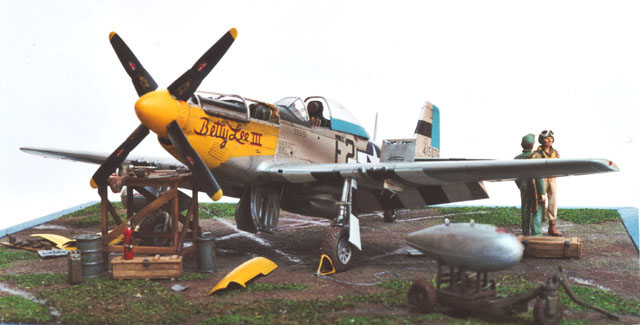
North American P-51D-15
Mustang
“Betty Lee III” - S.N. 415076 - Flown by Ft. Lt. William T. Kemp
(DFC)
8th A.F. - 375th Fighter Squadron - 361st Fighter Group - Little
Walden - England (1944) |

Tamiya's
1/48 scale P-51D Mustang is available online from Squadron.com
Commercial Kits and Accessories
•
Tamiya 1:48 Mustang
•
Aires cockpit set (resin/photoetch)
•
Aires landing gear bay & doors (resin)
•
Aires gun bay & doors (resin/photoetch)
•
Falcon vacuform canopy
•
Aires RR Merlin engine only (resin) (NOT THE WHOLE DETAIL SET)
•
Verlined engine firewall/oil tank (resin)
•
True Details resin wheels
•
Aeromaster decal sheet (Aces of the 8th - pt. 2)
•
Revell airport accessory set (bomb/fuel tank trolley only)
•
Unknown brand metal figures
Enamel Paints
•
Printing silver paste & Humbrol thinner (Unknown brand)
•
Testors MM (Zinc Chromate primer)
Acrylic Paints
•
Tamiya (flat yellow, gun metal, flat aluminium, flat white)
•
Gunze Sangyo (Interior green, Tire black)
•
Vallejo Air (Matt, Satin & Gloss clear. ABSOLUTELY GREAT!)
•
Citadel (Mithril Silver, Chainmail, various washing inks)
•
Lifecolor (crew uniforms, olive drab).
I’ve always loved Mustangs
but I’m aware that, thus being a wonderful plane, it’s surely not an
original subject to build.
The fact is that I began
building model planes only about four years ago (this is the third plane
I build and I needed about 20 months to complete it! Whew!) and I wanted
to try a superdetail-resin-photoetch-natural-metal-finish-diorama
challenge for my first Mustang.
I won’t describe the whole
job in detail. That will be too long and too boring, but I’ll list the
main modifications I made to the Tamiya kit which is a wonderful kit to
start from.
For the NM finish, I asked my
printing technicians (I’m a graphic designer) to lend me a bottle of
silver printing paste. I tried it, and it’s great!
1)
First I designed
the whole diorama and its elements (sizes, positions, etc.)
2)
Many experiments
done with the silver printing ink for the NM finish.
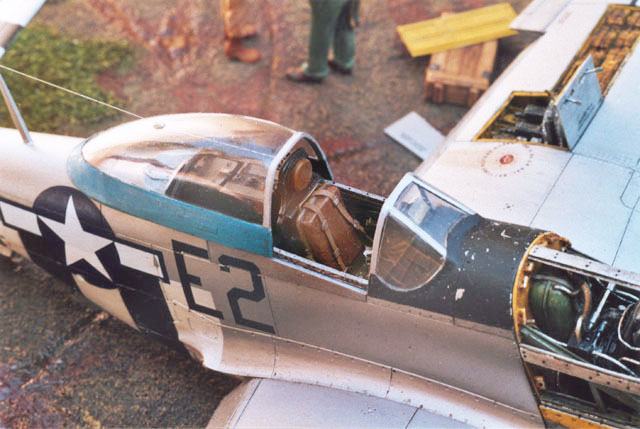
3) The Cockpit
• To
fit in correctly the Aires cockpit, you will have to sand the inner
sides of the cockpit until they’ll become almost transparent.
Click the thumbnails below to view larger images:
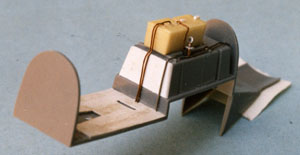 •
The main cockpit piece (floor+tank+radio & battery) is worse engineered
than the Tamiya one but radio and battery are great. I cut them off and
cyanoglued them to the Tamiya piece. I added some metal wiring and
scratchbuilt the gauge on the top left side of the fuel tank. Then I
made the fuel line running from the fuel tank to the door on the left
side of the fuselage. •
The main cockpit piece (floor+tank+radio & battery) is worse engineered
than the Tamiya one but radio and battery are great. I cut them off and
cyanoglued them to the Tamiya piece. I added some metal wiring and
scratchbuilt the gauge on the top left side of the fuel tank. Then I
made the fuel line running from the fuel tank to the door on the left
side of the fuselage.
•
The cockpit floor (wooden in the real thing) was roughened with thinner
then sanded.
•
Instrument panel and control stick were assembled as per Aires
instructions. The gunsight was improved with transparent film reflection
glasses, glued with Crystal Klear.
•
Aires photoetched seatbelts added to the pilot seat. I drilled a small
hole in the back of the headrest to fit in the antenna wire (extra-thin
naylon fishing line). Where needed, I added metal wiring, instrument
handles, etc.
•
All the cockpit parts were airbrushed and oil washed with dark burnt
umber. A small drop of Vallejo Air gloss clear into the intruments’
frames made the glass.
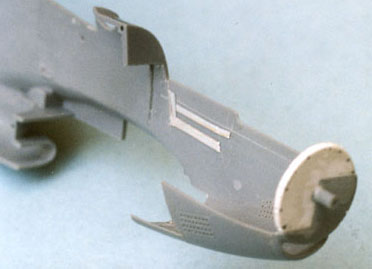
4)
I added the thin
vertical blade in the middle of the belly radiator scoop.
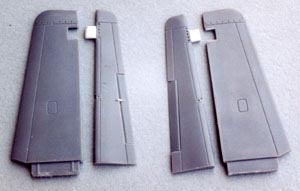
5)
The Wings:
• As
in the cockpit, the wings’ inner sides will need to be sanded for a
long, long time to fit in the Aires front gear bay.
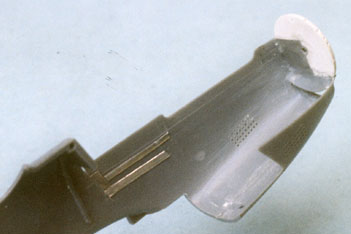
•
The landing light from Tamiya was grinded with a mini-drill, the inner
side painted chrome silver, then it was filled with clear epoxy glue to
simulate the glass.
•
Left wing’s top was cut to fit in the Aires gun & ammo bay.
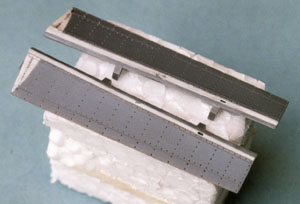 •
The Tamiya flaps were modified (with plastic sheet) at the wing root and
at the front side to be correcly shown in the lowered position. •
The Tamiya flaps were modified (with plastic sheet) at the wing root and
at the front side to be correcly shown in the lowered position.
•
The machine guns’ barrels were cut and replaced with pieces of medical
needles.
•
The sway braces under the bomb/tank racks were cut off and replaced with
pieces of flattened metal wire.
• I
added metal wires to simulate the fuel line to/from the right drop-tank
•
The wingtip position lights were drilled and rebuilt with a drop of
clear epoxy glue. Finally painted red (left) and blue (right) with
Citadel Inks.
•
The three signal lights under the right wing were drilled. The inner
side of the top right wing was painted chrome silver. Then, after the
final NM finish, I added in each light’s hole a big drop of clear epoxy
glue and tinted each light with its correct color with Citadel Inks.
6) Landing Gear:
•
The oleo’s damping scissors were emptied with a mini-drill.
•
The two towing rings on the outer side of the leg tips were made with
metal wire.
•
The brake lines were made with fishing lead wire.
•
The rear gear leg was cut to eliminate the plastic wheel, and reshaped
to fit in the resin one (True Details).
•
The rear gear bay was detailed with metal wiring and with the the two
small metal arms connecting the leg and the bay doors.
• As
the True Details resin wheels are flattened, they were fixed AFTER
glueing the legs in the bay holes.
•
The resin gear doors are from the Aires landing gear set.
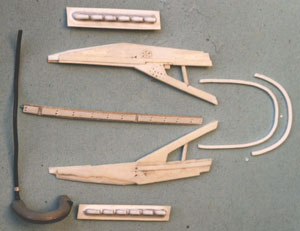
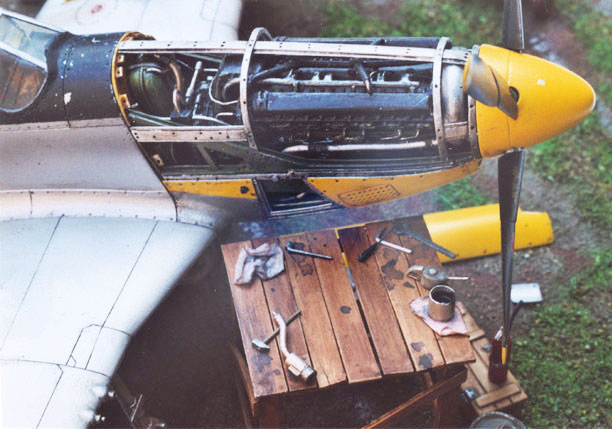
7) Engine Compartment (the toughest
job)
• (A
friend of mine allowed me to take a close look to the Aires detail set
for the whole engine compartment, and IMHO it’s not as accurate as it
could be, especially the resin engine chassis. So, apart from the Merlin
itself and the firewall/oil tank, I scratchbuilt all the stuff)
•
With a new blade cut off the four cowling panels, leaving the one on the
left side to show the ”Betty Lee III” decal), and made them as thin as
possible with mini-drill, cutter and sandpaper. The fixing screw holes
were drilled.
•
The nose intake duct was scratchbuilt from plastic.
 •
The Aires RR Merlin (perfect) was detailed as needed with metal wire. •
The Aires RR Merlin (perfect) was detailed as needed with metal wire.
•
The Tamiya engine exhausts (left side) were drilled and fixed to their
mounting plate (aluminium sheet). The ones on the right side were
drilled on both tips and separated to be shown disassembled on the
ground besides the plane.
•
The Verlinden resin firewall and oil tank (a gift from a friend. Thanks
Giampiero) was detailed with metal tubing and aluminium belts.
•
The cowling mounts were scratchbuilt from aluminium plate and plastic
sheet.
•
The ring-shaped tank behind the propeller was scratchbuild from sprue.
Click the thumbnails below to view larger images:
 8)
I cut the elevators, rebuilt the indent and I glued them lowered. 8)
I cut the elevators, rebuilt the indent and I glued them lowered.
9) The Canopy:
• To
simulate the difference between perspex and metal, the lower band of the
canopy was covered with aluminium tape and sanded.
• At
the canopy top, I glued a small teardrop-shaped bit of plastic (the wire
roller). After drying, it was drilled through, allowing the antenna wire
to reach the tail tip.
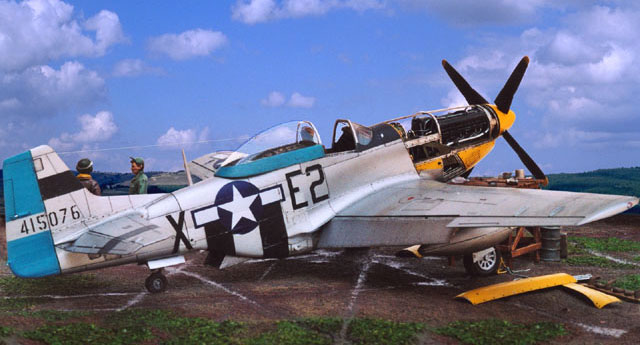
10) Finishing Touches
•
The plane was entirely painted BEFORE painting and assembling the whole
engine cowling mess.
•
The silver printing ink is a bit messy to use but IMHO it’s worth the
time. It comes in a dense and shiny paste (heavy as toothpaste) and
obviously it needs to be very well thinned and stirred before using it
with your airbrush. I gave the Mustang three coats (wait at least one
hour between each cover) the result was a SHINY and tough surface. Wow!
Obviously, like in all NM finishes, the plane has to be sealed, polished
and cleaned perfectly before airbrushing.
•
Then I masked and painted the invasion stripes, the black stripes on the
tail, the anti-glare panel, the blue rudder, and the yellow cowling
panels.
•
Some NM panels were masked and darkened with a very diluted mix of
Tamiya’s gun metal (9 x thinner/1 x paint). As you can see, NONE of the
wing panels were darkened, as in the real thing the wings were NOT left
in NM finish but painted with a silver finish.
• As
ANY kind of clear varnish literally KILLS the natural metal effect, I
tried not to use it before applying the decals. If the decals had to be
placed on acrylic-painted zones (fuselage sides, left engine cowling,
etc.) I painted them with a thin coat of Valleyo Air Clear Satin.
•
Then, with Gunze Sangyo’s Mr. Mark Softer, I applied Aeromaster’s
stencils and decals.
• To
simulate paint chipping, I scraped the acrylic-painted zones (where
needed) with a toothpick’s tip. The silver printing ink is really HARD,
so don’t worry, only the acrylic paint will peel off.
• I
weathered the Mustang with a Dark Burnt Umber oil wash. I used a more
brownish tint for the stains at the fuel tank doors.
• I
airbrushed oil and smoke stains were needed (belly, fuselage sides,
wings).
11) The Diorama
•
The base is 5 mm plywood. It was covered with a thin and irregular coat
of real soil, sealed with vinylic glue, then airbrushed. Same job for
the railway modeling grass.
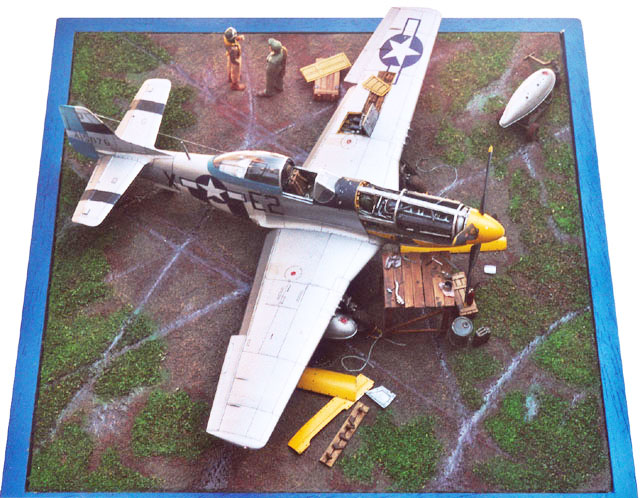
•
When everything was dry, with a big screwdriver, I dug the wheel signs,
painted them with a darker mix of brown and, finally, brushed-in the
Vallejo Air Clear Gloss to simulate water and mud.
•
The wooden structure and all the tools (screwdriver, hammer, wrenches,
rags, oil cans, etc.) were scratchbulit from plastic sheet and metal
wire. Wooden crates, jerrycans, gas tanks, came from my spare pieces
box. The fire extinguisher was scratchbuilt.
•
The Revell bomb/fuel tank trolley was detailed scratchbuilding the
hydraulic system mechanism.
12) Weathering
As you
can see this Mustang is DIRTY.
It’s a pity for its shiny
duraluminium finish, but that’s life ... Surely it could be criticized
for its dull finish (someone already did ...), but we all know that
these planes were flying from dusty/muddy airfields and all the
photographic reference show that almost all NM Mustangs flying over
Europe were matt-looking, oil stained and dirty.
IMHO, ground crews didn’t
waste precious time washing and buffing these planes. For example, the
famous colour shot of the four “yellow jackets” flying (leaded by Col.
Christian’s “Lou IV”) was planned and made for propaganda purposes:
before taking off, they were washed and polished to be photographed from
a 91st BG B-17 in July 1944!
Anyway, I hope you'll like my
Mustang.
I wish
to thank HyperScale's crew and all the guys that show their wonderful
models on the Web.
It's a
continuous challenge.
Keep
on modeling!
Click on the thumbnails
below to view larger images:
Model, Images and Text Copyright ©
2003 by
Cesidio Bonanni
Page Created 19 September, 2003
Last Updated
17 March, 2004
Back to
HyperScale Main Page |
 Home |
What's New |
Features |
Gallery |
Reviews |
Reference |
Forum |
Search
Home |
What's New |
Features |
Gallery |
Reviews |
Reference |
Forum |
Search