|
P-59A Airacomet
by Rob Woodbury
|

|
|
P-59A Airacomet |

Hobbycraft's
1/48 scale P-59A Airacomet is available online from Squadron
Inspiration leads to perspiration
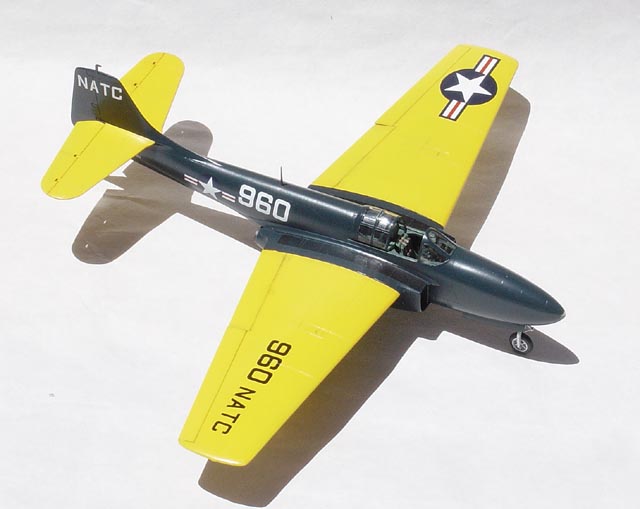
It’s not happened often to me but I bought the Hobbycraft P-59A Airacomet
at a recent club meeting and felt inspired enough to start on this kit
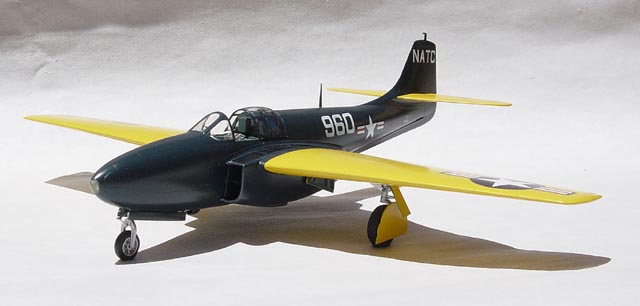
right away. Being something of a fan of US Navy aircraft I really wanted
to build the aircraft and finish it in the interesting dark sea blue and
yellow Naval Air Test Centre (NATC) scheme.
Detail Sets
For some odd reason the True
Details resin sets were available here in Australia prior to the arrival
of the Hobbycraft kits (due late Nov 2003). This was a bonus since the
detail sets would be easy to come by. True Details produce two sets for
the P-59, a cockpit detail set and replacement wheel set for those who’d
rather not use the rubber tyres provided in the kit.
The True Details cockpit set is very well detailed and worth the money, it
improves the model considerably. The cockpit sidewalls are beautifully
rendered and thoroughly detailed. The instrument panel and the remaining
cockpit details (floor, seat, and gun-sight) are well done. Careful
painting and dry-brushing will bring out the details beautifully.
The wheel set is also very nice. There are two nose gear wheels- one with
and one without a cover over the wheel. The main wheels are well detailed
and the tyres are bulged and have a very nice diamond tread pattern. The
overall quality is very high. No complaints here.
Cockpit
Construction started with
painting, assembling and detailing the cockpit area. Following the colour
recommendations that come with the TD set and other reviews I set about
painting it the required Testors Model Master “European Green” FS 34092. I
then dry-brushed the raised detail with Testors Model Master “Green Zinc
Chromate” followed by a final dry-brush with metallic powder. This gives
an effective lived-in appearance. This finish was applied to the cockpit
sidewalls, floor and seat. The raised moulded detail in the kit was
removed and the new resin parts put in place with CA glue.
The True Details resin parts are so well designed that they just slip in
to place once the kit sidewall detail is removed, no thinning or other
adjustments are required. The new cockpit floor was put in place and the
fuselage halves were closed up. I had also taken the step of gluing the
tail section to the forward fuselage halves prior to gluing them together.
The rest of the construction then progressed normally. The kit parts fit
together beautifully and there is minimal seam to deal with.
A Mystery...
Curiously, the kit
instructions fail to mention the intake splitter plates. These are
included in the kit and are shown in a drawing on the instruction sheet
but no mention of which one goes where…

After a bit of dry fitting and experimentation and using other reviews as
a guide I came to the conclusion that part 18 fits on the fuselage left
and part 20 on the fuselage right. Two further jobs to do at this point-
the splitter plates need to be thinned and a thin strip of plastic glued
to the back to keep the splitter plate away from the fuselage. The
splitter plates were then glued in place. I realised at this point that
the top and bottom of the splitter plates do not blend with the top and
bottom of the wing as the real ones do. However, I didn’t feel that the
extra time and effort was warranted to correct this.
Wings
The wings were tackled next.
The wings, on the whole, fit together quite well. As suggested in other
reviews I removed the locating pins to make fitting the halves a little
easier. The top of the wheel wells needs to be thinned somewhat to allow a
better fit of the flaps. The flaps and ailerons were attached next. In my
opinion these are the worst fitting parts of the kit and, although I may
be mistaken, it also appears that the flaps are indicated the wrong way
around on the instructions even though they can only fit one way. Even
following numerous dry fits of the parts I was unable to achieve a good
fit and some large gaps were apparent. I finished up by filling these with
plastic strip and achieved an acceptable finish.
The ailerons were next. I decided to concentrate on ensuring a good fit to
the top of the wing since the reference photos I have seem to indicate
fairly large gaps on the underside of the real thing anyway.

The intake trunk was next. I had two choices here. To either blank off the
intake or to leave it open and put a piece of card over the gap to prevent
a view down in to the wing. Blanking off the intake proved to be very
difficult due to the shapes and different diameters within the intake. I
then placed a blanking card over the wing hollow and proceeded to paint
the intake area (wing and fuselage) Testors Model Master “Dark Sea Blue”
FS 15042.
Wings to fuselage, tail surfaces and other odd jobs.
On the whole the fit is very
good. With little to do in the way of clean-up of the joints, most of that
is limited to the bottom of the fuselage. The top join is well hidden by a
fillet that runs the length of where these two surfaces meet. Well thought
out Hobbycraft.
The tail surfaces fit was a little less inspirational but nothing a few
minutes with sandpaper couldn’t fix. To ease attachment of these surfaces
I removed the location lugs and butt joined the surfaces using CA. The
moveable tail surfaces were glued in place next.
The ventral spine was attached next and to finish off, the forward and
rear sections of the canopy were glued in place using white glue as was
the clear nose section. The forward section of the canopy required some
sanding and filler to improve the fit.
The painting was undertaken
next using Testors Model Master paints. Following the kit box painting
guide the wings and horizontal tail surfaces were sprayed using Gloss
Insignia Yellow or “Chrome Yellow” FS 13538. A number of coats of yellow
were required to give a good depth of colour.
Allowing a day to dry the yellow areas were masked off and Gloss Dark Sea
Blue FS 15042 sprayed over the remaining areas. Only a couple of light
coats were required to give the blue good depth of colour.
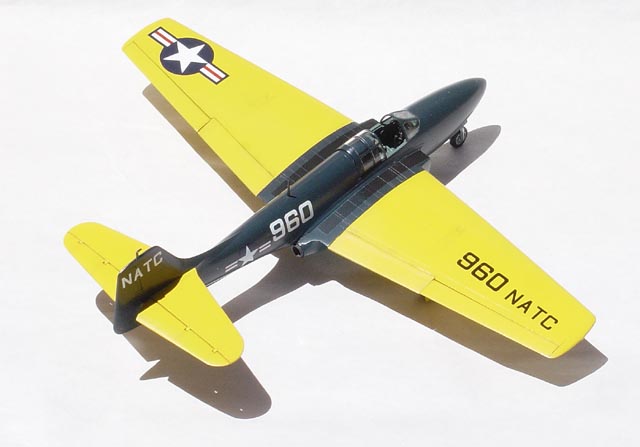
Decals and more mysteries
Despite my best efforts I
was unable to find a single photographic reference of the NATC’s P-59.
This proved to be somewhat frustrating as I examined the decal sheet and
discovered a set of white markings that were not mentioned at all on the
painting and decal guide. My only option was to use as a guide the NATC
P-59 featured on a well known resin model manufacturer’s web site. Now the
doubts crept in since that P-59 featured a blue tail versus a yellow one
as I had painted. Further research in the Monogram US Navy painting guide
left me with the feeling that a yellow tail was a good possibility, so
yellow it would stay.

Applying the decals finished up being an exercise in itself. On the whole
the decals are fine. They are a little thick and require the use of a
strong setting solution to get them to respond to the panel lines. But the
real problem came when I discovered that a portion of my decal sheet
lacked the release agent. The decals had been pretty much printed on to
the paper. Blast! As it turned out the thickness of the decals were their
saving grace as I was able to carefully float the decals free by using a
paintbrush to slowly lift then from the paper backing. This seemed to have
affected close to half the decals I need to use on this kit. No one else
has reported this problem so it may have affected my kit only.
All up the decals were applied in 90 minutes.
Weathering and Varnish
Normally I don’t like to over weather my
models so I applied a small amount of dark brown pastel chalk weathering
to the flying surfaces, walkways, cockpit and engine exhaust areas. The
model was then varnished using Testors Model Master Semi-Gloss varnish.
The last few jobs were to add the landing gear and a few detail parts to
the cockpit. Again relying on other reviews I took the step of shortening
the main landing gear by 3mm in length, this contributes to giving the
aircraft its tail-low appearance. I also removed the top locating pin on
the main gear used, I think, to help locate one the gear bay doors. This
allows the gear door to be fit more easily.
Did I enjoy building this model? The answer is yes. But I have to say that
Hobbycraft haven’t done themselves any favours by the number of simple and
silly mistakes that I came across in this kit. Just fixing the instruction
sheet and decal/marking issues would make life a bit easier.
Model, Images and Text Copyright ©
2003 by Rob Woodbury
Page Created 13 November, 2003
Last Updated
17 March, 2004
Back to
HyperScale Main Page |
Home |
What's New |
Features |
Gallery |
Reviews |
Reference |
Forum |
Search