|
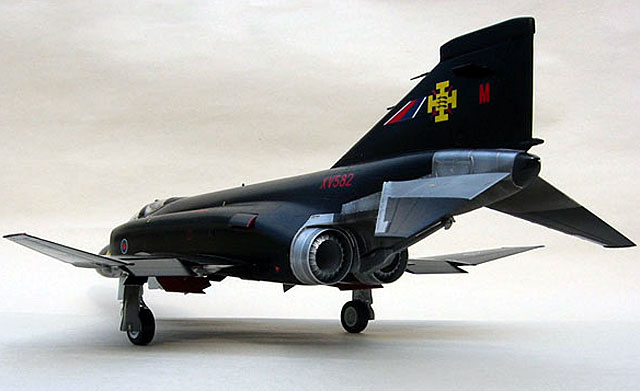
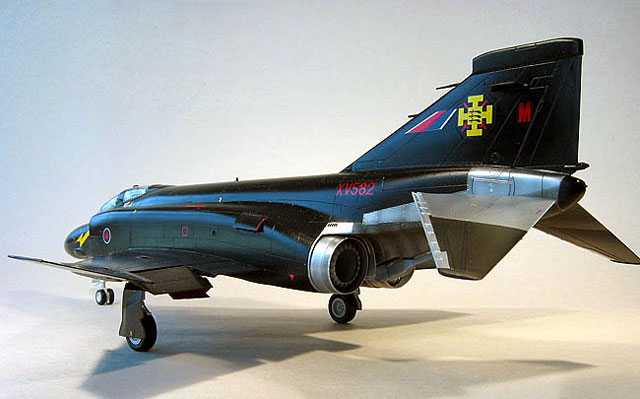
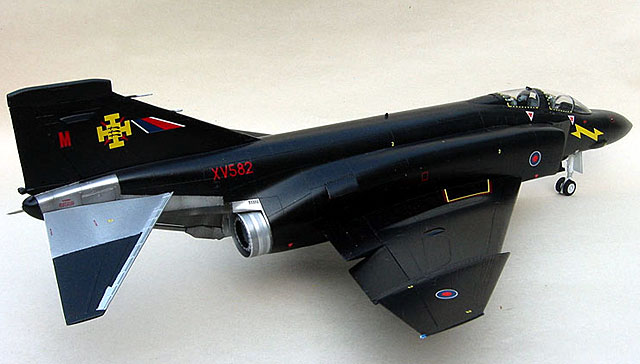
Phantom FG.1
by Mike O'Hare
|
 |
|
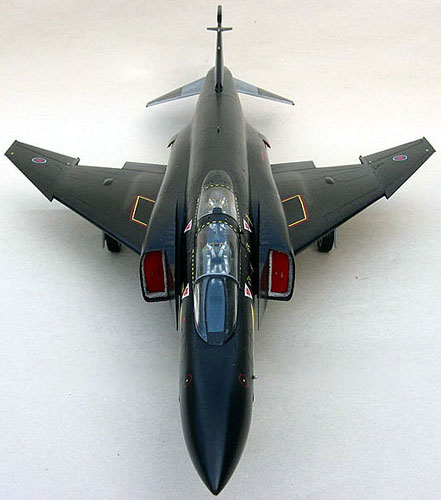
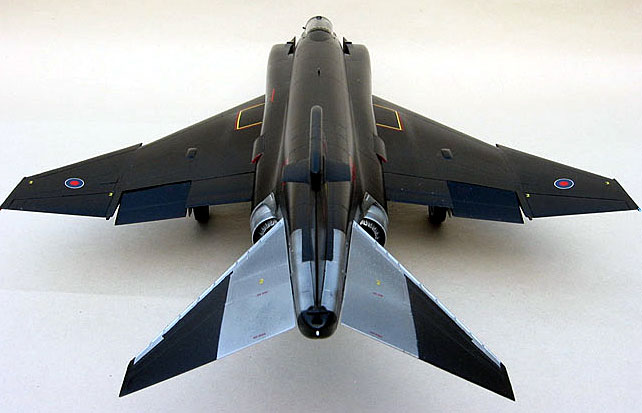
Phantom FG.1 |

HyperScale is proudly supported by Squadron
Hasegawa's series of 1/48
F-4's are classics that truly raised the bar when first released some
twenty years ago. Perhaps the best measure of how good they were is the
fact that they are STILL excellent kits today.
They're certainly the best
kits of the Phantom in 1/48, arguably the only one worth building in the
scale, and their family is one of the most complete ranges of F-4's in any
scale - the only major versions Hasegawa haven't released yet are the
recce RF-4s, though the RF-4B and RF-4E are coming soon. It is also
possible to convert their B/N, C/D and E kits with the Black Box noses in
the mean time.
The kits themselves have something of a history. The original release was
the F-4J, which had raised panel lines throughout. Not long after, a
high-tech version of the kit came out, which was re-tooled to include
recessed panel lines. At present, the F-4E, F-4EJ (and Kai), F-4F, F-4G,
F-4J, F-4K, F-4M and F-4S all have recessed panel lines, and only the
thin-winged F-4B/N and C/D kits have raised panel lines. Each release
includes parts specific to the version it's meant to represent - slatted
or hard wings, slotted or unslotted stabilizers, different radomes, gun
configurations and forward fuselage plugs. The British Phantom kits share
only the cockpit/main landing gear sprue with the rest of the series; the
whole of the airframe proper was re-tooled to accurately depict the
changes, both major and minor, for Spey-engined aircraft. The kit in this
review is from an SP release of Hasegawa's FG.1 - the basic kit, plus a
set of Cartograf printed decals to model "Black Mike", one of the farewell
schemes. It's also available in two regular releases, for RN Phantoms in
Extra Dark Sea Grey over white, and later RAF aircraft with markings for
the Barley scheme. The FGR.2 is largely the same again, save for the
decals.
Click the thumbnails below to view larger
images:
Simple Scratchbuilding, Pt.1
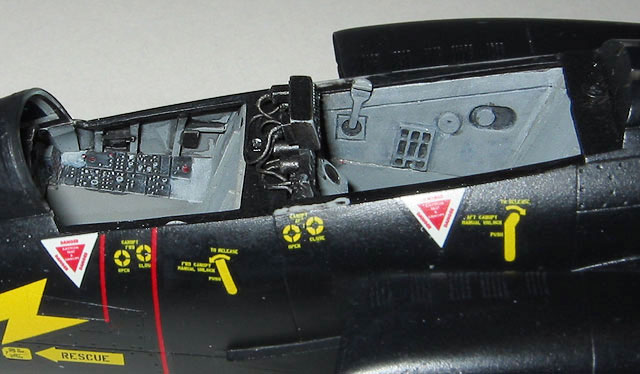
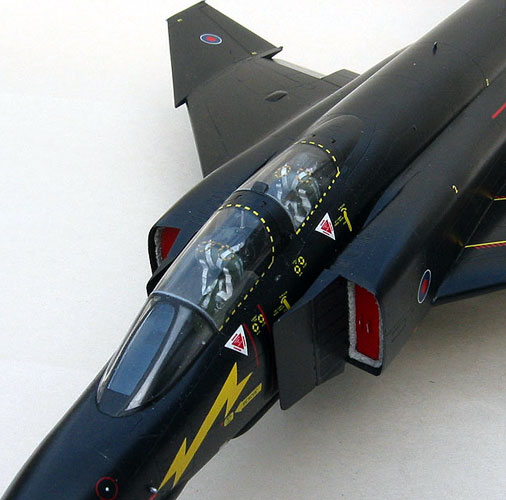
Construction begins, as with most kits, in the cockpit. Hasegawa is known
for decent, though not spectacular cockpit detail, and this kit is no
exception. It looks good straight from the box - particularly the tub
itself, though the five-part seats are nice too - but the detail fans will
want to either scratchbuild or opt for a resin replacement. As I intended
to close the canopies, going all out with a resin cockpit seemed a bit of
a waste, so I opted to just do a bit of scratchbuilding on the sidewalls.
These, as with most models, are the weakest part of the kit's cockpit.
They have some raised detail, but it's very faint, undersized and
unspectacular. At the very least, some ribbing can be added with strip
styrene. I went a bit further, adding details with sheet and rod styrene,
essentially just trying to duplicate (more or less) the basic shapes using
the sidewalls from a Black Box F-4E cockpit as a sort of 3-D, scale
reference. I also added a simple attempt at a throttle - the corners were
rounded over on a section of strip styrene and a line scribed to give the
impression of two halves, it was then painted, lopped off the strip and
glued in place. Finally, I added True Details seats - not strictly correct
for the British Phantoms, but close enough for me.
Click the thumbnails below to view larger
images:
It's Shake and Bake, and I Helped
Construction of the rest of the aircraft is really pretty straightforward
and the model clicks together with little or no problems. The intake ramps
are "hollow" on their back sides, so a bit of sheet styrene and CA will
fill the spaces. They are fairly well hidden between the intake and
fuselage, but it's a simple fix that's worth the effort. Another simple
trick worth noting has to do with the insert for the IFR door on the
fuselage side. It's much easier to add by drilling/filing/carving away
most of the recess, so the part can be manipulated from the rear as well.
This will make it easier to get a perfectly flush fit, though obviously it
means adding the part before joining the fuselage halves or installing the
cockpit.
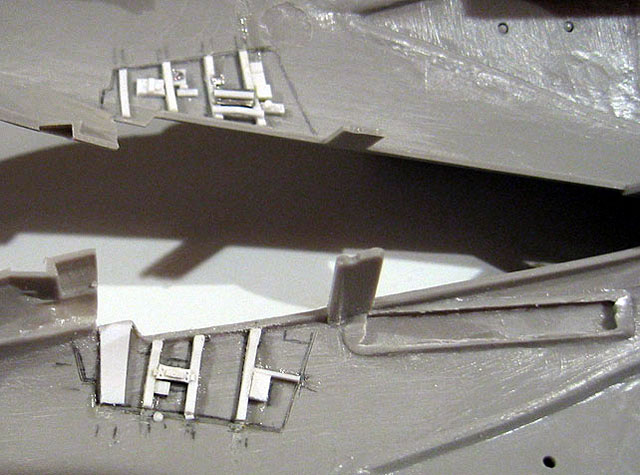
IFR insert recess removed. Also note plastic
strip sidewall detail.
It's also a good idea to
fully assemble the left and right fuselage halves before joining them
together - add whatever nose halves the version requires (in the case of
the Brit Phantoms, it's just a radome half on each side). This will allow
a perfect alignment around the nose and a join with less clean-up required
- any seam work will be along the length of the smooth radome, rather than
around the circumference of the nose/fuselage join, so it's easier to sand
out. You'll also be able to join the parts on a flat surface, to make sure
they're square and true. Finally, once the fuselage is together, attach
the intake parts before gluing on the wings - it's easier to get them
lined up this way.
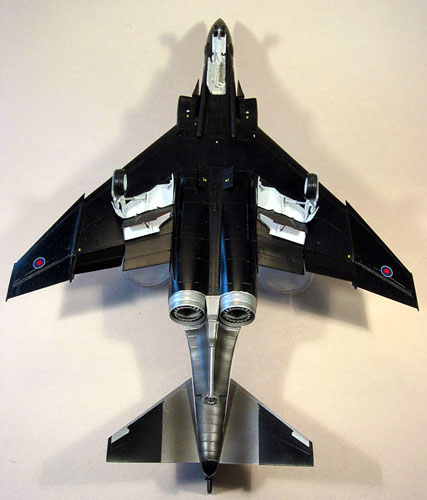 As
Black Mike never carried drop tanks, the pylon locating holes under the
wings were filled in, and the raised pylon re-enforcement panels tooled on
to the wing sanded off. It did haul a pair of dummy Skyflash bodies in the
forward recesses, so the fins were clipped off of two of the Sparrows
included in the kit and the missiles were turned in a drill lathe to round
them out. Once smooth, the raised strips were added back on with some
strip styrene using the "spare" pair of missiles as a guide. This was
probably excessive, but seemed about the easiest way to erase all traces
of the fins and smooth out the mould line at the same time. As
Black Mike never carried drop tanks, the pylon locating holes under the
wings were filled in, and the raised pylon re-enforcement panels tooled on
to the wing sanded off. It did haul a pair of dummy Skyflash bodies in the
forward recesses, so the fins were clipped off of two of the Sparrows
included in the kit and the missiles were turned in a drill lathe to round
them out. Once smooth, the raised strips were added back on with some
strip styrene using the "spare" pair of missiles as a guide. This was
probably excessive, but seemed about the easiest way to erase all traces
of the fins and smooth out the mould line at the same time.
As mentioned,
with a bit of care and test fitting, the model all but clicks together, so
only a light layer of Gunze's Mr. Surfacer is needed to smooth out all the
seams. Because of the way the fuselage halves are tooled, the rivet detail
tends to fade out around the spine, so this was touched up using a
straight pin in a pin vise, using the impressions on the kit as a guide.
It also meant the rivets weren't obliterated after a light sanding along
that seam.
Once the wings are on and all seams taken care of, the model is ready to
paint. A word of caution here - DO NOT ATTACH THE STABILIZERS UNTIL THE
MODEL IS FINISHED. Resist the urge to test fit them, they go on just fine
without any need for adhesives, via small, easily broken rods. This is
(unfortunately) the voice of experience talking.
Simple Scratchbuilding,
Pt.2
The intakes themselves are a little disappointing - there's no intake
trunk, just a simple bulkhead an inch and a half back on the fuselage
halves. And the bulkheads themselves aren't flat, nor do they cover the
whole of the intake - the model is see-through along the bottom of the
intake. Seamless Suckers have resin intake trunks available for those who
want to look back to the fan and there's also a number of aftermarket
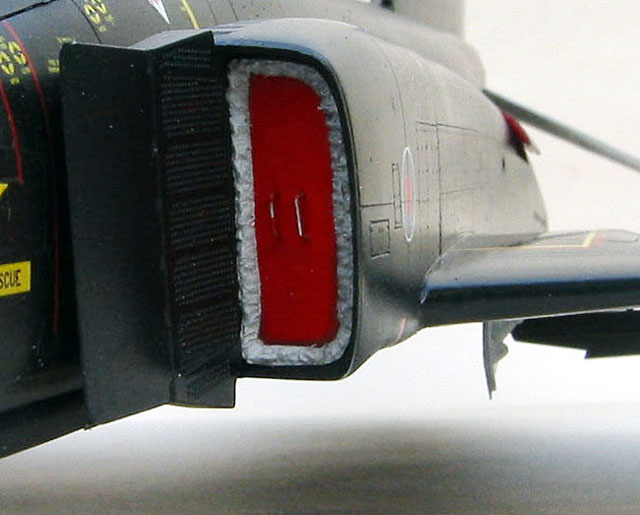
options to do US-style FOD guards. The British Phantoms have different
intakes though, and different intake covers - basically a sheet of plywood
roughly the size and shape of the intake, outlined with a spongy medium to
hold it in place, and a pair of metal handles. In scale form, it's a case
of cutting a piece of sheet styrene roughly to size, tacking it in place,
adding a thin sausage of epoxy putty around the edges and some wire
handles in the centre. The "plywood" portion was then painted red, and the
"foam" sections hand-painted Light Ghost grey and washed to bring out the
detail. A quick search for British Phantom pictures on-line will turn up
dozens of images of the FOD guards for reference
I See a
Phantom and I Want to Paint it Black
Click the thumbnails below to view larger
images:
First, in preparation for a coat of Alclad II, the exhaust area was primed
with Gunze's Mr. Base White 1000, basically just a white version of Mr.
Surfacer 1000, a very tough lacquer-based sandable primer. Its biggest
benefit is the fact that it buffs to a high gloss, which means it's the
perfect smooth, shiny base for metallics. It is also an excellent
choice for any gloss white - a brisk buffing will give it a good shine,
and a bit of Tamiya polishing compound will bring out a mirror-like
finish.
 With the primer
coat down, the Alclad could be painted. The aluminium sections are,
surprisingly enough, aluminium, but with a hint of steel added to take the
edge off. I then sprayed lightly along the panel lines with a slightly
darker version of the base shade (more steel added). For the burnt metal
portions, the process was reversed - steel with a touch of aluminium to
lighten, and a slightly lighter version sprayed down the centres of the
panels. The exhausts were painted with a base coat of aluminium, and
detail painting done with a variety of shades and techniques - the
"feathers" are Model Master Metalizer gunmetal on the inside, titanium on
the outside, while the darkest band around the exhaust itself is Metalizer
magnesium. The lighter band is Humbrol matte coat. It's interesting to
note that the Metalizers seem to stick very well to the Alclad underneath.
With the natural metal portions taken care of, they were masked over and
attention turned to the rest of the aircraft. With the primer
coat down, the Alclad could be painted. The aluminium sections are,
surprisingly enough, aluminium, but with a hint of steel added to take the
edge off. I then sprayed lightly along the panel lines with a slightly
darker version of the base shade (more steel added). For the burnt metal
portions, the process was reversed - steel with a touch of aluminium to
lighten, and a slightly lighter version sprayed down the centres of the
panels. The exhausts were painted with a base coat of aluminium, and
detail painting done with a variety of shades and techniques - the
"feathers" are Model Master Metalizer gunmetal on the inside, titanium on
the outside, while the darkest band around the exhaust itself is Metalizer
magnesium. The lighter band is Humbrol matte coat. It's interesting to
note that the Metalizers seem to stick very well to the Alclad underneath.
With the natural metal portions taken care of, they were masked over and
attention turned to the rest of the aircraft.
One of the main reasons
Black Mike vaulted to the top of my To-Build pile is the relatively simple
paint scheme: it's black. The problem with this, though, is that it can be
pretty boring visually if a model actually IS black. Because of this, I
added a few drops of Gunship Grey to my paint cup full of Humbrol matte
black paint to lighten it ever so slightly, allowing me to pick out the
panel lines with a truly black wash later on. Wheel, airbrake and
auxiliary engine wells were painted with Gunze's Mr. Base White, along
with the associated doors and landing gear. Once it had set, the engine
bays and doors were sprayed with Gunze's gloss red.
The gloss coat is Model
Master Metalizer Sealer - a laquer based gloss coat that goes on
beautifully smooth and dries to a rock-hard finish. I find it's best to
mist on a few light coats, then a couple of wetter, heavily thinned ones.
The result isn't quite a "wet paint" kind of high shine, but it is nice
and smooth, and glossy enough for any decal.
Decal, Wait, Repeat
As this is an SP release, the decals aren't standard Hasegawa fare. The
ones in this release were printed by Cartograf, and were beautifully thin,
completely legible, and in perfect registration. This was a lucky thing,
as most of the major markings, such as the roundels, nose and tail badges,
aircraft numbers and so on, were printed in two parts. The first part a
white slug to serve as a backing, the second the marking proper, again
printed over a layer of white. While it is something of a hassle applying
the major markings twice, everything lined up perfectly, and the clear
film on each piece is a different size so the decals blend in better. And,
with a bit of Gunze's Mr. Mark Softer, they all melted in to the model's
surface. With decalling done, the residue was rinsed off and the model
gloss coated again to even out the surface.
Click the thumbnails below to view larger
images:
Final
Assembly, Final Comments
|
Final assembly began by adding the landing gear and gear doors. The white
metal wheel hubs were polished with a motor tool, then sprayed white and
added to the gear struts. The canopies were attached after securing the
seats and adding both the scratchbuilt inner and kit supplied outer
portions of the side periscope. The airbrake doors were given a light wash
of white paint, then added to the wings, and the flaps attached. All that
remained was to pick out the assorted lights and probes and the model was
finished.
It really is a classic kit, and one that's hard to screw up. That's a
lucky thing, as there's dozens of fantastic users, camo schemes and
special markings that can be built with the various Phantom kits. It's
eminently buildable straight out of the box, while a little bit of (very
simple) effort will help to flesh out the cockpit sidewalls for the more
advanced modeller. And if you want to go all out, there's a slew of
gorgeous resin and etch products from Black Box, AiRes and Eduard to make
superdetailing easy.
Model,
Images and Text Copyright © 2003
Mike O'Hare
Page Created 04 November, 2003
Last Updated
17 March, 2004
Back to
HyperScale Main Page |
 Home |
What's New |
Features |
Gallery |
Reviews |
Reference |
Forum |
Search
Home |
What's New |
Features |
Gallery |
Reviews |
Reference |
Forum |
Search