|
Hawker Sea Fury FB.11
by Stuart Hurley
|
 |
|
Hawker Sea Fury FB.11 |

Hobbycraft's 1/48 scale Sea Fury is available online from Squadron.com
Amazingly,
the Hawker Sea Fury has been almost overlooked
in kit form and there has been only one in 1/48 scale. The venerable
Hobbycraft kit is still going strong and complete with its trench-like
detail and awful canopy, is pretty much the only game in town as far as
Hawkers brutal looking fighter-bomber is concerned. The kit captures the
look of the original reasonably well but is subject to being slightly
under scale.
I found that after market decals
and detail sets, when incorporated into the model show up the deficiency
in scale size.
This really only hit me when I
had completed the main building of the kit.
I used the old PP aeroparts detail set for this
project. P.P. did some great sets years ago (Thanks Tim) but sadly have
ceased trading. It is a comprehensive set, featuring a cockpit, inserts
for the cooling gills, prop blades and spinner, wheels and
undercarriage, wingfolds and flaps, gun bays, tanks, bombs, lots of
etched parts and a decal sheet. I had decided to use Almark decals for
this model as their sheet featured an aircraft for which I had good
references. The PP cockpit parts fitted well although the cockpit
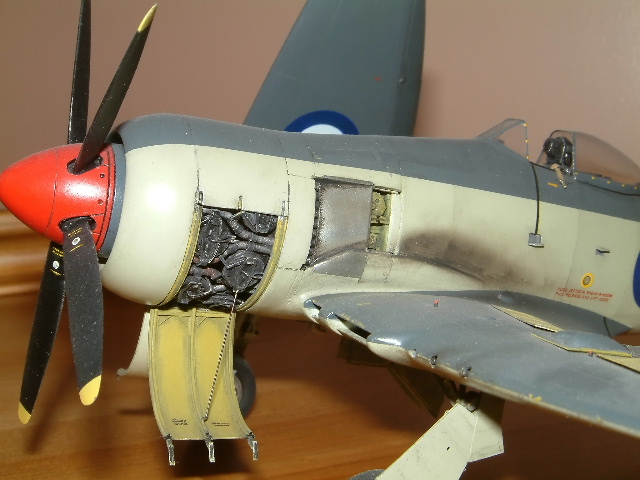
opening needed to be enlarged. I had decided to fit an engine, so the
cowls were cut out. The resin inserts for the chain driven cooling gills
were to be fitted later. The exhaust/gill apertures were not quite big
enough so these were opened out. If this is not done the exhausts and
gills will look too low down the fuselage in comparison with the EDSG
demarcation line. It is all a matter of getting key proportions to look
right. The exhausts were made from military connector crimp terminals.
It was at this point that I cut out the Falcon canopy and test fitted
it.
Something looked wrong. The canopy looked too big
and when in the open position, it was too close to the fin. Measurements
showed the kit to be under scale, and the fuselage in particular to be
about 3mm too short. I cut out the codes from the decal sheet and taped
them in position. Sure enough, they could not be positioned with the
correct spacing and also looked too big. There was nothing for it. Out
with the saw, off with the tail.
I made up a plug from laminated plastic card and
extended the fuselage by 3mm. just in front of the tailplane. This
doesn’t sound much, but it made all the difference. There generally
isn’t much that can be done about the size of the kit, but for me, this
combined with exhaust modification transforms the appearance of the
model. The decals now looked in proportion, with the correct spacing,
and the canopy size and position looked right. With that panic out of
the way I decided to scratchbuild the Centaurus engine and cowlings. Not
much is visible of the engine except for the cylinder heads and exhaust
system so a piece of plastic tubing of the correct diameter for the
crankcase was marked out, drilled and tapped to take some cut down M5
screws to represent the cylinders. I made a cylinder head from plastic
and used it to mold the rest from milliput. These were glued onto the
ends of the screws. The exhaust manifolds were made from solder wire,
and the cowlings from plastic card. With the gill inserts and engine
fitted, the cowl ring was rounded off a little and glued to the
fuselage.
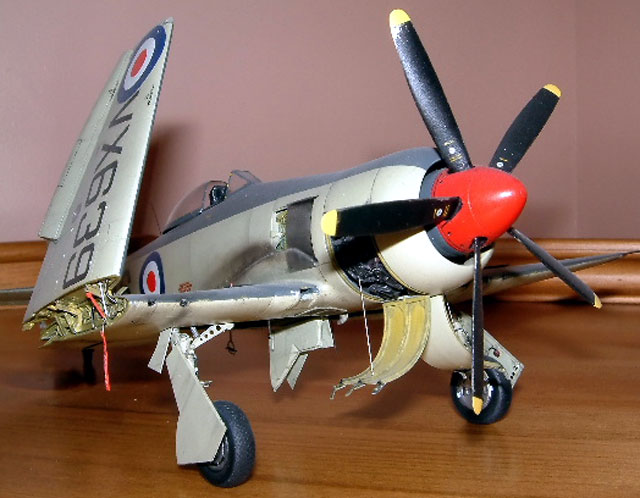
I wanted to show the wingfold and also the gun
bays, so as Sea Furies were often seen with one wing folded, this was
the way I went. The control surfaces were cut out, the starboard wing
cut away and the aileron on the folded wing was angled upwards (The
ailerons are sprung inwards when the wings are folded) Some thinning of
the wing halves was required to get the resin wingfold inserts to fit.
These were detailed with wire and plastic card. On the other wing, the
gun bay hatches were cut out and the etched bays, resin ammo boxes and
white metal cannons fitted. These were also detailed with wire. I also
cut off the wingtips, inserted a 2mm spacer and refitted the tips to
improve the wingspan. The flaps were cut out and the etched kit parts
made up to be fitted later.
All surface detail on the model was sanded off and
the engraved ‘trenches’ filled with C.A. When I had got a smooth Sea
Fury, I re-scribed the panel lines and details. Some detailing and
scratch building was carried out in the wheel wells. The PP
undercarriage parts were cleaned up and assembled. These are a great
improvement over the kit parts and I added some extra detailing such as
springs and brake pipes. With the etched doors fitted these look superb.
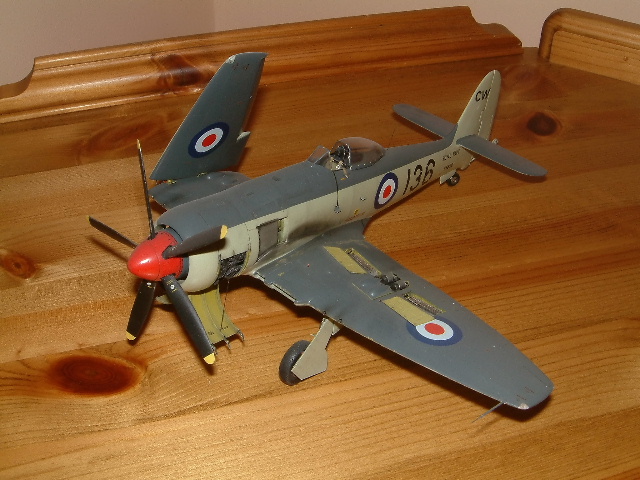
Xtra-colour sky and EDSG. paints were used, with
the sharp demarcation lines masked with Bare Metal Foil. The Almark
decals went on with no problem. Roundels were from Xtra-decal. The
superb resin spinner and metal prop blades were a huge improvement over
the kit parts.
I kept the weathering to a minimum as these
aircraft were kept immaculate. There is a great photo of VX639 inside
the cover of the Squadron ‘Sea Fury in action’ book, and the only
weathering visible is the characteristic exhaust stain. I believe that
Flightpath now have re-released the P.P. detail set, although I’m not
sure if it is in exactly the same form as it was. A Sea Fury kit is
unlikely to attract huge sales so we will have to make do.
There are a couple of other sets available as well,
so thing are not that bad for Sea Fury fans!
Model, Images and Text Copyright ©
2003 by Stuart
Hurley
Page Created 09 December, 2003
Last Updated
17 March, 2004
Back to
HyperScale Main Page |
 Home |
What's New |
Features |
Gallery |
Reviews |
Reference |
Forum |
Search
Home |
What's New |
Features |
Gallery |
Reviews |
Reference |
Forum |
Search