|
Supermarine Spitfire Mk.I
Bob
Laskodi
|
 |
|
Supermarine Spitfire
Mk.Ia |

Tamiya's 1/48 scale Spitfire Ia
is available online from Squadron.com
The 63rd anniversary of the Battle of
Britain (BoB) is almost upon us, and it is an appropriate time to
remember those brave warriors in the air who paid the ultimate sacrifice
for their countries. This article pays tribute to one of the most famous
aircraft featured in the BoB; the Supermarine Spitfire.
On June 18 1940, aware of Hitler’s plan for the
invasion of Britain, Winston Churchill made his “Finest Hour” speech
calling to arms his fellow countrymen: “The Battle of France is over,
the Battle of Britain is about to begin, upon this battle depends the
survival of Christian civilization, upon it depends our own British life
and the long continuity of our institution and our empire”.
Historians often argue as to the exact dates that
the BoB was fought, however it is generally agreed that July 10 through
31 October 1940 are the most appropriate dates. The BoB was significant
in many ways, not the least of which, is that it was the first major
battle to be fought entirely in the air.
The BoB consisted of four major phases in support
of “Operation Sealion”, the proposed German invasion of the British
mainland. Phase 1 which ran from July through early August was
characterized by German attacks on the convoys supplying Britain in the
English Channel and Thames Estuary, attacks on industrial targets, and
large scale German fighter sweeps hoping to draw up the RAF for
destruction. Phase 2 featured “Adlerangriffe”, the Luftwaffe’s planned
destruction of the RAF on the ground and in the air, culminating in
“Adlertag” on August 13, one of the largest aerial battles ever fought.
Phase 3 featured a change in German strategy from destruction of RAF
targets, to the “Blitzkrieg” of London in early September, a change in
strategy that many historians argue cost the Germans victory in the BoB.
And lastly, Phase 4 starting in early October, the end of large-scale
day attacks with the majority of the fighting taking place at night over
large British industrial centers and cities.
PHASE 1:
Convoy Attacks & Fighter Sweeps
While 10 July 1940 is generally accepted by most as
the start of the BoB, there were many previous attacks by the Luftwaffe
on the British mainland. The Luftwaffe made its first large scale attack
on the night of 18 June, when a force of over 100 bombers attacked a
variety of targets between Yorkshire and Kent. A soon to be famous South
African named A.G. “Sailor” Malan shot down two German bombers from his
Spitfire that night when they were illuminated by searchlights, an
amazing feat of marksmanship. The following night, approximately 100
German bombers hit a variety of targets scattered throughout England and
Wales.
The Luftwaffe made its first daylight raid on 1
July, hitting targets in Scotland. This was followed by small-scale
daylight raids over the next three days, and combined day/night raids
through 9 July. Then on 10 July, the battle started in earnest.
On the morning of 10 July, a ship convoy code-named
“Bread” was transiting from the Thames Estuary to the Straits of Dover
when it was detected by a reconnaissance DO-17P of 4(F)121. This
aircraft was heavily escorted by BF109’s from I./JG51, and six Spitfires
from No. 74 intercepted. The Spits were heavily outnumbered by the 20+
BF109’s but managed to attack and damage the DO17, which eventually
crash-landed in France. The DO17 managed to alert the Luftwaffe and they
responded with over 70 aircraft to attack “Bread” later in the
afternoon. About 30 British fighters intercepted the German formation
and the first large-scale dogfight of the BoB ensued. A total of 6 RAF
and 13 German aircraft were lost in this engagement, but the most
significant fact of the battle was that only one ship from “Bread” was
lost. In addition, coincident with the raid on “Bread”, a strike force
of JU88’s hit Swansea and Falmouth. The British did not intercept this
attack. Further shipping attacks were accomplished on 11-18 July,
although generally poor weather hampered operations.
On 19 July weather improved and the B.P. Defiants
from 141 Squadron were patrolling in the English Channel. The Defiants
were jumped by over 20 BF109’s from III./JG51 and in the ensuing battle
six Defiants were lost while JG51 lost only one BF109. The carnage may
have been worse had not 111 Squadron arrived on the scene to ward off
the BF109’s. This battle illustrated the weakness of the Defiant against
the far superior BF109 and along with another disastrous engagement in
August led to the withdrawal of the Defiant from day operations.
Further small scale convoy attacks and fighter
sweeps continued throughout the month, and the Luftwaffe aces suffered
some heavy losses when Noacke, von Houwald, Erlich, Riegel, and Keidel
were lost and leading German ace Werner Moelders was shot down and
wounded.
A combination of poor weather, and German
preparations for “Adlertag”, the all out assault of the RAF in the air
and on the ground led to lower levels of combat activity through the
early days of August. On 2 August, Goering issued the final orders for
“Adlertag” which was to commence on 10 August. The last major German
attack before “Adlertag”, which was to be forewarning of the immense
aerial battles yet to come, occurred on 8 August when convoy “Peewit”
was attacked in an immense aerial battle by over 150 German aircraft.
Approximately 30 RAF fighters in an intense dogfight opposed these.
Casualties were high on both sides, the RAF losing 19 aircraft and the
Luftwaffe losing 31 aircraft, along with a significant amount of
shipping lost.
PHASE 2:
“Adlerangriffe” - Destruction of the RAF
Poor weather on 10 August forced the postponement
of “Adlertag” for 24 hours, and was later rescheduled by Goering to 13
August. There was no significant activity on the 10th, but
aerial activity was high on the 11th. A bombing raid on Dover
started the day, followed by three Luftwaffe fighter sweeps but the RAF
generally did not pursue combat. Later in the day, a large German force
of over 160 aircraft assembled for an attack on Portland that was
engaged by approximately 70 British fighters. Heavy fighting ensued and
many aircraft were lost on both sides; 27 by the RAF, and 36 Luftwaffe.
In addition, convoy attacks were attempted in the Thames Estuary and the
English Channel, but worsening weather stopped further action by the
RAF.
Heavy activity was again observed on 12 August,
with the morning started off by the now customary German fighter sweep,
followed by a surprising attack on the British coastal radar chain. Some
minor convoy attacks were also observed, but around noon, a German
aerial force of over 200 aircraft was detected and approximately 58 RAF
fighters were scrambled to oppose it. The German formation split into
two groups; one attacking Portsmouth and the other attacking the radar
station at Ventnor that was seriously damaged in the attack. Aerial
casualties were high on both sides. In the afternoon, an attack of the
RAF fighter bases at Manston, Lympne, and Hawkinge was accomplished; the
first time British mainland fighter airfields had been attacked by the
Luftwaffe. Casualties were high on this day, with 22 RAF aircraft lost
and 31 Luftwaffe.
Poor weather and confusion reigned supreme on
“Adlertag” morning on 13 August. Due to the deteriorating weather, the
attack was postponed until later in the day but the word did not reach
many German units who launched their attacks. Attacks were attempted on
the naval base at Sheerness, and airfields at Eastchurch, Odiham, and
Farnborough, but success on both sides was poor due to the weather. Such
was not the case in the afternoon when the weather cleared.
The largest German aerial armada to date of over
300 aircraft was assembled in the afternoon to attack the docks at
Southampton, the naval base at Portland, airfields at Andover, Detling,
and Middle Wallop, and factories at Rochester. The RAF intercepted these
attacks and heavy fighting ensued. Surprisingly the RAF suffered only 13
aircraft lost to the Luftwaffe’s 34. More importantly for the RAF, only
three pilots were killed with two wounded, leaving many pilots to
continue the battle. After darkness fell, the night attacks continued
with German bombers striking throughout the mainland, even ranging as
far as Belfast.
Fortunately, poor weather limited operations on the
14th, giving both sides a break from the intense fighting of
the previous days. However, attacks were mounted by the Luftwaffe with a
loss of 19 aircraft.
The weather on the morning of 15 August was poor
and forced the cancellation of many planned missions. However, a rapid
improvement in the weather later in the morning allowed the planned
operations to commence into what became the bloodiest day in Luftwaffe
history and a turning point in the BoB. JU87’s attacking Hawkinge and
Lympne accomplished the first attacks of the day, and the radar stations
at Dover, Rye, and Foreness with heavy damage. British Spitfires rose to
defend but were simply overwhelmed by the more numerous BF109 escorts.
Shortly after noon, a large bomber raid featuring the first major attack
of HE111 bombers from Norway struck the Newcastle area followed by JU88
bombers from Denmark. Little damage was done in the raid, but the
bombers were intercepted by British fighters well out to sea and heavy
German losses occurred. The Norwegian based bombers never again
attempted Mass daylight raids.
The afternoon of the 15th saw action
return to southern England when the Germans launched a fighter-bomber
raid on Martlesham Heath airfield followed by a JU88 raid on Rochester
and Eastchurch. Both raids were heavily escorted by BF109’s and the
British fighters rose in strength to oppose the attack and fighting was
heavy. Slightly further to the west, a large strike force of JU88
bombers escorted by BF110’s attacked airfields at Middle Wallop, Odiham,
and Worthy Down. Again, these formations were intercepted by the British
with heavy aerial fighting. Still further to the west, a large bomber
force comprised of JU87 dive-bombers and escorted by large numbers of
BF109 and BF110 fighters struck the Portland area. Here, the British
fighters were particularly effective against the Stuka’s and they
suffered tremendous losses. Later in the afternoon fighting continued
when the Luftwaffe fighter-bombers and JU88 bombers hit Croyden and West
Malling airfields. The heaviest fighting in the BoB occurred on 15
August with the Luftwaffe losing an astounding 75 aircraft in 2,199
sorties and the day became known as “Bloody Thursday”. The RAF also
suffered heavily losing 30 aircraft in 974 sorties.
Combat continued on 16 August, although at a much
reduced level after the all out attacks on the 15th.
Airfields were the primary targets of the Luftwaffe with West Maling,
Tangmere, Westhampnet, Manston, Farnborough, Harwell, Brize Norton,
Gosport, and Lee-on-Solent all being hit. In addition, the radar station
at Ventnor was also successfully attacked. Losses this day were also
heavy, with the RAF losing 22 aircraft and the Luftwaffe 45 aircraft.
After a much needed day off from combat on the 17th,
intense activity resumed on 18 August. Action started around noon, when
heavy attacks were underway on the sector stations at Kenley and Biggin
Hill. The airfields at Croyden and Manston were also hit. Along the
coast, a large attack led by JU87 bombers hit the airfields at Thorney
Island, Gosport, and Ford. In addition, the radar station at Poling was
also hit. The Luftwaffe took large casualties on the day, primarily the
JU87 and BF110, which lost 18 and 17 aircraft respectively. This forced
the removal of the JU87 from the battle, and BF110 operations were
severely restricted. A total of 31 RAF aircraft and 53 Luftwaffe
aircraft were lost in the day.
A combination of poor weather and a needed respite
from operations led to low levels of combat until 24 August. The
Luftwaffe hit airfields at Manston, Hornchurch, and North Weald, but the
most significant activity of the day was when bombs intended for Thames
Haven and Rochester were dropped over central London. This accident
would have a far-reaching effect on the battle yet to come. A total of
22 RAF and 38 Luftwaffe aircraft were lost on the day.
Combat activity continued on the 25th,
however the events of the day were overshadowed by the RAF Bomber
Command attack on Berlin at night in retaliation for the bombing of
London the previous day. While not planned as such, this attack was to
have a profound effect on the remaining battle in which the Luftwaffe
changed their attack strategy from decimating the RAF to attacks on
London. At this time the Luftwaffe was very close to defeating the RAF
and the respite from the almost continual attacks on RAF airfields was
much needed.
Combat activity remained relatively high through
the remainder of August, with the RAF losing 132 aircraft and the
Luftwaffe losing 168 aircraft in the final week.
The first week in September saw continued Luftwaffe
attacks on the RAF bases and also a new emphasis on the aircraft
manufacturing facilities. The attacks were not as massive as those in
mid-August, but casualties remained significant for both sides with the
RAF losing 120 and the Luftwaffe losing 143 aircraft for the first six
days of the month. However, the battle was going to change significantly
on 7 September.
PHASE 3:
“Blitzkrieg on London”
7 September dawned fairly quiet, a few
reconnaissance patrols but no significant air activity. However that was
all to change by the late afternoon when the Luftwaffe launched an
assault force of about 350 bombers escorted by about 600 fighters.
British fighters were scrambled to intercept, but expecting continued
attacks on the RAF airfields they left London largely unguarded. By the
time the RAF had realized that the target was indeed London and vectored
their fighters towards the bombers, most of the German bombing runs were
over. The result was horrific; London was in flames. Four hours later
during the night, the Luftwaffe assembled another attack striking
London. Guided by the roaring fires, the German bombers once again found
London as the target. No respite would be given for the next seven days,
London would be bombed heavily each night.
15 September, which would go down later in history
as “Battle of Britain Day”, saw the daylight attacks on London resume.
However, Fighter Command had the respite it needed from the relentless
attacks on its facilities to rebuild and redeploy to prepare for this
attack on London. When the Luftwaffe launched their major attack on
London around 11:00 AM, the British fighters were ready and met the
German assault head-on. Massive dogfights ensued, and by the time the
bomber force reached London, the bombers were largely devoid of their
fighter escorts. The German bombers then received their first
introduction to the “Big Wing”, five squadrons of British fighters led
by the famous Douglas Bader. Together with other British units, the “Big
Wing” feasted on the bombers causing them to jettison their bombs
haphazardly spoiling their bombing runs. Shortly after noon, the German
bomber force was retreating back to France and hunted relentlessly by
the British fighters. Two hours later the Luftwaffe tried another
attack, but it too was met by massive British force and largely
repelled. In terms of aircraft losses, the battle did not seem all that
spectacular compared to the mid-August attacks, with the British losing
27 and the Luftwaffe losing 56 aircraft, but the tide had turned in the
BoB. For the first time in the battle, the British had the advantage in
strategic position in the air and were not significantly outnumbered.
The Luftwaffe, on the other hand were severely disenchanted believing
they had the British “on the ropes” only to see massive resistance.
On September 19, even though the British did not
know it at the time, the BoB was won when the Germans cancelled
Operation Sealion, the planned invasion of Britain. Although London was
bombed relentlessly at night, only two days remaining in September
featured large scale day fighting, on the 27th and 30th,
although these raids were nowhere near the size featured earlier in the
month.
PHASE 4: Day Attacks Cease
While night attacks would continue on London, and
other important British industrial centers, October would feature an end
to the massive day light raids seen earlier. However, a new German
tactic of bombing raids by Bf 109 “Jabos” was started which were very
difficult to defend against. The Jabo raids were more of a
nuisance than an actual threat, and the BoB was all but over.
Tamiya's
1/48 Scale Spitfire Mk.I
|
The kit is the Tamiya 1:48 Spitfire Mk I (KIT #:
61032), and nothing more needs to be said as this is an absolutely
fantastic kit! I will freely admit that I am a “resin-o-holic” and
cannot resist any resin set specifically designed for the kit I’m
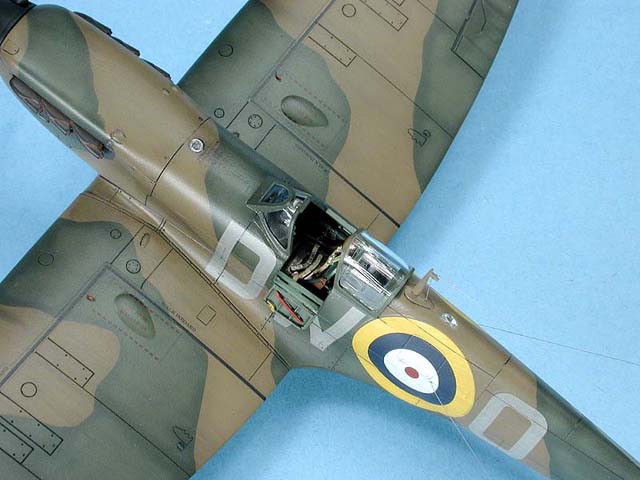
building. While the box stock cockpit is quite nice (and more than
adequate if you keep the canopy closed!), the Cutting Edge (CE) Spitfire
Mk.I cockpit is absolutely beautiful.
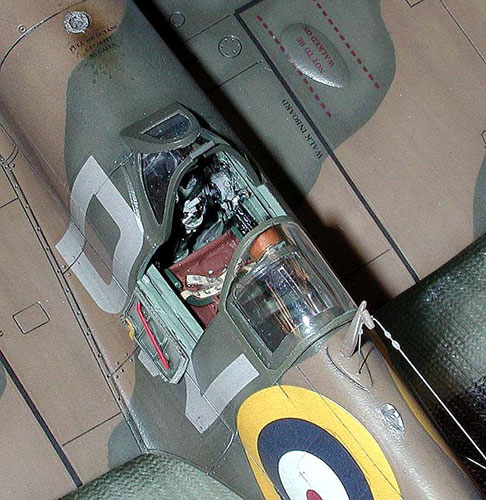
The only fault I have with it is since it is
designed as a “drop-in” replacement (and it does truly “drop-in”) it
snaps onto existing detail in the cockpit, but leaves a rather thick
side area that can be seen if you open the pilot access door (like I
did!).
There is absolutely nothing to report here as the
Tamiya kit builds with only a few minor problems.
The CE cockpit presents no real challenges outside
the usual resin issues (removing pour stubs, cleaning up parts, etc.).
The two areas I had problems with on the kit are the fuselage spine/aft
clear cockpit join and the rear fuselage/wing join that both feature a
significant step that needs to be filled and sanded smooth.
That’s it. Otherwise it’s smooth sailing!
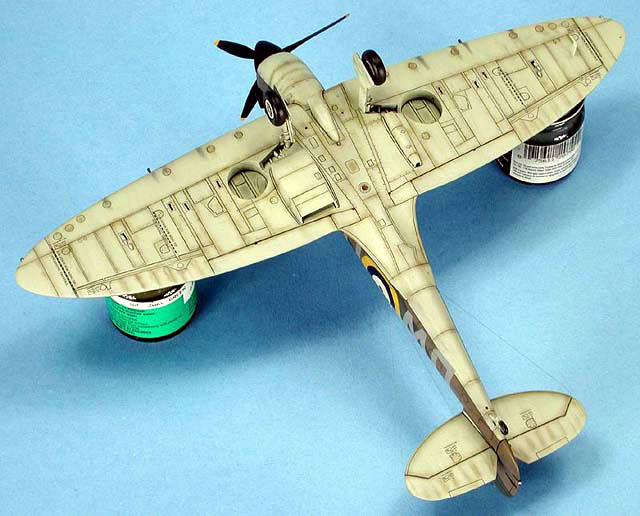
Painting,
Weathering and Markings
|
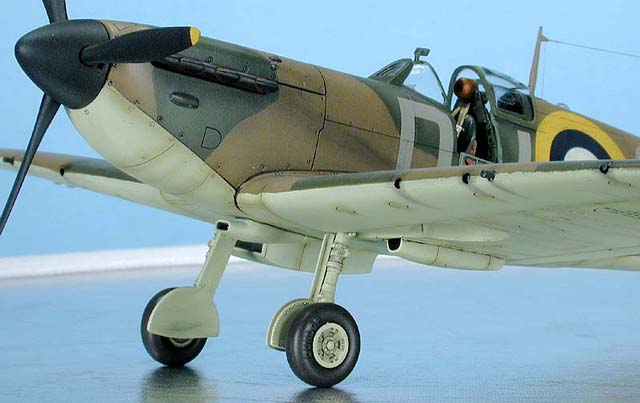
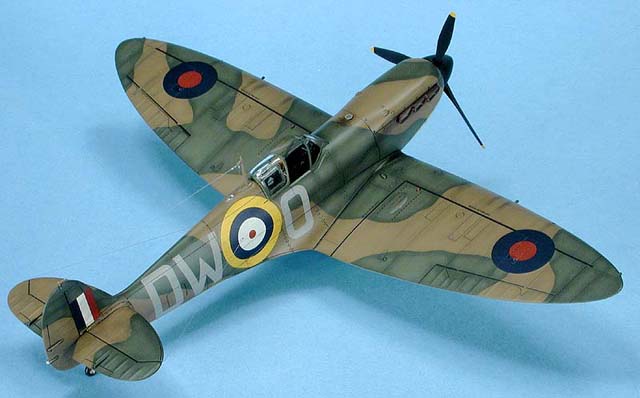
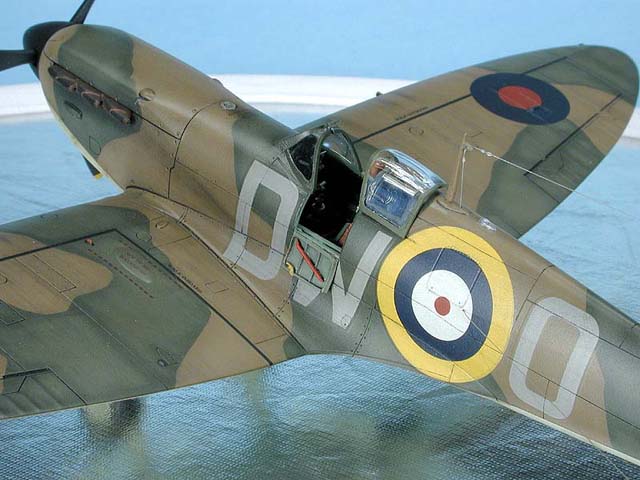
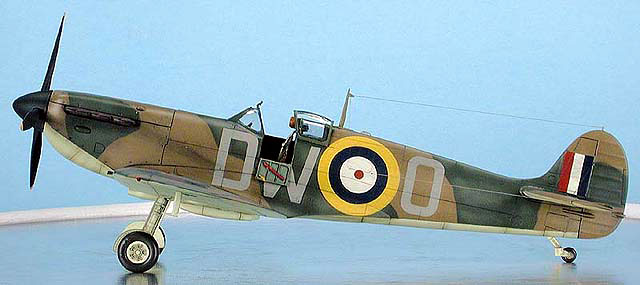
I chose to model the aircraft flown by the British
610 Squadron. The aircraft is in the early British day fighter scheme of
Dark Green over Dark Earth with Sky undersides.
 I
used Polly Scale acrylic paint throughout. After letting the paint dry
overnight, I airbrushed a light coat of Future to prepare the surface
for decaling. The decals went on quite well and responded to Microsol
without any permanent wrinkling. Some silvering was noted in the
extensive clear areas surrounding the squadron codes. After drying
overnight, I wiped the decals off with a moist cloth with Pollys Plastic
Prep to remove any residue and after drying I shot a light coat of
Future over the decals to seal them. I
used Polly Scale acrylic paint throughout. After letting the paint dry
overnight, I airbrushed a light coat of Future to prepare the surface
for decaling. The decals went on quite well and responded to Microsol
without any permanent wrinkling. Some silvering was noted in the
extensive clear areas surrounding the squadron codes. After drying
overnight, I wiped the decals off with a moist cloth with Pollys Plastic
Prep to remove any residue and after drying I shot a light coat of
Future over the decals to seal them.
Next, a light coat of Polly S Flat Finish was shot
to provide a surface for pastels. I used a watercolor based wash of
sepia to highlight the engraved detail such as the panel lines. I then
used pastels applied with a soft brush to simulate the dirt staining
that is commonly seen on these aircraft that were operated from grass
fields. Lastly, I sealed everything with a light coat of Polly S Flat
Finish.
Tamiya models are my absolute favorite to build, as
they usually have no major problems to contend with. This kit was no
exception, and with the only two problem areas noted you can almost
build this kit with your eyes closed! This kit makes a beginner modeler
look like an expert and is highly recommended.
-
Squadron/Signal
Publications, Spitfire in Action #39
-
Smithmark Publishers,
The Battle of Britain
Click on the thumbnails
below to view larger images:
Model, Images and Text Copyright ©
2003 by Bob Laskodi
Page Created 19 September, 2003
Last Updated
17 March, 2004
Back to
HyperScale Main Page |
 Home |
What's New |
Features |
Gallery |
Reviews |
Reference |
Forum |
Search
Home |
What's New |
Features |
Gallery |
Reviews |
Reference |
Forum |
Search