|
Hellenic TF-104G
by Dr. Menelaos Skourtopoulos
|
|
|
F-5A Freedom Fighter |
Converting Revells F-104G
into a TF-104G in 1/32 Scale

HyperScale is proudly supported by Squadron
The first Starfighters
arrived in Greece in April 1964. The Royal Hellenic Air Force received
through MAP 38 F-104Gs and 4 TF-104Gs. They were all in overall natural
metal finish with white wings and carried a “buzz number” (FG- plus the
last three digits of the serial number) on the fuselage behind the wings.
In 1966 came 5 more F-104Gs and 2 TF-104Gs. Two squadrons flew the F-104G,
the 335 Interceptor Squadron and the 336 Fighter-Bomber Squadron. When the
Starfighter was withdrawn from active duty in 1992-93 both squadrons
converted to the LTV A-7E Corsair II.
In 1971 all aircraft were
painted with the standard USAF-SEA camouflage and the good old silver
glory days were over! More aircraft were received in 1972 from Spain and
in the eighties from Germany and the Netherlands. During the first year of
operation by the RoHAF No 335 Squadron was able to fly more than 1000
hours without any accident proving once again that careful training and
maintenance could make the Starfighter as safe as many others fighters of
its generation. The people that flew the F-104 are proud to say today: “We
are the 104ers”.
There are two kits of the
F-104G in the big 1/32 scale, one from Hasegawa and another from Revell.
The Hasegawa Starfighter is the better Kit but Revell offers a far better
price and here and there some better parts than the Hasegawa kit. So I
chose the Revell kit because I needed two kits for the conversion and
wanted to save money. The choice for the Revell kit means that some extra
details must be made from scratch for the conversion.
Well, let’s get started!
Before I could start, I
needed to know the correct dimensions of the TF-104G in 1/32 scale. In
that case I used the fine 1/72-scale drawings by A. Granger from the book
of P. Moyes “The Lockheed F-104 Starfighter” (Aerodata International No
15). I made photocopies of those drawings up to 1/32 scale by enlarging
them up to 225%. The Revell TF-104G in 1/72 scale was used for the 3D
understanding of the proportions of the fuselage behind the cockpits.
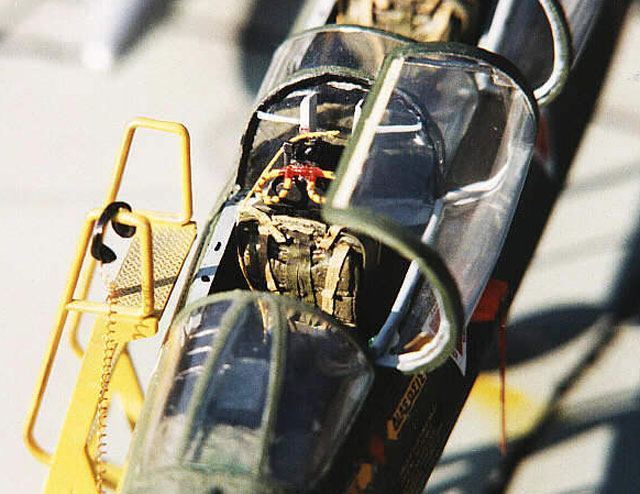
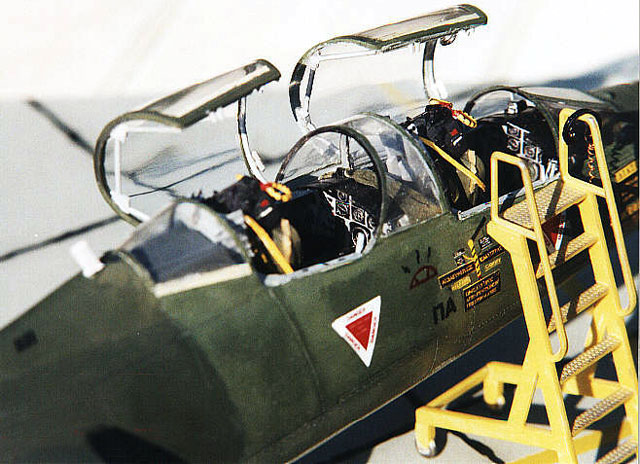
The Cockpit
I found out that the length
is the same in both versions and this made things much easier. First I cut
out the region behind the cockpit (the electronic bay of the F-104G) to
make room for the second cockpit. I used epoxy putty to form the fuselage
behind the back cockpit. This was the trickiest work of the whole
conversion. It took many weeks of thinking, sanding, more putty here or
there, more sanding and more thinking.... but in the end it worked!
The cockpit of Revell
F-104G is actually for the C version (the instrument panel) but this
should not be a problem. The difference between the C and G panel are not
so big, so I used those panels as I don’t want to buy too many resin
parts. I cut the side panels and glue them in an angle because they are
absolutely horizontal (If you have the ESCI F-104G Cockpit in 1/12 scale,
this should be a great help). For those who’d like to make a 100% accurate
cockpit the Kendall set would be a fine replacement, or the Eduard PE set
for the Starfighter.
 The
back cockpit had to be changed to fit in the more narrow fuselage region
in the back. The back wall was made from plastic sheet. I used the cover
for the front panel (kit part No 10) for both cockpits and changed it only
for the back. The TF had no internal gun, so I closed the gun bay doors
and sanded the gun muzzle smoothly. The
back cockpit had to be changed to fit in the more narrow fuselage region
in the back. The back wall was made from plastic sheet. I used the cover
for the front panel (kit part No 10) for both cockpits and changed it only
for the back. The TF had no internal gun, so I closed the gun bay doors
and sanded the gun muzzle smoothly.
I used plastic sheet from
Evergreen to make some details inside the cockpit walls. The throttles
were made from plastic styrene.
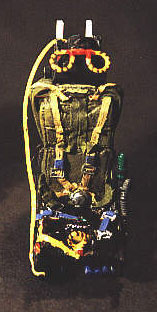
Last but not least: the
seats. Both kits have the original C2 seat that was used for all countries
but after 1972 Germany, Greece, Italy, Turkey and Denmark changed the C2
seat with the Martin-Baker Q7 seat for safety reasons. Well I wanted to
build a late Starfighter and there is only two ways to solve the problem:
build the MB seat from scratch or buy the resin Q7 Seat from CAM. I was
very happy to choose the second way and receive those fine resin parts.
The seat is very accurate and highly detailed and depicts the later GQ7
version (the headrest is more round). I put on both seats an oxygen tube
made from wire, and I made the details behind the front seat from scratch.
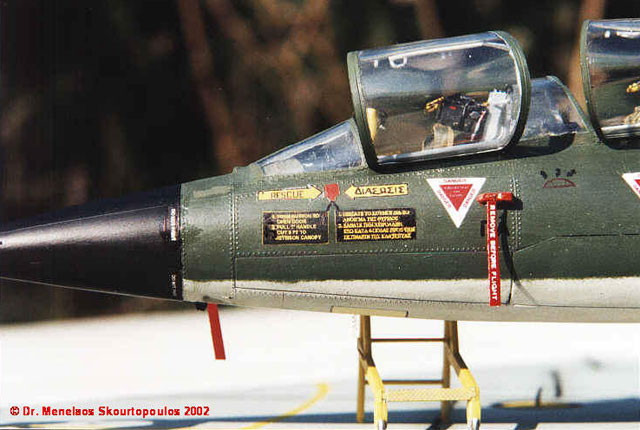
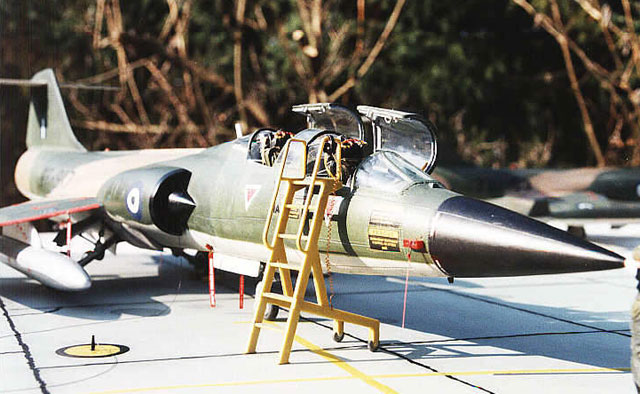
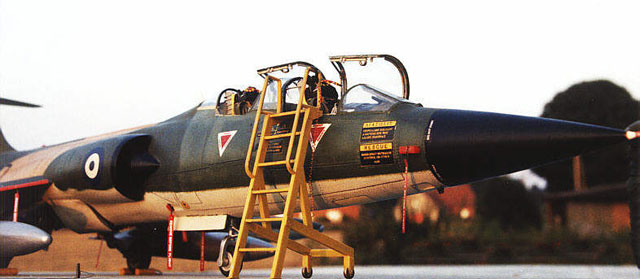
The Canopies
The next problem was the
canopies for the TF-104G. Well, I was very happy to have two extra
canopies from the Revell kit RF-4C (yes that’s right!). These canopies
have just the right proportions for the TF-104. I changed their shape and
formed them in hot water. The middle part of them made from the canopy of
Revell’s Tiger Moth kit in 1:32 scale. The solid canopy behind the back
cockpit made from transparent plastic sheet again formed in hot water.
I had to put the details
inside the canopy frames. I made them from plastic styrene and wire
together with some mirrors from photoetched parts from the spare box.
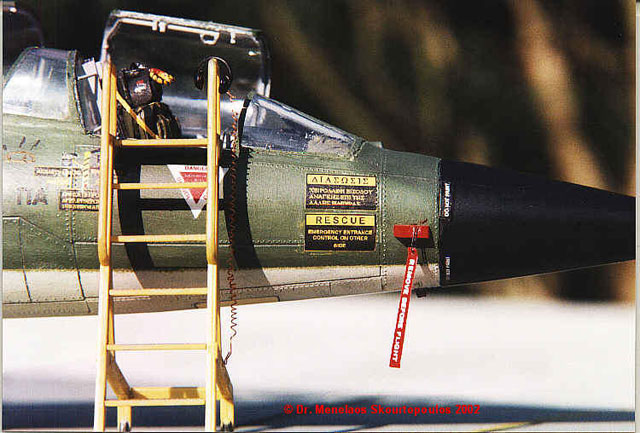
Nose and Main Gear
The two-seat versions of
the 104 had their nose gear well moved back 7.4 inches and the gear
located at the forward end, retracting rearward. I closed the single seat
gear well hole with plastic sheet and opened a new one at the end of the
former. I used also the nose gear well from the kit but in reverse
direction. The nose gear itself had to be changed, so I cut the shock
strut and the retraction arm, turned the gear strut in the new direction
and glue both parts on it again. The gear door had a rectangular shape, so
I had to cut off the angled pieces in front of the doors.
The main landing gear in
the Revell kit has poorer detailing than the Hasegawa one. But there are
rubber tires and with some work here and there you can make a masterpiece
out of it. Otherwise the main gear details (hydraulic lines etc.) are all
there in the Revell kit.
Pylons and Stores
I had to change the wing
pylons of the kit cause they are basically wrong! The right ones should be
longer and higher. I made new ones from thick plastic carved to shape. I
used the wing tanks from the spare kit to make two underwing tanks out of
them. Those tanks are different from the tip tanks. Wing tanks had the
same fins left and right and no fin extension underneath.
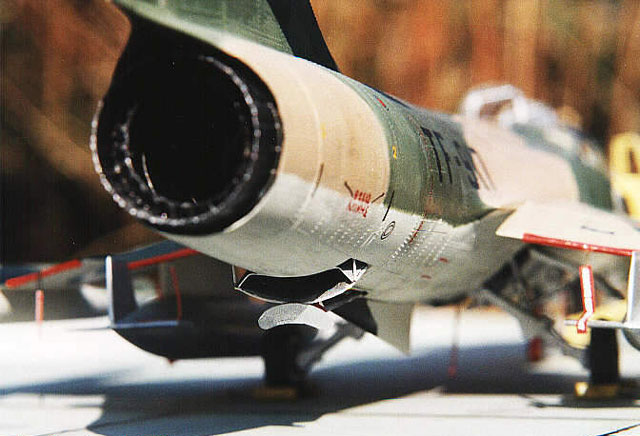
Exhaust Nozzle
The jet nozzle from the
Revell kit is a crude one-piece affair with not many details and too
narrow, and so you must build a new one. The RF-4C kit saved the situation
once more. I used that kit to build the RF-4E and the J79-15 nozzles left
over were available for other purposes.
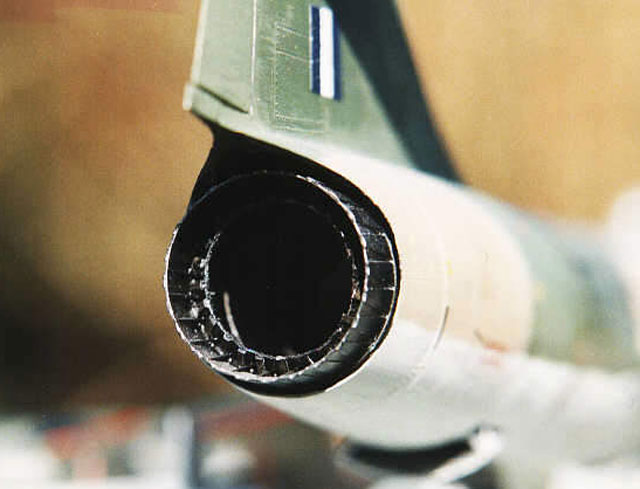
The Phantom nozzles are
well detailed and all that I had to build was the primary exhaust flaps,
which I made from plastic sheet roundly formed.
Some Extras
If you want to open the
parabrake door, then do it before you glue the two fuselage halves. It’s
easy to build and makes the model more realistic. I also cut out the slats
and flaps and glue them in the down position. The main gear doors were
slightly bulged to make room for the thicker wheels and tires of the
G-Type. I made those bulges from putty (if you have the Hasegawa kit, they
are ready molded on the doors.
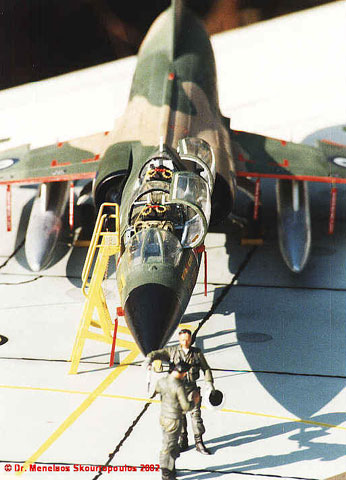
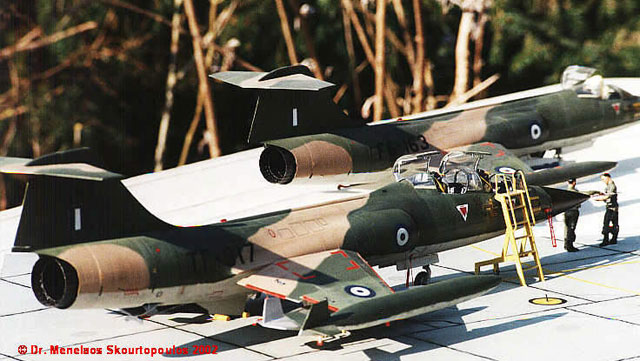
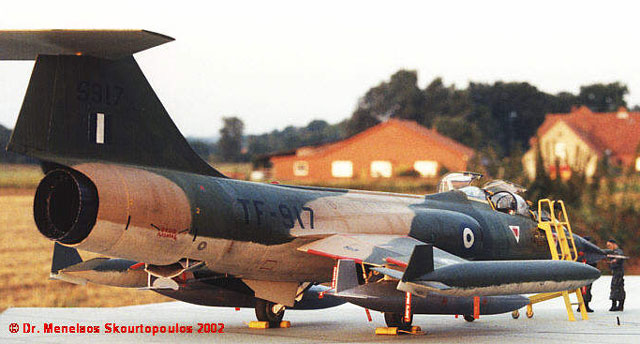
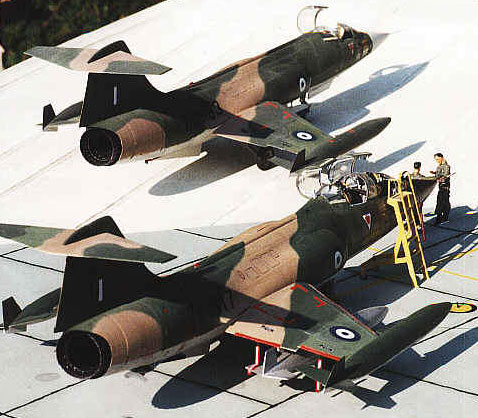
As I noted above, Greek
Starfighters after 1972 were painted with the typical SEA colors (two
greens 34079 and 34102, a tan 30219 and a light Grey 36622). I used
Humbrol enamels for that job, but I had to put some white (20-30%) to make
them lighter. The radome shows the origins of the aircraft: light grey
with black antiglare surface means a MAP aircraft, overall black means ex
Luftwaffe aircraft, overall light grey means ex-Bundesmarine aircraft
(German Navy).
I chose to build
Starfighter with Luftwaffe No 5917 (ex 27+87). TF-104s carried a buzz
number on the fuselage with two letters: TF. Greek F-104s had many warning
stencils written in Greek and there are no such decals to buy. To make
them I drew them with a graphic program (Corel Draw) and printed them on
transparent decal. The Greek roundels and the “remove before flight” flags
are from a Greek company called Plastimodelismo. The buzz number with the
TF letters came from Verlinden Productions sheet for USAF letters in 1/48.
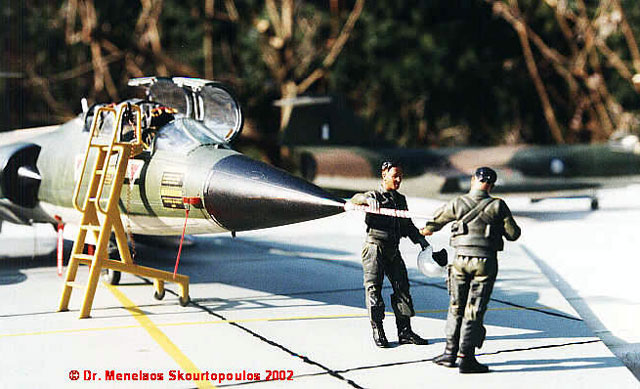
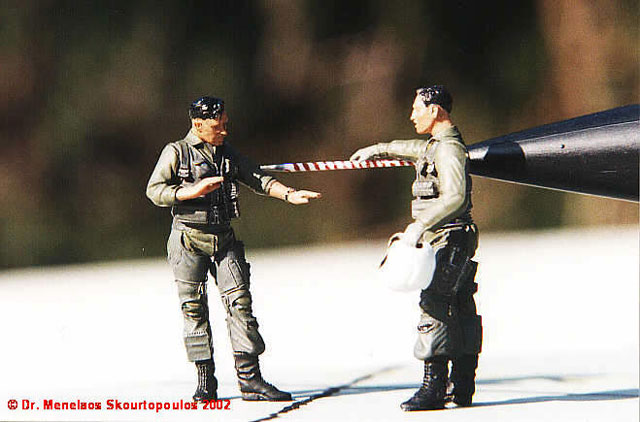
I put the aircraft on piece
of wooden plate that I painted before. The two pilots are one and the same
figure from Verlinden with another head and arms on one.
Their heads are from
Verlinden Productions (German Heads WWII). The instructor is showing his
student how he could better maneuver the machine after their flight. The
student’s helmet and the boarding ladder came from Hasegawa’s F-16C/A+ kit
in 1/32 scale. The headphones were found in the spare box.
If you have enough money to
spend on the Hasegawa kit, it is the better kit and you don’t have to make
many of the secondary works on it to make it looking right. But I think
with the Revell kit you could have the same result without any fear from
destroying the model. The Q7 seat is not a must if you want to build a
Belgian or Canadian or USAF F-104D. All in all this was a nice conversion
and the satisfaction was guaranteed.
-
The Lockheed F-104
Starfighter (Aerodata International No 15)
-
F-104 Starfighter in detail
& scale Vol. 38
-
F-104 Starfighter in action
Vol. 27 & 135 Squadron sign. Publ.
-
Combat Aircraft of the
(Hellenic) Air Force (in Greek) from the Model magazine „Modelling“
-
Ptisi &
diastima July-August 1988 Vol. 54 (Greek aerospace magazine)
Click the
thumbnails below to view larger images:
Model, Images and Text Copyright ©
2003 by Dr. Menelaos Skourtopoulos
Page Created 21 August, 2003
Last Updated
17 March, 2004
Back to
HyperScale Main Page |
 Home |
What's New |
Features |
Gallery |
Reviews |
Reference |
Forum |
Search
Home |
What's New |
Features |
Gallery |
Reviews |
Reference |
Forum |
Search