|
Tornado GR.Mk.4
by
Piero De Santis
|
 |
|
Tornado GR.4 |

HyperScale is proudly supported by
Squadron.com
The Tornado is
an attack aircraft designed in partnership between UK, Italy and Germany
to be used at low-level for deep-strike.
The Tornado's first generation
was marked as "GR.Mk.1" for UK air force and "IDS" for Italy and Germany
air forces.
The strike role was designed
and developed for the "Cold War", but with the end of the "Soviet bloc",
it change his role to conventional interdiction (GR.1 and IDS),
reconnaissance (GR.1A and IDS), suppression of enemy air defences (ECR,
GR.1/1A) and anti-naval (GR.1B, IDS) .
An air defence variant (ADV) was
realized to respond at the demand of UK, to intercept the heavy
long-range bombers.
The only export order was made
by the "Saudi Arabia" air force, for "GR.1" and "ADV" variants.
All the Tornado's variants
(GR.1/1A, IDS, ECR, ADV) were used over Iraq and over Balkans... and
actually the GR.4/4A have been used again
over Iraq.

Because the Tornado's history is
too long, I dedicated these few words only to the last variant employee
today by the Royal Air Force: the Tornado GR.Mk.4.
With the end of the "Cold War"
and following the lessons learned during the "First Gulf War", the RAF
decided that the Tornado GR.Mk.1/1A fleet has to go under a "Mid-Life
Update" program: the main external feature was the addition of a FLIR
system integrated with NVGs used by crews to permit a fully night and
all-weather operational.
Other weapon systems already
integrated only to few aircrafts were extended to all the fleet: those
included TIALD pod and ALARM missiles, using an enhanced weapon control
system with a new stores management databus.
A new HUD and a
Multi-Functional-Display were installed in the front cockpit replacing
the old-fashion Moving-Map-Display.
Recently with the advent of the
GPS new technology, also this system has been integrated on the GR.Mk.4
together with Enhanced LGBs.
Recce's missions are carried
using the internal infrared-line scanner system or using dedicated
external pod as Vinten Vicon series or the new RAPTOR pod.
New weapons are the "Storm
Shadow" stand-off missile and the "Brimestone" anti-tank missile.
Further Reading
Information related to the
Tornados are available on books, magazines, web sites... everywhere.
I can highly recommend books as
"Tornado Multi-Role Combat Aircraft" by Jon Lake&Mike Crutch, the "World
Air Power Journal" N°3, the Verlinden Lock On N°12" or the "Aeroguide
N°24"... but in any case my suggestion is to look into the aircraft
magazines as "Combat Aircraft", "Aircraft Illustrated", "Air Forces
Monthly", or the "Royal Air Force Yearbook" and on the aircraft's web
sites... because are the most updated media to get pictures and others.
Tornado variants are well
represented in all the three main scales.
In 1/72th we have kit dedicated to the
GR.1/IDS/ECR/ADV from Hasegawa, Revell, Italeri, Airfix, Monogram and
ESCI (last two are out-of-production).
In 1/32 scale
we have a nice reproduction from Revell, especially for the GR.1/IDS
variants, but also a F.2(ADV).
In 1/48 scale
we have kits from Italeri, Revell, Airfix, Heller and ESCI.
Except for the ESCI, that was a
pre-production IDS replicas... the Italeri and Revell kits share the
same mould. Same for the Airfix and Heller kits... they share the same
mould.
So, at the end the choices to
reproduce a 1/48th Tornado's replica is limited to two kits.
At the moment to start this
project none of the available kit was a GR.4... Airfix has a GR.4 in the
catalogue 2003... but it's derivates from the old GR.1 mould.
So I had to start from a
GR.1/IDS to convert it into a GR.4.
Converting
Italeri's 1/48 scale Tornado GR.1
|
I decided to use the GR.1 kit
from Italeri as base, this because compared to the Airfix one, it has
recessed panel lines, detailed cockpits and a "better plastic feeling".
Shapes and sizes looks ok at first but after a deep analysis many
"mistakes" came up.
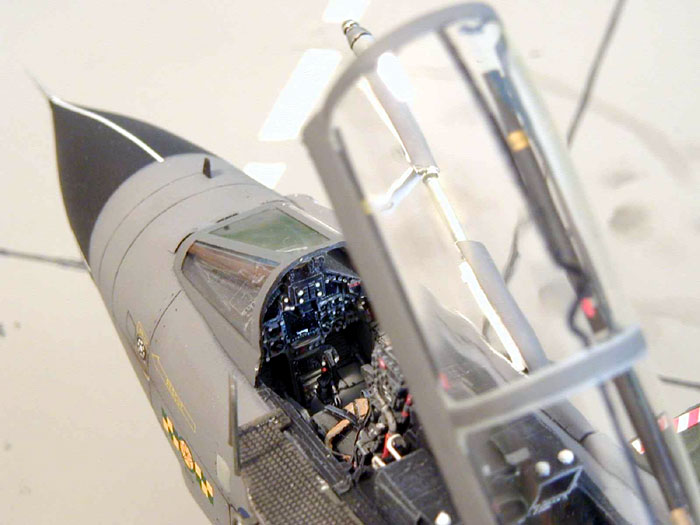
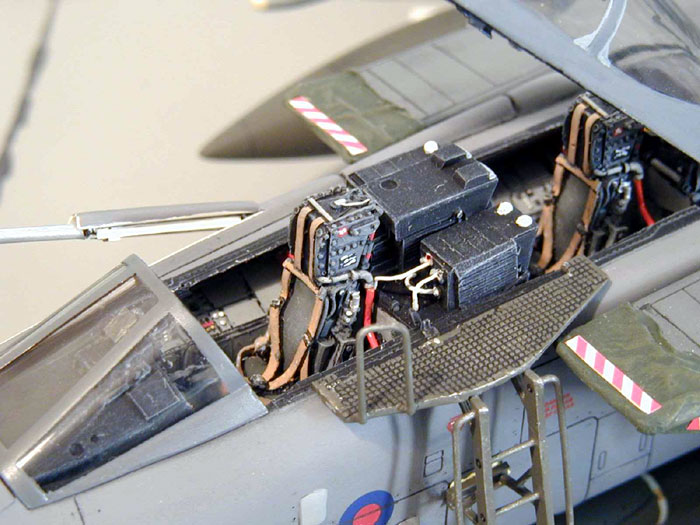
Cockpit
The kit parts has raised
instrument panels... but the instrument panels covers are an
"approximate" replicas. In this area the best thing to do is to
eliminate the parts provided in the kit and use the resin cockpit set
made by Neomega.
It's designed for GR.1/IDS but a
little work of "update" can transform it for a GR.4.
Same for the ejection seats...
the Martin Baker Mk.10 in the kit are not bad... but nothing compared to
the couple included in the Neomega's set.
Xtraparts/Paragon made a nice
resin replica of the seat too... but those are out-of-production as for
the rest of their product lines.
The cockpit colour is Medium Sea
Grey (36270)... I used Humbrol 165. Instrument screens and clocks are
Black with White/Light Grey switches. Some Red led and Yellow striped
handles are there too.
Seats are Dark Grey with Black
headrest cushion. Seat cushion is Dark Green with Yellow-Gold stripes. A
couple of Red oxygen ducts are to be reproduced with thin styrene rod
for each seat.
In the front cockpit instrument
panel the round Moving Map Display has to be substituted with a squared
Multi-Functional-Display.
On top of the rear instrument
panels cover there is a little "trapezoidal" box... GR.4 has two of
those box... should be lights for the instrument panel.
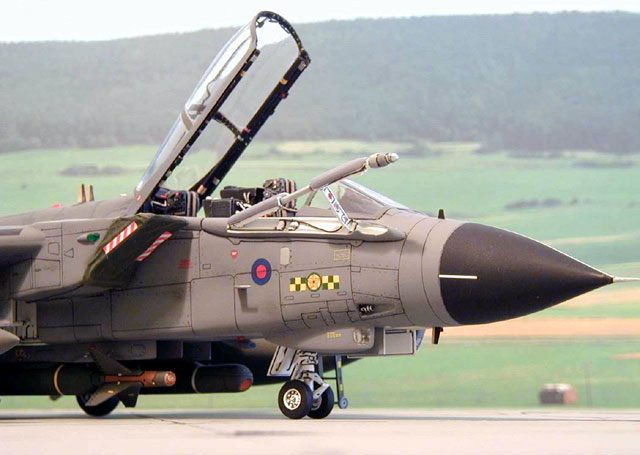
Forward Airframe
The GR.4 has the FLIR pod added
under port side of the nose, corresponding to the LRMTS. This addiction
caused the deletion of one of the cannons and the consequent close of
the fairing panels. For my model the resin FLIR pod came from an
"Airwaves" set dedicated to the GR.4 conversion. A metal FLIR pod is
also included in the "Flightpath" detail and conversion set dedicated to
the GR1/GR.4 variants.
A small Black antenna blade
needs to be added in front of the FLIR pod.
The plastic LRMTS pod is not the
best... needs to be sanded to obtain a much better profile.
Two Light Grey "rhomboidal"
placard needs to be added on the front fuselage side just where the
front windscreen finish.
Three small rectangular pieces
of thin plasticard were added in front of the windscreen to simulated
the rain dispersal ducts.
Antennas blade over and under
the nose are photo etched parts.
I decided to install the
extended IFRP, but I used only the base from the kit parts, with some
rework and details done at the attaching point. The extended parts are
completely scratch build. Thin copper wires were added to simulate the
electrical cable.
Central Airframe
The upper fuselage contour after
the cockpit is a little bit wrong... should be much linear... but is not
a big mistake. Can be corrected using epoxy putty.
A small circular White GPS
antenna has to be added between the warning black "Fragile Area" stencil
and the two antenna blades.
I opted to put a couple of soft
cover on the main engine intakes, made using masking tape. These are
Dark Green with Red White warning tags.
To join the front fuselage
section with the central section I put some references styrene parts
inside. This result in a much stronger attaching point.
All the joints needs a lot of
cyano glue and putty.
Under the rear section of the
fuselage I rebuilt the arresting hook and added a couple of intakes.
Here, with thin plasticard, I reproduced the metal plates and a small
antenna blade was added.
I replaced the speed brake vanes
with Eduard photo etched parts... better than the plastic parts but not
the best... scratch build should be best here.
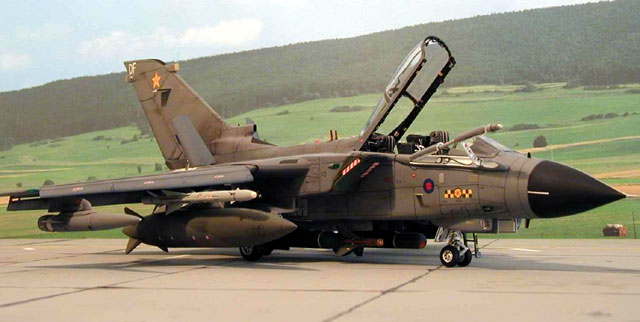
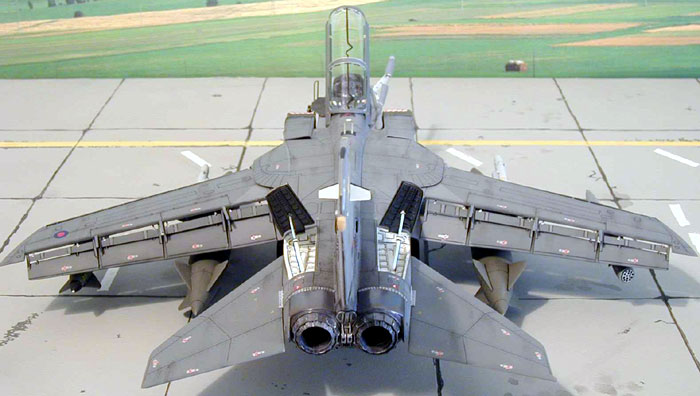
Wings
A parked Tornado with open wings
and extended flaps&slates looks "beautiful" to me.
I've got the resin flaps&slates
produced by Paragon... not so easy to be used.
Plastic flap&slates were removed
from the wings. Everything was dry-fit tested many times before glued
together.
I not glued the wings inside the
fuselages as reported in the instruction sheet. Just cut off the plastic
attaching point on the wings... the result will be an open semi-circular
area. This will give you the option to put the wings inside the fuselage
only after that everything is painted, using the pivot point inside the
fuselage as references. The rubber part where the wings enter into the
fuselage were made using the Eduard photo etched parts.
Fin
Here there is the biggest
"mistake" of the kit: the front section of the vertical fin
is completely wrong and must be replaced.
I used the resin part from
Paragon.
A precision cut has to be done
and dry-fit is a must. Epoxy putty too.
The RWR fairing has to be
shorted.
A small triangular fuel vent
dump need to installed just over the vertical rudder.
Under the RWR rear fairing some
Tornados has a small circular fairing, maybe a light... mine has this.
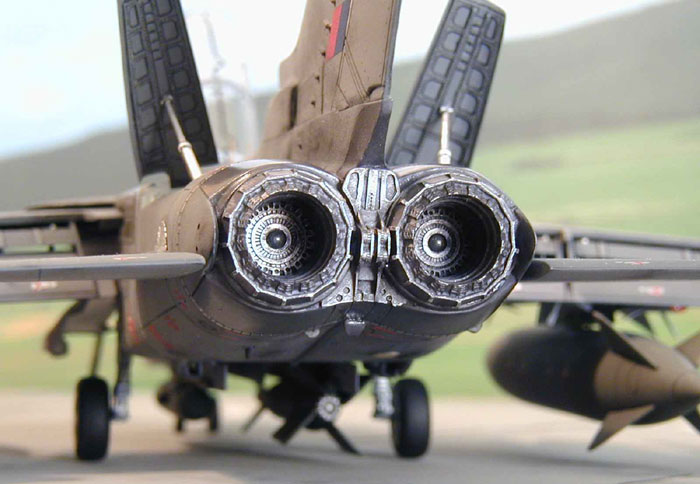
Nozzle
I used the resin afterburner
parts with the reverse thrust mechanism made by Paragon.
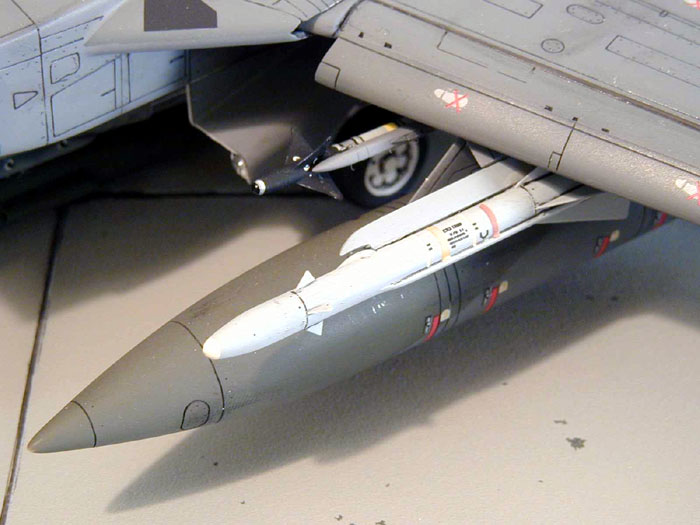
Pylons
I used the resin pylons, for
wings and fuselage both, made by Paragon. I added scratch build external
launch rails for ALARM missiles on the inboard wing pylons.
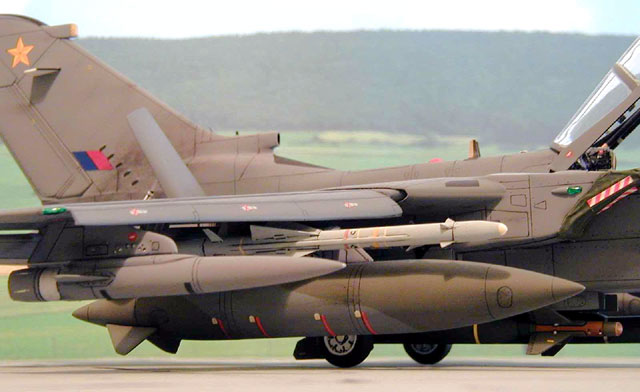
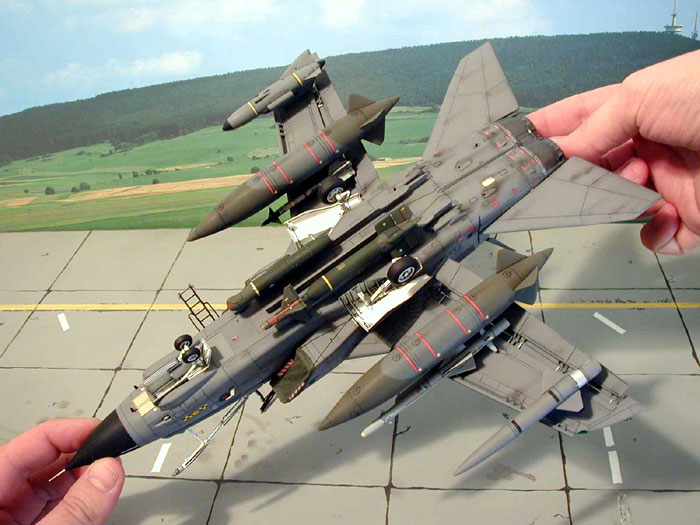
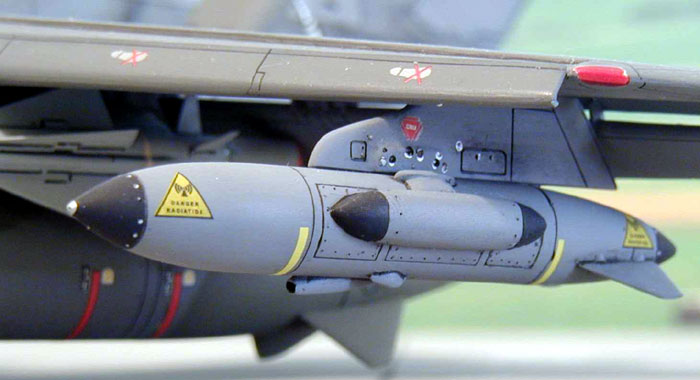
Weapons and Fuel Tanks
I compared the big "Hindenburg"
resin fuel tanks produced by Paragon and Flightpath and I was not so
happy for shape and size... and for the weight.
So having a pair of these
big tanks from the Airfix kit, I decided
to rescribe all the panels and to use the four resin fins from Paragon.
At the end I had two nice big tanks not to much heavy.
They are painted in the old RAF
camouflage, Dark Green/Dark Sea Grey... Humbrol 163 and 164.
A resin TIALD pod came from
Amraam Line.
A Paveway III LGB came from the
newest Hasegawa Weapon set, has for the AIM-9Ms.
ALARM missiles are from the
Airfix GR.1... but with much reworked done and with thin plasticard fins
(12 each missile... sigh!): colour is Light Aircraft Grey (Humbrol 127).
BOZ chaff&flares launcher and
Sky Shadow ECM pods are resin parts from Paragon: colour is Dark
Camouflage Grey (Humbrol 156).
Undercarriage
Because of the "heavy" weight of
the completed model, I decide to use the metal undercarriage legs made
from Aeroclub... I do not recommend this set to all, because it's hard
to be worked and a little bit "short". Anyway, at the end I used the
set.
Legs and wheels are Gloss White
(Humbrol 130).
Wheels contained in the kits are
not good... so I decide to use the "flatted" resin set from Paragon,
very nice done: with my big surprise(...) when everything was in place,
my Tornado looks like a Formula 1 car... the LGB under the belly was at
less than 1mm from the padding surface!
The "short" metal legs plus the
"flat" resin wheels was the reason of this shame!!!
My safe were the plastic wheels
from the Airfix GR.1... not so nice as the Paragon, but correct and
"inflated" enough to put some "mm" between the aircraft and the table.
Thin copper wires were added to
simulate the hydraulic tubes.
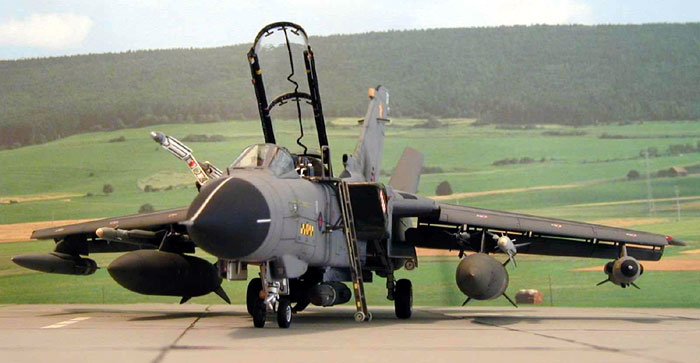
Canopy
The clear plastic part has a
seams line in the middle and a MDC. A lot of extra detail needs to be
added inside the canopy structure, as for six back-mirrors.
MDC was simulated with thin
pointed Black marker by "Gunze Sangyo Gundam Serie".
The canopy structure outside is
Dark Sea Grey (Humbrol 164), and inside is Black.
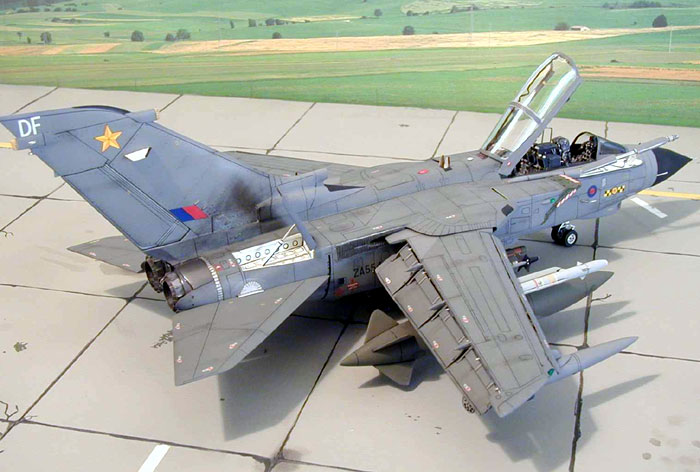
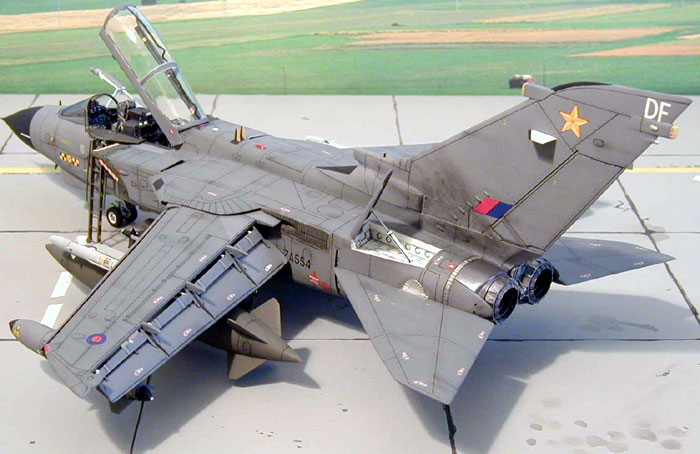
Camouflage
RAF Tornado GR.4 carry the
"double-grey" standard camouflage: Dark Camouflage Grey (Humbrol 156)
overall with Dark Sea Grey (Humbrol 164) for upper surfaces.
Radar radome is Black, as for
some vertical fin areas covering antennas.
Pre-shading with airbrush and
weathering with dry-brush and inks was done as usual.
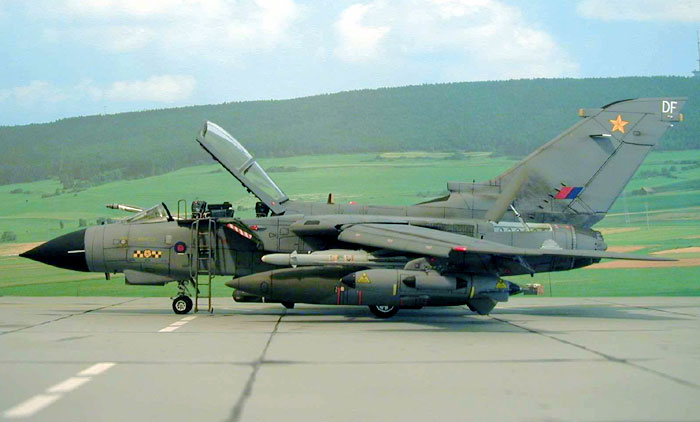
Markings
Model reproduced a RAF 31°
squadron "Gold Stars" GR.4, based at RAF Marham.
Serial code is "ZA554" and tail
code is " DF".
Squadron markings, serial/codes,
step markings, roundels and fin flash came from Xtradecal sheets
dedicated to the "RAF-2000" air force. Looks ok but it's not perfect...
squadron markings are a little bit under sized, and serial number has a
little of white outlined. Yellow stencils do not represent all the type
of English/German warnings. Step markings are a little bit large and
grey colour is "anonymous".
Many other stencils came from
Tauro Models decal sheets and from Tiger Wings decal sheet.
An access ladder was almost
scratch build. Dark Green is the colour with Yellow markings.
Pictures were took with my
"Olympus" digital camera.
A big effort (both
economic and work hours) is required to have a nice
Tornado replica in 1/48th scale. Again, a lesson of true was learned:
not all the "conversions" or "detail set" are good only because the
name...
And last but not least.... WE
NEED A COMPLETELY NEW AND UPDATED TORNADO KIT!!!!
CIAO!
Piero
Click on the thumbnails
below to view larger images:
Model, Images and Text Copyright ©
2003 by Piero De Santis
Page Created 02 May, 2003
Last Updated 17 March, 2004
Back to HyperScale
Main Page
|
 Home |
What's New |
Features |
Gallery |
Reviews |
Reference |
Forum |
Search
Home |
What's New |
Features |
Gallery |
Reviews |
Reference |
Forum |
Search