|
U-Boat Type IXC/40
by
Ingemar Caisander
|
 |
|
U-Boat Type IXC/40
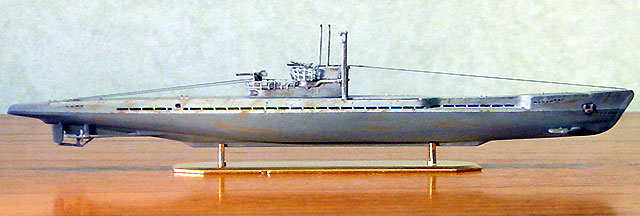
U-804 |

Mirage's
1/400 U-Boat Type IXC/40 is available online from Squadron
The U 804 was one in a series of six U-boats (U 801 – U
806) built by the shipyard at Seebeck, Bremen. U 804 was laid down on 1
December, 1942 and was commissioned almost exactly one year later on 4
December, 1943. Her commander, Oblt. Herbert Meyer, was to remain with her
until the time of her loss.
Between 4 December 1943 and 30 June 1944 she served with
the 4. Flottille as a training boat. On 16 June she was attacked by a
Norwegian Mosquito aircraft (of Sqdn 333/R); the Flak crew of the U-boat
managed to shoot down the plane but not until after it had wounded eight
men. The aircrew survived and two days later they were picked up by U 1000
and taken to Norway for questioning.
On 1 July, 1944 U 804 joined the 10. Flottille and sailed
on her first war patrol as a front boat. Then on 1 October, 1944 she was
transferred to the 33. Flottille. Her success in hunting enemy ships was
limited, though, during her entire career she only managed to sink one
vessel for a total of 1,300 tons.
Nearing the end of the war, on 9 April 1945, her luck ran
out. While en route from Norway to Kiel, U 804 and U 1065 (a type VII C/41
U-boat) was attacked by 13 British Mosquito aircraft (of Sqdn 143, 235 and
248). The British aircrafts fired several volleys of rockets that hit and
blew up both U-boats, killing their entire crews. One Mosquito (DZ592)
crashed during the attack, probably after being hit by flying debris.
The U 804 was a large ocean-going type IXC/40 U-boat with a surface
displacement of 1,144 tons. Being just over 76 meters long she carried a
crew of about 60 men.

Her two turbo supercharged MAN 9-cylinder diesels (these
were huge beasts, each engine sporting a swept cylinder volume of 520
liters!) had a nominal power rating of 2,200 hp at 470 rpm but could be
overloaded to 2,470 hp for about half an hour, enabling a top speed of
more than 18 knots on the surface. When cruising at 10 knots the surface
range was an impressive 13,850 nautical miles. Max diving depth was around
230-250 meters and the two SSW electric motors provided a top speed of 7
knots when submerged, cruising range underwater was 128 nautical miles at
two knots.
Main armaments were the standard G7a, G7e and G7s
torpedoes, the latter being the famous Zaunköning acoustic anti-escort
homing torpedoe, all fired through four bow and two aft torpedo tubes.
Normally a total of 18 torpedoes were carried, one reload for each torpedo
tube below deck and two extra torpedoes in stowage tubes at the rear base
of the conning tower. A further four reserve torpedoes were carried in
water-tight containers below the aft decking.
The antiaircraft armament was quite extensive, consisting
of one 37mm M42 autocannon on the lower Wintergarten and two twin 20mm
FlaK 38 autocannons on the upper platform. Usually about 3,050 37mm rounds
and 10,750 20mm rounds were carried. No deck gun was fitted in order to
minimize underwater drag.
The type IX C/40 U-boats featured a few modernizations as
compared to earlier variants, the most prominent features being the
retractable Schnorkel mast fitted in front of the conning tower and the
cut-back of the forward deck. The Schnorkel enabled the U-boat to run its
diesel engines when submerged just below the surface, thereby minimizing
the risk of detection when cruising or charging the batteries. U 804 was
equipped with the older Schnorchelausführung 1 with external air intake
pipe running along the side of the command tower. As this pipe was easily
damaged by heavy waves and hence leaked at the connection flange during
snorkeling it was later replaced in production by the Schnorchelausführung
2 without external ducting.
The cutback of the forward deck was done in order to minimize the time
needed for an emergency dive, as the older full-width deck had a tendency
to trap air.
Mirage's
U-Boat in the Box
|
Mirage has released a range of different German U-boat
kits in 1/400 scale lately, both the well-known type II and VII as well as
the larger ocean-going type IX. This is really great as model kits of
especially the type IX U-boats are very rare (in any scale).
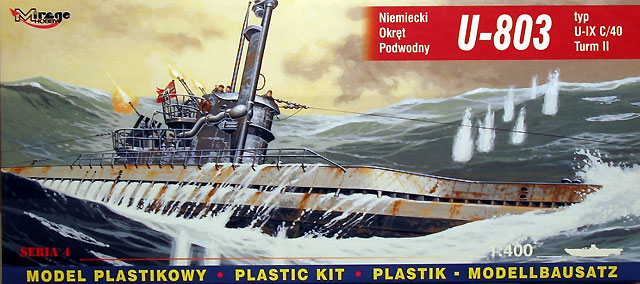
This kit (Mirage No. 40044) is molded in a light gray
styrene, detailing is impressive and mayhaps just a tad soft. No flash and
only a few minor sink marks were present on my example. When looking at
the parts on the sprues you almost get the impression of an early DML /
Dragon kit. Some of the tiniest parts are a bit too thick, especially the
propellers and the gun shields. This really is just a nitpick as I guess
it would be quite hard to mold the details any better due to the small
scale. Oh well, I guess it is time to bring out the knife and sanding
paper (or if you prefer to “cheat” and replace the small kit parts with
photoetched bits)!
Decals are supplied for three boats, U 803, U 804 and U
805.
The instructions are written in Polish with some minor
English translations but this really is not a problem as the construction
drawings are pretty clear and easy to follow.
Painting instructions are a bit vague, though, I recommend
using external references for the specific U-boat you are modeling.
I intended to build this kit “somewhat” out of the box,
only improving the kit supplied parts and adding some extra detailing by
scratch building.
Construction began by cementing the two hull halves
together. No locating tabs are provided but fit is good. The upper deck is
a bit more tricky as there is a quite prominent “step” between the
uppermost part of the hull side and the deck itself; this step will have
to be filled with putty and then sanded smooth.
The small details on the hull below the waterline are
next. The bow hydroplanes are a bit too thick so these were scraped with a
knife for a more realistic thickness. Fit is a bit mediocre here as the
rear mounting lugs on the planes don’t match up with the holes provided in
the hull. I filled the hull holes with putty, sanded the area smooth and
then just cemented the hydroplanes flush with the hull (after cutting off
the mounting lugs) using the front support arm as a guide. The result was
quite satisfactory.
The anchor is way too sturdy in appearance looking more
like some sort of toy than anything else. I sanded it down quite
extensively to give it a more realistic thickness, the centre leg was cut
off and the “horns” were reshaped to make them more pronounced (scraping
away material at the base and sharpening the tips).
Moving aft you are challenged with the construction of the
rudder / propeller arrangement. Actually, this is a rather simple affair
if you work slowly and let the glue set before moving on to the next step.
A few good location diagrams are also provided, these are quite helpful.
If you build the aft assembly “out-of-the-box” you will
end up with a reasonable good and complicated looking rudder / propeller
arrangement; however, with a little extra work you can make it near
perfect and very realistic looking, this requires just some puttying and
relocation of parts (to improve fit). Almost everything needs to be
thinned down a bit too as the small parts in this area are all a bit too
thick and sturdy looking.
The biggest joke are the propellers themselves, they look
more like, well I don’t know, mayhaps flowers or something rather than
small delicate U-boat propellers. The general shape is ok but the
thickness of the blades is ridiculous. You should either replace these
items with new scratchbuilt items or thin down the kit supplied parts. I
choosed the latter, scraping the blades extensively with a sharp knife
until their thickness became somewhat more realistic. It is actually
pretty easy work but you need to work slowly and carefully as it is very
easy to snap the blades.
I left the finished propellers off the model for now as it
will be easier to paint them that way.
If you have followed the location diagrams for the aft rudder assembly the
propeller shafts will fit nicely with no problem at all. When they are
cemented in place they will significantly stiffen up the entire aft
assembly.
Leaving the hull almost completed it was time for the second main assembly
of the kit, the command tower. This boat has the Turmumbau IV, the
improved version with an extra lower Wintergarten gun platform in addition
to the extended upper one.
Fit of the tower parts are quite good, a little sanding
here and there but nothing drastic really. No locating tabs are provided
for the two tower halves so make sure you get them aligned.
The guns are all a bit too sturdy looking (now, have I
written that before?). Everything was sanded and thinned down to get the
parts at least somewhat more to realistic scale thickness. The gun shield
for the 37-mm autocannon was replaced by a small piece of paper bent into
shape.
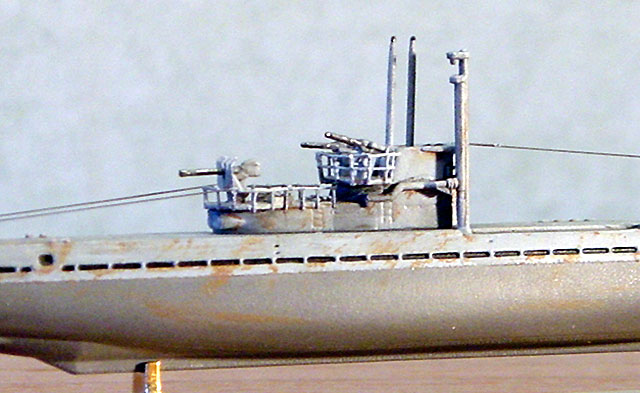
In hindsight I think the gun barrels (both 37 and 20-mm)
should have been replaced by stretched sprue or metal thread. This would
indeed enhance their appearance.
After cementing the guns in place I realized that the command tower looked
pretty “naked” and simple. So after some serious hesitation I decided to
add scratchbuilt railings made from thin pieces of stretched sprue.
I made small locating cuts in the platform edges of the
tower and then cemented the small vertical rods of the railing in place.
When these were fixed and the glue had cured I then added the horizontal
rods, these were also made from small pieces of stretched sprue.
It took quite some time to complete both Wintergartens
with the added railings but when done the tower certainly look so much
more realistic and “complete”.
The Schnorkel was cemented in place on the deck (you can only have it in
the raised position or be prepared for some serious cutting and scratch
building of the upper hull deck…) and the associated air intake pipe was
glued to the side of the command tower. Note that the spray deflector on
the starboard tower side will need to be removed in order to have the air
duct line up with the connection on the Schnorkel mast.
The two periscopes were trimmed and cemented in place. I choosed not to
attach the various antennas, though.
Finally the entire command tower assembly was cemented in
place on the deck.
For a completely accurate look you should also add the hull railing,
preferrably by using stretched sprue and the same technique as for the
command tower Wintergarten railings. I chickened out on this one, though.
Mayhaps on the next boat!
Most of the late-war type IXC/40 uboats were painted light
grey on the upper hull and command tower, with a darker, almost black,
grey colour below the waterline. Some uboats differed by instead having a
dark red underwater hull.
I began by painting the entire hull below the waterline in
Humbrol 79, a dark grey colour. When dry the waterline was masked and the
upper hull and tower was painted Humbrol 145 light grey. This was followed
by a a sprayed-on coat of clear semigloss varnish in order to prepare the
model for the weathering phase.
A black wash was added to the deck and tower, in some
places I let the wash remain a bit longer before wiping it off in order to
get a slight discolouration of the light grey. After this I added patches
of rust here and there (both above and below the waterline) and then
quickly wiped off most of the paint. This gave a nice rust-red hint to the
otherwise pretty uniform and “boring” paint scheme. Small dots and streaks
of rust were also added to the command tower and upper hull, and
especially around the free-flooding holes in the sides.
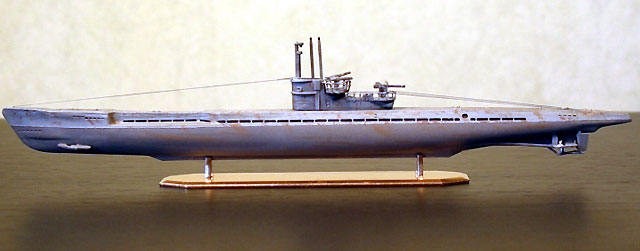
Finally I added a subtle drybrush with very light grey to
pick out and accentuate some of the detailing on the uboat. Flat clear
varnish was then sprayed on in order to seal everything.
Now it was time for the finishing touches. Antennas made
from thin black stretched sprue were added, as were the propellers. I
painted the propellers silver instead of the usual brass; late in the war
most of the German uboats had propellers made from steel rather than brass
due to shortage of raw materials.
The stand for the model was spray-painted gold.
Well, there you have it. One quite interesting little
model. Completed it is less than eight inches long so it definitely won’t
take up a lot of shelf space!
Mirage has done a good job with this kit. With just a
little bit of extra work and scratchbuilding it can be turned into a very
nice model.
Model, Images and Text
Copyright © 2003 by
Ingemar Caisander
Page Created 30 July, 2003
Last Updated
17 March, 2004
Back to
HyperScale Main Page |
 Home |
What's New |
Features |
Gallery |
Reviews |
Reference |
Forum |
Search
Home |
What's New |
Features |
Gallery |
Reviews |
Reference |
Forum |
Search