|
V-1 & Fi 103A-1
Tamiya vs. MPM
by
Floyd S. Werner Jr.
|
|
|
Arado Ar 234B |

MPM's Fi 103A-1 and
Tamiya's
V-1in 1/48 scale are available online from Squadron.com
Historical Background
The history of the V-1 is well known.
The V-1 can be considered the world’s first cruise missile. Conceived as
a vengeance weapon for use against England, it was used from mid-1944
until the end of the war. It was built in underground bunkers by slave
laborers. The missile utilized a Ramjet engine, the V-1 was either
launched on a rail system or from a He-111H-22. The V-1 would travel on
a straight course until it ran out of fuel, at which time it would drop
from the sky and explode on impact. German spies would radio back the
impact area and adjustments would be made to the next missile in
reference to fuel supply.
Unbeknownst to the Germans, the spies had been turned and were
sending back false impact locations. This saved lots of lives, but not
all V-1s missed their targets. The missiles were used on England and on
the continent, especially towards Antwerp. Derivatives of the V-1 would
allow a pilot to fly the V-1 on a suicide mission, similar to the Ohca
from Japan, but fortunately these were never used operationally.
Why Build Two V-1s?
Why build a V-1 let alone two?
While giving a modeling class at the local hobby shop (Nostalgic Plastic
in Silver Springs) one of the customers, a little boy with his father
and older brother, approached and asked if I could paint their V-1. I
had the tools and they bought the paint I said sure why not.
Well the little Tamiya V-1 impressed me and the boy was very
enthusiastic about how well it fit and how much fun it had been to
build. After painting the camouflage scheme from the box, which was not
anything spectacular, the little boy was ecstatic. He loved the airbrush
work I did, which really didn’t take but 15 minutes. He and his father
thanked me profusely and left.
I saw a lot of joy in that boy’s face when he was talking about how good
the kit was and the spark in his eye when I handed him the painted
finished product and I remembered why I got into modeling in the first
place, MODELING IS FUN! I could see myself in that boy’s place many
years ago. Oh to relive when it didn’t matter whether the plane scaled
out perfectly, the seams weren’t filled, the paint had runs or any of
the other of mirad of things modelers complain about today. In the end
it came down to he had fun and he was proud of his accomplishment in
building this kit.
I thought I would try to build that little kit and then the AMS
(Advanced Modelers Syndrome) came out in me. What if I built the Tamiya
kit and the new MPM kit and determined which was better or looked more
accurate. So that was in impetus of this build.
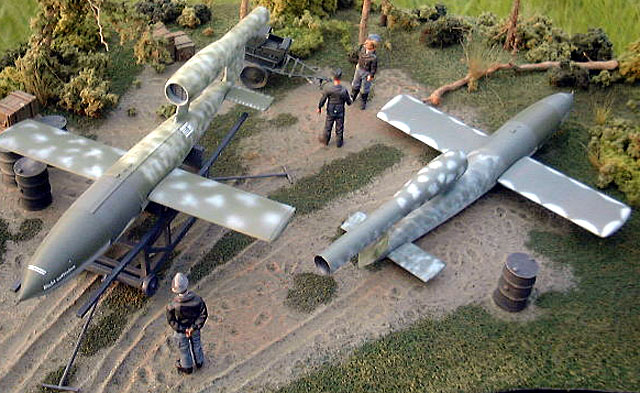
Tamiya
The kit consists of eight pieces of plastic that make up the missile
itself and a nine-piece trolley. The only instructions are on the back
of the box. There is a small decal sheet included and nothing else. The
construction does not begin in the cockpit, as there isn’t one.

There is no real order to the construction save that you have to put
in the engine front before the intake front, but other than that build
it anyway you want. The fit is perfect.
MPM
The MPM kit was released within the last year so I had high hopes for
it. It consists of eleven pieces of dark gray plastic. The surface had
some issues with pitting but in the long run I liked the pitting and
thought it very accurate, especially after painting.
Construction was straightforward. The MPM kit offers the wings as a
two-piece each side affair. I should have sanded the trailing edges more
as they are thick but the kit actually turns out pretty nice.
The Pros and Cons:
Tamiya- Like I said earlier the fit was beautiful. The spinner on the
nose is nicely done but very fragile as my example broke off early in
the construction process. The wings are a one piece each side so that
saves on filling. The exhaust pipe is suitable narrow at the exhaust and
the seam is invisible. The details such as the actuator rod for the
rudder and vents are nicely done.
The kit has a unique shape to the ramjet. It does not look like any V-1
I have ever seen. I suspect that Tamiya went to a museum that rebuilt a
V-1 and used it as a model, but the museum copy was incorrect. One thing
you will notice quickly is that the front and rear engine supports are
too tall. Again I think this goes back to the museum example.
MPM- The MPM kit benefited in being done after the Tamiya kit and it
addressed many of the flaws that the Tamiya kit had. When you look at
the MPM kit it just looks like a V-1. There are a few areas that
required filling but nothing too much and all was easily taken care of.
On the downside, the MPM kit is missing a panel line around the nose
cone. It doesn’t include the pitot tube. The propeller spinner is not
nearly as delicate as the Tamiya one. The details like the actuator rod,
vents and some access panels are not included.
Comparison:
What I noticed right away was that the Tamiya kit was about 5%
smaller than the MPM kit in length. Wingspan is fairly close to each
other. The delicate detail of the Tamiya kit is nicer than the MPM kit.
Some of the details have been omitted in the MPM kit (actuator rods on
the rudder, vents, filler ports on the nose cone).
There are some panels missing on the nose cone area of the MPM,
noticeably the nose cone itself. The MPM kit is superior in the area
under the ramjet. MPM includes the correct panels that the Tamiya kit
doesn’t. MPM doesn’t include the pitot tube that Tamiya does.
Then there is the matter of the size of the ramjet supports. MPM
looks correct but the Tamiya offering is too tall front and back. The
ramjet is superior on the MPM kit. The Tamiya one is just incorrect and
a pain to replace.
The Tamiya exhaust is better than the MPM, however, the MPM cleans up
just fine with some sandpaper.
Painting
For the purpose of this discussion the term RLM 82 is Dark Green. I
decided to try some different shades of the same paint color from
different manufacturers. As the V-1 was built in different
sub-assemblies and painted at the factory this led to a lot of
variations, especially since there were no color chips issued for the
late war greens. I did paint both interiors of the ramjet with Model
Master Magnesium. Then they were masked with foam earplugs.
Tamiya-I decided early on to try to hide the incorrect shaped ramjet by
camouflage. I painted it to represent the V-1 on page 194 in the
Monogram book. I painted the area around the warhead Polly-S RLM 84.
Then I sprayed some Gunze Sanyo RLM 82 Dark Green in a wavy pattern
typical of late war construction. Once these were dry I had to mask over
the area. Then the whole kit was spayed Polly-S RLM 76. I applied the
Polly-S RLM 82 over the nose area and then mottled the tail area,
especially the ramjet. Utilizing photos from the “V Weapons of the Third
Reich” I replicated the “clouds” and the “jagged teeth” camo in Model
Master Acrylic RLM 76. A soft mask was used for the jagged teeth and
then cleaned up free hand. Once happy I put it to the side.
MPM-Now with a beautifully painted Tamiya kit I started on the MPM.
Initially I painted the nose cone area in Model Master Acrylic RLM 82
over RLM 76 and the rest of the missile with a Gunze color I can’t
remember but it replicated RLM 99 (a very bright green primer) exactly
and RLM 77 (a very light gray primer). I liked it but it was very
boring, not to mention bright, when compared to the Tamiya paint job so
I had to go back and I repainted the whole thing except the rudder,
which I left in a mottling of RLM 99. Then after some research in the “V
Missiles” book I found another missile (page 207 top) that was different
than the Tamiya V-1 but was still very aesthetically pleasing to me. I
painted the bottom of the wings and the warhead area in a Polly-S RLM
84. Then I painted the Polly-S RLM 82 over the warhead 84. Masked it off
so that I couldn’t see it. I did this so the camouflage wouldn’t line up
perfectly.
Then I sprayed the whole missile with Model Master Acrylic RLM 76. I
then applied the wavy camouflage of Model Master RLM 82 over the top
surface. Once that was dry I then went back with the Polly-S RLM 76
clouds for the engine and the mottling. Just to experiment I used a
light over dark treatment instead of my usual dark over light technique.
I must admit that I liked the results this time. I added the scalloped
areas to the wing in RLM 76, like the photo and I was done.
Both kits were given a coat of Tamiya Clear.
Decals:
Tamiya- The Tamiya decals were printed on Invisa-Clear carrier by
Scale-Master ® and were very thin, opaque and in register. Some of the
ink ran so the decals were a little fuzzy and not clear, some of the
smaller words were not readable. Strangely much of the stencils were in
a bright green. Can’t say they were right or wrong but it looked
strange. They settled down nicely with MicroSol.
MPM- The MPM decals were very nice. The words were crystal clear and
mostly printed in black. This seemed correct to me. They were printed on
a flat carrier film but once setting solution and a gloss overcoat was
on them they disappeared.
Weathering:
Prior to weathering a Model Master Acrylic Flat was applied. The
weathering was kept to a bare minimum with only a few scratches along
the area where the missiles were attached to the trolley and where the
nose cones attached. The wash is a very light wash of Burnt Umber artist
oils.
Total time for building these two kits took about six hours. It took
me longer to paint them than to build them. So if you are looking for
something to finish quickly or a weekend build either of these kits will
do.
I liked the ease of construction of the Tamiya kit, however, the grossly
misshaped ramjet and its mounts detracts from an otherwise excellent
kit.
On the other hand, the MPM is a very nice kit but suffers from la ack
of detail.
Overall, I think the MPM kit is better. The few items missing don’t
overly detract from the look of the finished product and most can be
added by scribing or simple scratch building. With the costs being
fairly close you have to decide what is important to you. Tamiya or MPM,
oh wait what about the V-1 in the Monogram He-111 kit? Hmmm! Bottom
line: MODELING IS FUN! Keep it that way.
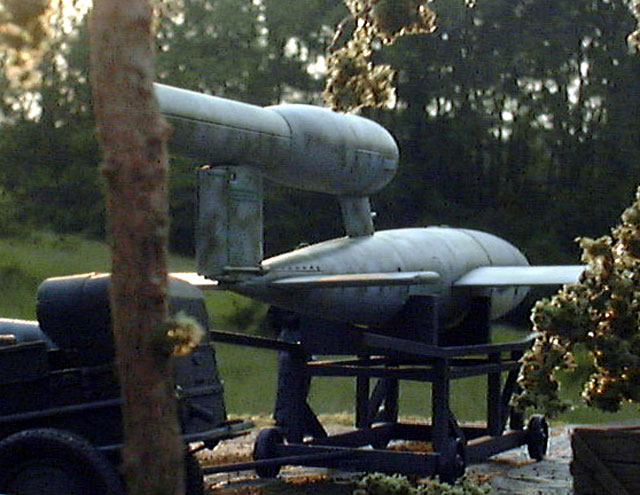
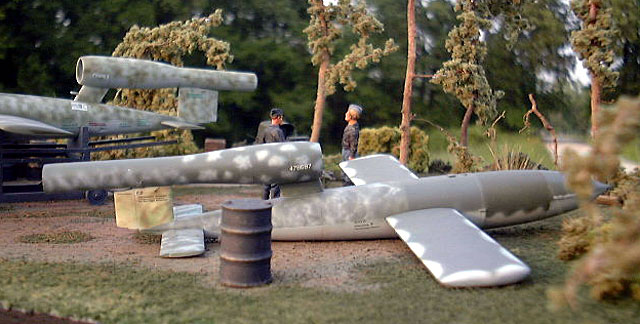
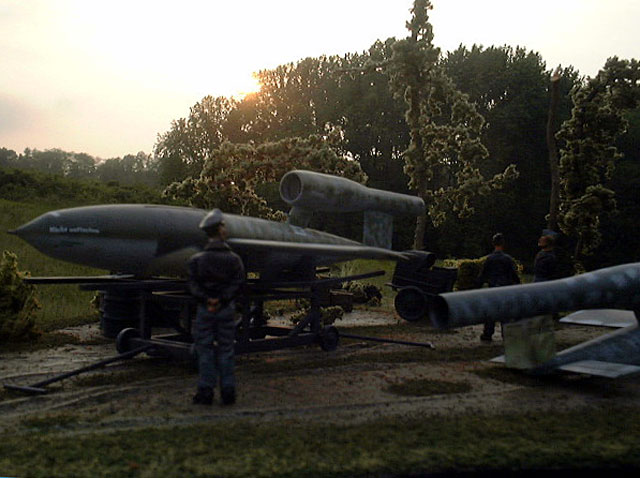
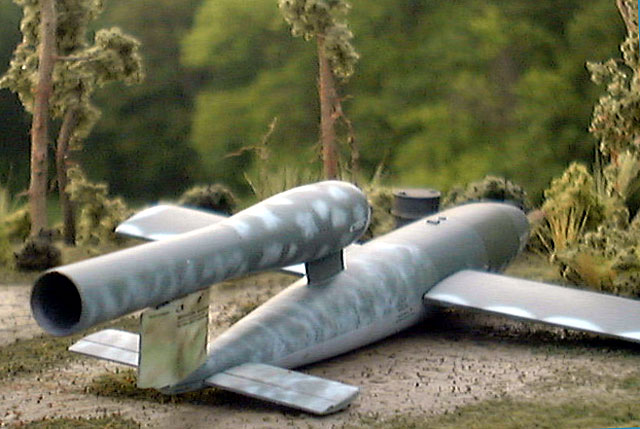
The Tamiya V-1 comes with a trolley to mount the V-1 on. Its
construction is very simple, but it adds a nice touch to the kit and an
easy way to elevate the missile off the ground. Yes, the MPM kit will
fit on it as well. There are no color suggestions that I gleaned so I
did mine in German Panzer Grey with weathering in the form of silver
pencils and pastels. As this trolley may have been made of wood you
could do a wooden paint job on it, but I think I’ll save that for
another kit like the Lippish DM1.
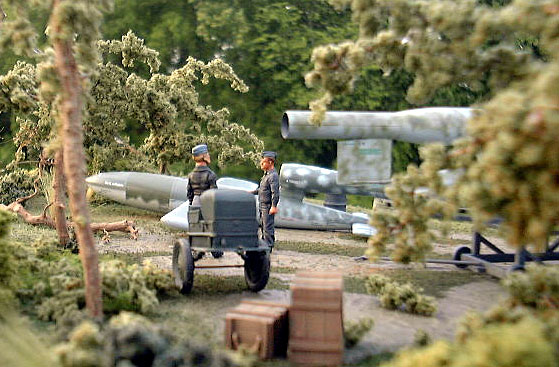
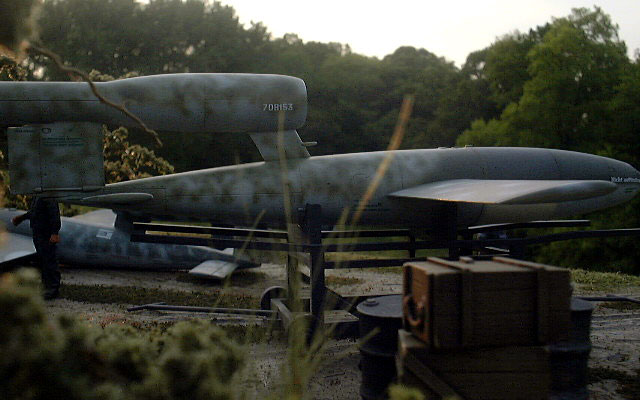
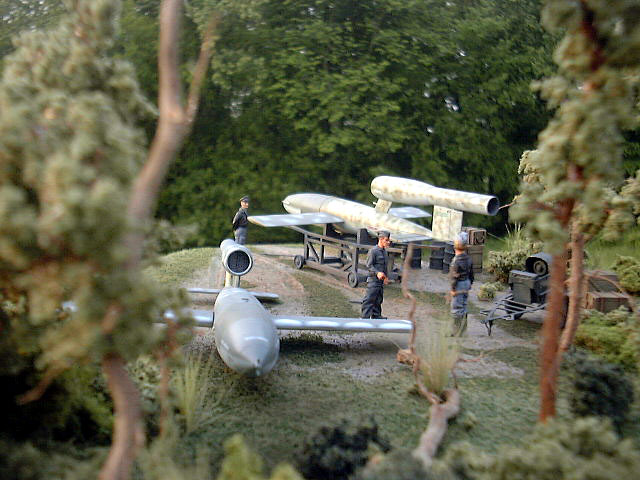
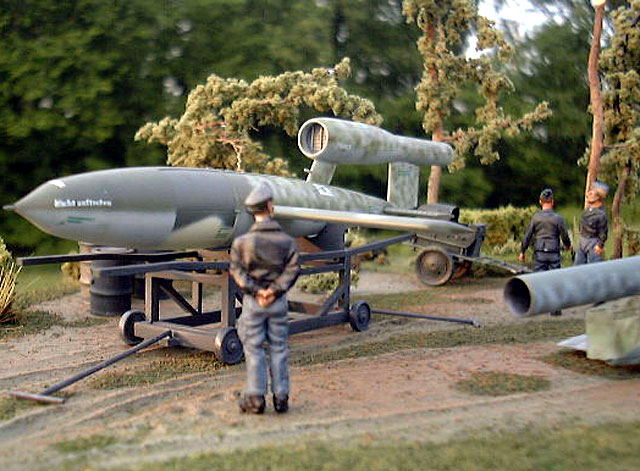
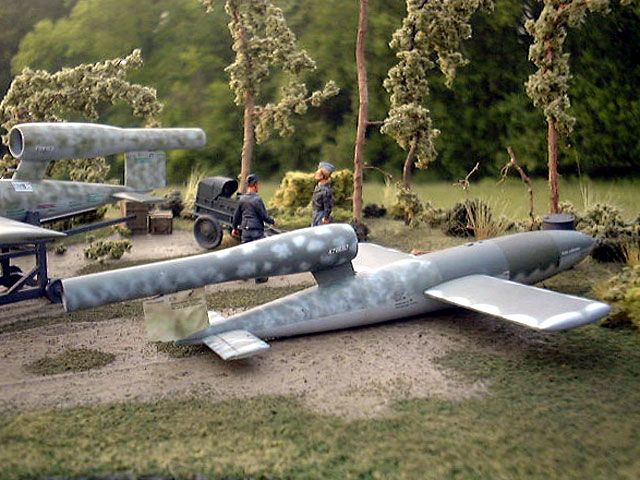
Rafe Morrisey made the base out of a foam core board with Woodland
Scenic grass, bushes and the like. The trees are some roots from the
forest around his house with Woodland Scenics foliage leaves. The ground
colors were mixed by Rafe from some ceramic paints available at Wal-Mart
for about a $1.00 each. This is only his second base and it is very good
and sets the tone for what I wanted to accomplish with the V-1s, hidden
in the tree line getting ready to launch, but best of all there is room
to put a Bf-109 or FW-190 in there. Thank you Rafe for taking the time
to show me your techniques and indulging me, not to mention overfeeding
me (thanks Kat).
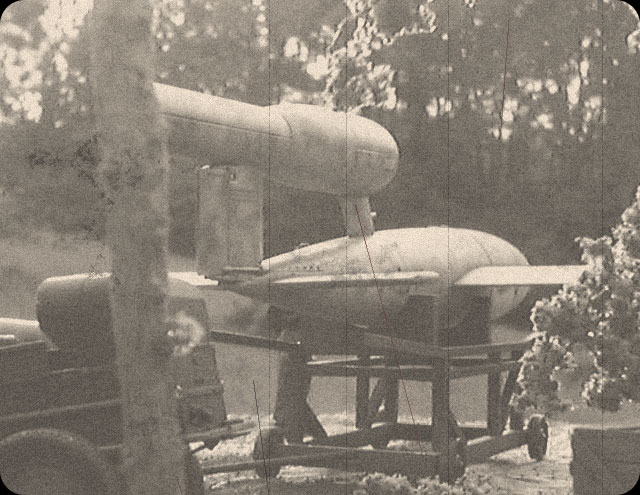
“V-Missiles of the Third Reich”, Dieter Hoelsken, Monogram
Publications, ISBN 0-914144-42-1, Copyright 1994
Click on the thumbnails
below to view larger images:
Model, Images and Text Copyright © 2003 by
Floyd S. Werner Jr.
Page Created 21 June, 2003
Last Updated 17 March, 2004
Back to HyperScale
Main Page
|
 Home |
What's New |
Features |
Gallery |
Reviews |
Reference |
Forum |
Search
Home |
What's New |
Features |
Gallery |
Reviews |
Reference |
Forum |
Search