|
de Havilland Venom
by Derek Pennington
|
|
|
de Havilland Venom |

HyperScale is proudly sponsored by
Squadron
Time: - spring, 1957
Place: - Royal Air Force Tengah, on Singapore Island. With No 60 Squadron.
It had started out as a normal day; the early crew had arrived on the line
at 6.30am, and prepared the Venoms for the first sorties. It was to be a
time of Battle Climbs to 40,000feet, busy, but not at the frantic pace of
the previous week when the Squadron had done practice rocket and bomb
training.
Four at a time, the machines took off, to reappear an hour later, flying
down the runway, peeling off to lose speed for undercarriage deployment
and then arcing down in a constant turn to line up with the runway. This
was a signal for the ground crew to stroll out to meet their charges,
which they had ‘lent’ to the pilots.
And so it went, even during the lunch hour, and being comparatively idle,
we armourers gave a hand to refuel and do the mundane jobs that made a
squadron run smoothly. There was always the odd tyre to change, oxygen to
be replenished, or simply running a kerosene soaked rag over the belly of
one of the Venoms. The different trades helped each other; being so far
from home, of the same age group, we were a pretty tight knit group.
So, it was with some interest that we noticed that a
pair of returning Venoms had broken with the usual routine. They were
flying around the airfield in formation, with one lurching all over the
sky. After a few minutes of this, a singleton peeled off and made a normal
landing but the other continued to cruise at low altitude. Even more
significant was the fact that the fire wagons had quit their lean-to and
had moved off, while a Meat Wagon (ambulance) had joined them.
I got a call from my Sergeant, who told me that the
one on its own would make a wheels up landing, and I was to be quick about
getting the ejection seat disarmed, as soon as I could get near it. The
aircraft was one of my section, and so I assumed responsibility. We
watched as the aircraft made a downwind approach, landing to gain maximum
use of the grass at the side of the runway, the canopy flying off just
before touch down. The Venom ran about 400 yards staying upright, sliding
to a stop quite near the waiting Fire services. The pilot undid his
straps, turned around and inserted the safety pin in the face blind of the
ejection seat. Good man!
As soon as it was determined that there was no sign
of fire, I was allowed in the cockpit to take out the drogue gun and to
disarm the ejection gun itself. This took a few minutes, even today, some
45 years later; I could do it in my sleep. Then it was the turn of the
recovery crew to lift the aircraft, lower the wheels and assess the
damage, but most of all to find out why this happened.
The damage was surprisingly slight, the underside
engine cowlings would need replacing, as would the gun bay doors, there
was some wear on one of the wooden fuselage formers, but all-in-all it was
nothing that a few days in the Air Servicing Flight hangar could not put
right. It was also quickly determined that the reason for the
undercarriage failure was that the Bowden cables which ran from the
undercarriage selection lever to the u/c uplocks had corroded to such an
extent that cable had seized in the tube it ran in. Think bicycle brakes,
and you will see what I mean.
With this all in mind, life returned to routine, there were still aircraft
to fly and the day was only half over. I sought out our Squadron Flight
Sergeant, the man who oversaw all our goings-on, as I was anxious to know
when my Flight would be back to full strength. This man, Flight Sergeant
White, was on his last posting prior to retirement, a man universally
liked by one and all and who it was said, had been in the RAF since the
Tiger Moth was in its chrysalis. To my query he smiled, shook his head and
said to be patient, as tomorrow is another day. With this I had to be
content.
Early the next day, we noticed a Venom land and taxi over to the ASF
hangar. It joined the wounded warrior of yesterday, which as I was to
discover was being picked clean of every useable part, as the newcomer was
its replacement, not only a new aircraft but also a different mark! Within
a day, this Mark 4 Venom was towed to our flight line, taking up the spot
of the other machine, and very pretty she looked. The finish glowed in the
tropical sun, the tiptanks and rudders had been painted red, the squadron
badge was on the nose, and the squadron emblem, white lightning flashes on
a black background were either side of the roundels on the booms. She even
smelt new. The long- range tanks were still fitted to the bomb pylons, and
one of the flight commanders, Flight Lieutenant Brian Mercer, asked that
they be left on so that he could ‘ check the aircraft out.’ One of the
differences between the Marks 1and 4 was that the latter had powered
ailerons, and he wanted to see what they were like. So the new girl was
fuelled and away he went. On his return, we gathered around him and he was
pleased with the new mount, and declared it was to be his; since he was
acting Squadron Commander, the C.O being absent, he could do this!
While all this was happening the Chiefly stuck his
head out of the office and yelled, “Strike”. He wasn’t referring to a
baseball game, or a withdraw of labour, but the fact that the squadron was
to take part in an up-country sortie, using live ammo. He was pointing to
a tractor pulling a train of bomb trolleys, so it was to be a bomb strike.
It should be explained that the British, Australian and New Zealand forces
were engaged in Operation Firedog, a fight to free the Malayan Peninsular
of C.Ts, or Communist Terrorists. It was to take ten years to do this, and
was the only time that the Communists had been beaten by force of arms.
Quickly the pylon tanks were taken off the new
aircraft, a check of the bomb release circuit showed all was well, and she
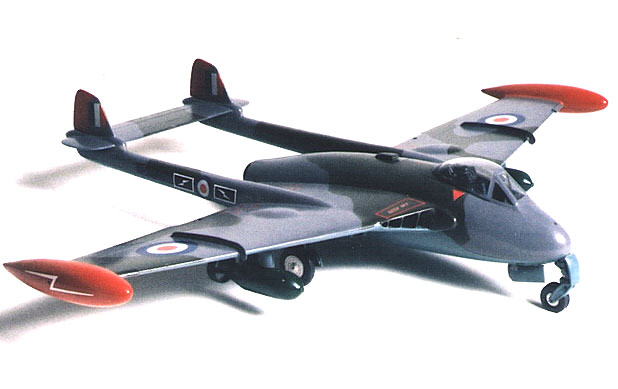
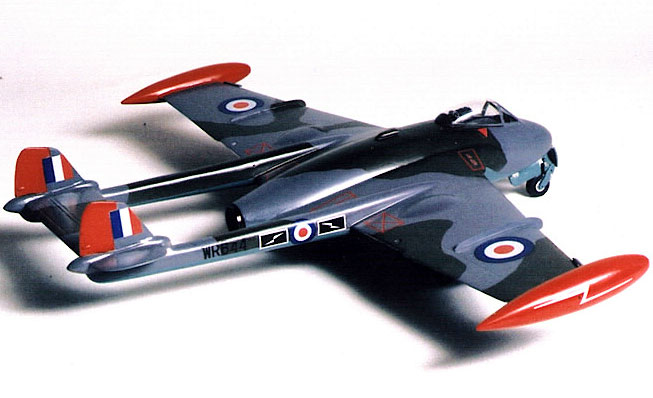
was then placed on the roll. And that is how you see my model. Bombed up
and awaiting the pilot.
Aeroclub's
1/48 Scale Venom
|
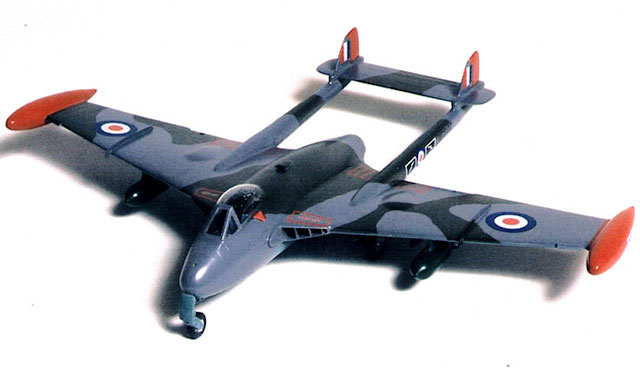
The Aeroclub Venom in 1/48 scale is a mixed media
kit, with vacuformed wings and centre fuselage; injection molded forward
fuselage and cockpit floor, tail booms and tailplane. The undercarriage,
wheels, D-doors, wheel wells, ejection seat and instrument panel are all
white metal. There are two excellent canopies, very clear, which proved to
fit well. There is also a decal sheet that provides enough decals to do
two aircraft.
Construction
Following the instructions carefully, I cut out and
sanded down the vacuformed wings and centre fuselage. A test fit showed
that they would not require any further work. Prior to gluing them
together, I laid the white metal engine rear fan and shock cone in the
tail pipe area and attempted to close the fuselage. This indicated that
some light file work would be needed on the white metal parts to get them
to fit. In addition, they would not stay put inside the smooth vac parts,
so I decided that I could slide them into position easier when the
fuselage and wings were glued together. They were set aside until later.
Prior to gluing the wings together, the white metal wheel wells were laid
in place, a check showed an excellent fit, and they were held in place
with CA. Looking for a cheap source of glue, I checked out the local
Shoppers Drug Mart for nail repair glue. It turned out to be CA with a
pretty smell! It is thin, and works well. And the price is right.
The combined wings and fuselage were tweaked a little and then MEK was run
along the joins. The fit was pleasing and when dry, some light sanding was
all that was necessary. I opened up the holes in the trailing edge of the
wing where the airbrakes were located; these are merely indicated on the
wing. These holes are in the airbrakes themselves.
I picked up the jet tailpipe metal, and slide it through the front of the
fuselage, into position, adjusting for the amount of correct protrusion
out of the rear end. Aeroclub give you a white metal jet pipe which is
added to the fan and shock cone, but I decided to use a piece of thin
brass tube instead. For this, I went to my local hobby shop; Keith’s on
Yonge Street.
I cut out the excess plastic for the air inlets at the wing roots and the
forward fuselage. Having built and painted the injection molded nose
portion, a quick check showed that this would not require much fitting and
filing, so the nose was glued in place, using MEK.. Once this was dry, the
white metal intakes were cleaned up, and glued into the wing root gaps.
Here some careful blending and filling were needed, but nothing that a few
applications of Mr. Surfacer 1000 couldn’t handle. Eventually, I was
satisfied with the blend and then turned my attention to the tail booms.
The joining surfaces were rubbed down lightly, and the fin trailing edges
worked on to reduce their thickness. Again, they were assembled with MEK,
and set aside to dry, while the holes in the wings were opened up to
accept them.
At this stage, I decided to stare at some flying shots of the Venom, to
assess the angle of the booms to the wing. Having satisfied myself on that
score, I test fitted the booms in place and was pleasantly surprised at
how well they fitted and lined up. Well done, John Adams of Aeroclub. This
was helped greatly by the set of three-view 48th scale drawings that come
with the instructions. The first boom was glued in place with constant
reference to the plan view and the Mark One Eyeball. When done, the second
boom was put in place using the first as a reference point, the theory
being that if one boom is wrong, it is best to do the same with the other,
as it will not be noticed!!
The horizontal stabilizer was slipped into place between the booms with
little trouble after some test fitting. There are two tailplane stubs,
which are located on the outboard side of the booms, so these were glued
on, using the tailplane as reference.
By now, the model was coming together, and it was necessary to consider
the tip tanks. Test fitting showed, once again, no insurmountable
problems, but prior to installation, a hole was drilled on the outboard
side of the tanks, in line with where the main wing spar would be. These
holes represented the access for the torqued bolts that held the tank in
place, and were noticeable on the photos that I looked at. That done, the
wing tanks were installed, carefully checked in profile and plan view.
The model was to be armed with two 1000lb bombs, these were obtained from
Keith’s who ordered them in from Ultracast. They are really excellent, the
fins are delicate, and the attention to detail, even on such mundane items
as bombs, quite high. Aeroclub do not give bombs or pylons in the kit, nor
yet the zero length rocket rails, so these have to be obtained from the
ubiquitous spares box. The bomb pylons were made from Contrail strut, and
the rocket stubs from cut-down 72nd items. These were installed, and at
this juncture some light cleanup of the model was done.
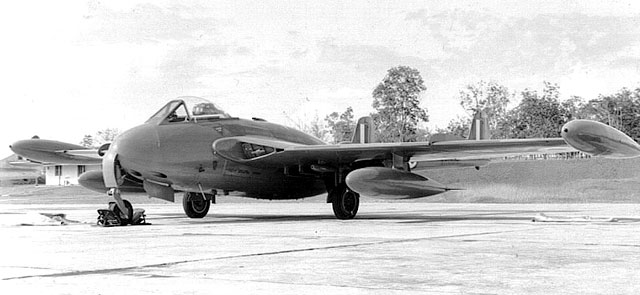
The Venom was an out growth of the Vampire, having a more powerful Ghost
engine, and a thinner higher speed wing. It was fitted with ejection
seats, and had fixed slots on the wing leading edge to correct some
interference between the wing tanks and wing itself that was affecting the
ailerons. It also had wing fences, but although Aeroclub give you the
fixed slots in white metal, the fences are not included. Using the guide
provided, I cut mine out from thin plasticard, and using the back side of
a No 11 blade, scoured out the indicated slot on the upper wing surface,
sufficiently to accept the wing fence. A touch of MEK secured these into
position.
It was now time to install the ejection seat, discard the Spitfire control
column(!) provided by Aeroclub for the more representative Hunter column
and go about cutting out and installing the canopy. There are two supplied
and they are clear and thin. I cut the first one out, fitted it, and then
tried something that John Adams had recommended, and that was to flood
solvent around the base of the canopy so as to soften the plastic to
accept the vac canopy. It worked, although perhaps I shouldn’t have used
MEK, as it started to set up the canopy. This is NOT what I wanted, so I
used the second one to go onto the model.. I dug out some slides I took so
long ago in Singapore to verify what I thought I remembered about this
fit, and satisfied with the way things were, thought about the paint job.
The Venoms were painted in the then current NATO colours of Azure Blue
undersides, Dark Green and Ocean Grey upper surfaces. These colours differ
somewhat from the wartime colours, in that they are glossy and have a
different intensity. For this I used Humbrol Azure Blue on the underside,
covering everything, including the wheel wells, and Gunze Sanyo Dark Green
and Ocean Grey.
I painted the Grey on the upper surface first, having
previously masked off the canopy, and then using the Aeroclub camo pattern
traced out lightly the Dark Green. Using a technique I saw on HyperScale,
I masked off the Grey using a Chinese version of Silly Putty, called Super
Putty. This I found in the local Toys ‘R Us, not only is it much cheaper
than the US product, but is better for masking. Since this product is for
children, who inevitable put it into their mouths, it has no oily residue
and can be used with confidence.
The method is as follows: -
Take off a small piece roll and flatten very thin.
Lay on the model close to where the drawn pattern is then ease it up to
the line using a finger. It clings very well, and can be pressed in place
confidently. I went over the canopy and wing fences, wrapped it around the
booms where they were getting thinner at the tailplane. A final check that
all was well, and the green was sprayed on. As soon as this was dry, the
putty was pealed off, to give sharp demarcation lines and what is more,
not a sign of residue. Any overspray on the putty can be rolled in, and it
will not affect its use later. Since I hate and detest masking, this is a
neat way to get out of it!
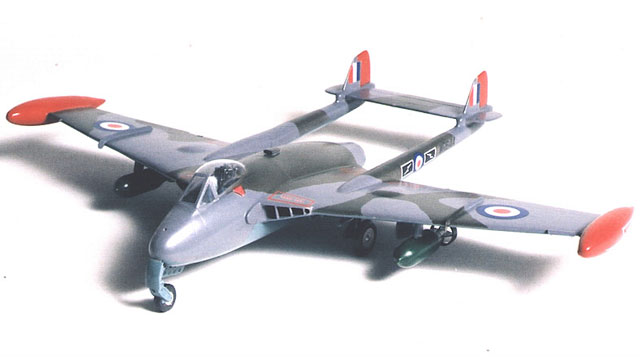
The tip tanks and fins were painted Tamiya gloss red, the lightning
stripes on the tanks made up from white decal sheet, the white outlined
black boxes either side of the roundels on the booms were done the same
way. The rest of the markings came from the decals provided by Aeroclub,
and a final overspray of Future Floor wax was used to seal everything in,
followed by a light dusting of semi-gloss to tone down the gloss a little.
The bombs were painted Testors Bronze Green No 1124, that is the little
square bottle, and when dry installed on the pylons using white glue. It
only remained to finish off the undercarriage and the D doors and the
model was finished. I didn’t like the tip-toe aspect of the way the model
stood on the wheels, so I dragged it across some rough emery cloth several
times until the wheels had flat spots, always remembering that the main
wheel tyres were inflated to 150lbs.
Aeroclub are to be congratulated on the brave way
they have issued these kits. While not to be recommended for the beginner,
they present no great challenge to those with a few conversions under
their belt. It is highly unlikely that any mainstream manufacturer will
ever do these models, and if you want a Venom in your collection in this
scale, this is the only way to go.
Model, Images and Text Copyright © 2002
by Derek Pennington
Page Created 13 February, 2003
Last Updated
17 March, 2004
Back to
HyperScale Main Page |
 Home |
What's New |
Features |
Gallery |
Reviews |
Reference |
Forum |
Search
Home |
What's New |
Features |
Gallery |
Reviews |
Reference |
Forum |
Search