|
DeHavilland Venom Mk.4
by Thomas Muggli
|
|
|
De Havilland Venom Mk. 4 |

HyperScale is proudly supported by
Squadron
Did you know that when the Venom was introduced by
the Swiss Air Force in 1956, it became the first air force in the world
with all its combat squadrons equipped with jets?
If you did know, you probably are a Swiss Air
Force buff, like myself. The 250 Venoms Mk. 1 and Mk. 4, built under
license in Switzerland, enjoyed a long and successful career in alpine
surroundings. Despite being replaced within a decade of its introductions,
by Hunters and Mirages in front line service, the Venom was in use by
militia squadrons of the Swiss Air Force for over 30 years. The last
Venoms were retired in 1983.
Naturally, I needed to have a Venom in my collection of 1/72 Swiss Air
Force aircraft. Specifically, I wanted to depict a Venom Mk. 4 as it would
have appeared in the 1960s. As is the case with most aircraft used by the
Swiss Air Force, there are no good quality kits of the Venom readily
available. When I started the project, I didn’t know that Aeroclub made a
kit of the Venom, so I decided to go another route: I was going to kitbash
my Venom from an Airfix Vampire kit and a Venom "Upgrade" kit from Tasman
Models.
Basic Construction
I turned my attention to the fuselage first. As
usual, I started construction with the cockpit. I used the cockpit floor,
instrument panel, rear bulkhead and control column from the Airfix kit. I
added details made from styrene scraps and photo-etched parts from a
Vampire detail set by Eduard. Since I could not find a suitable
aftermarket item, I built a Martin Baker Mk. 2 ejection seat from scratch
using sheet styrene, stretched sprue and wire.
Before installing the cockpit into the fuselage however, it was time for
surgery! The Venom’s fuselage was stretched and enlarged to accommodate
the larger DeHavilland Ghost engine. Using a razor saw, I cut the
unassembled fuselage halves 12 mm behind the cockpit. I also cut 18 mm
sections from the middle portion of the Sea Venom fuselage halves. These
sections were now inserted between the Vampire fuselage sections and glued
into place with liberal amounts of superglue. I also added styrene strips
to the inside of the fuselage to reinforce the joints. There are now
noticeable steps between the Vampire and Sea Venom fuselage sections. I
glued more styrene strips adjacent to the Sea Venom fuselage section to
even the steps a bit. The cockpit was now installed and the fuselage
halves joined.
Now comes the elbow grease section of the project: Using coarse files and
sandpaper, I shaped the fuselage to match my reference drawings and
photos. Once I was satisfied, I set the fuselage aside and addressed the
wings, which came from the Sea Venom kit. I removed the wing fence and the
intake vanes, and later replaced them with parts made from thin sheet
styrene. I also removed the molded sections for landing flaps and
airbrakes. The shape of the wing tip tanks did not look convincing, but I
left them alone, removing only the fins, which were not present on Swiss
Venoms. After joining the wing halves, I smoothed the leading and trailing
edges.
What followed now was elbow grease section, part 2: Joining the wings to
the fuselage. I shaped and dry fitted the wings until I achieved a
somewhat acceptable fit, and proper wing dihedral. Again using liberal
amounts of superglue, I attached the wings to the fuselage. I let
everything dry thoroughly, then filled the still existing gaps with
styrene scraps and superglue. Then there was more shaping and sanding with
coarse sandpaper, files and sanding sticks. Once everything looked ok, I
applied a coat of bright silver, then filled and sanded still existing
gaps and holes made visible by the silver paint. This needed to be
repeated a number of times until a smooth surface free of blemishes and
sanding marks was achieved. During this process I also restored panel
lines using a scribing tool.
After checking my references and dry fitting the parts, I decided to use
the twin boom tail section from the Vampire kit. It needed some
modifications though: Outside extension to the horizontal stabilizer and
new vertical tail sections were fashioned from sheet styrene. The carrot
shaped fairings on the tail were made from pieces of sprue. All the parts
were glued in place and any gaps filled with superglue.
Detailing
With the basic construction completed, it was now
time to add some detail to the model. I noticed on my reference photos
that most Venoms had their landing flaps dropped and airbrakes extended
while they were parked. I wanted to represent this on my model. The
respective molded on sections had already been removed from the wing
earlier. Replacements were made from sheet styrene. I stretch formed the
mid section of the landing flaps over the left over tail booms of the Sea
Venom kit. I dry fitted the new parts carefully, then put them aside to be
glued in place after painting was completed.
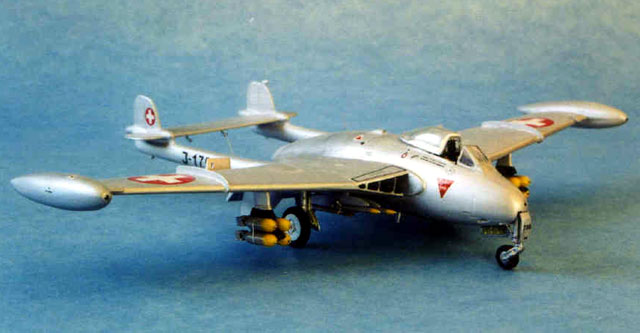
The Venom’s main landing gear varied from the Vampire, and I did not like
the parts from the Sea Venom kit. So I wound up making a new main landing
gear. The struts were made from brass tubing and styrene scraps, the
wheels came from my spares box.
I fashioned new outer wheel well doors from thin
sheet styrene and used photo etched parts from the Eduard Vampire detail
set for the door operating mechanism. The inner wheel well doors, as well
as the nose gear assembly, from the Vampire kit looked good enough for my
Venom, so I used them. The canopy from the Vampire kit was also glued in
place with white glue, and an air intake added to the top of the fuselage.
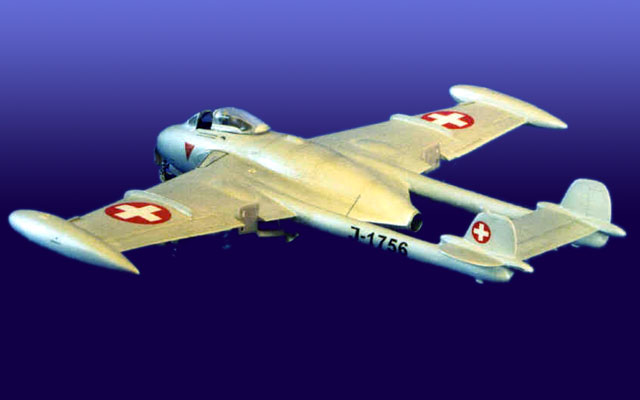
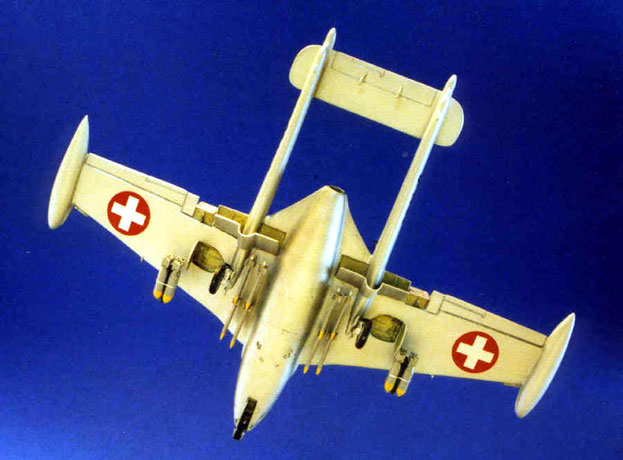
I wanted to depict my Venom with its typical Swiss
made armament. This included eight 8 cm Oerlikon rockets and two bundles
of 4x50 kg bombs. I shaped the rockets from styrene rod with the fins
carved from thin sheet styrene. The bombs were made from pieces of sprue,
their fins from brass scraps. The weapon adapters were fashioned from
sheet styrene of various thickness. Making the weapons was a bit tedious,
but I think the results are worth it.
I finished my model by airbrushing overall acrylic aluminum paint, which I
smoothed with a polishing kit. In hindsight, a lacquer based metalizer
paint would probably have been a better choice. The decals for the
national insignias came from a Shadow decal sheet, which I bought from a
mail order company in Switzerland. The remainder of the decals were made
on my computer and printed on an inkjet printer.
And there it is – my Swiss Venom! It is not a museum
quality model, but nevertheless a fun project. I am looking forward to
adding more members of the Swiss Venom/Vampire family to my collection!
Model, Images and Text Copyright © 2003
by Thomas Muggli
Page Created 20 February, 2003
Last Updated
17 March, 2004
Back to
HyperScale Main Page |
 Home |
What's New |
Features |
Gallery |
Reviews |
Reference |
Forum |
Search
Home |
What's New |
Features |
Gallery |
Reviews |
Reference |
Forum |
Search