|
SAAB AJ-37 Viggen
by
Piero De Santis
|
 |
|
SAAB AJ-37 Viggen |

Airfix 1/48 scale Viggen may be ordered online from
Squadron.com
The SAAB Viggen is a heavy multi-role combat
aircraft designed, produced and exclusively used by the Swedish Air
Force.
Introduced in the 1960s and the 1970s in all its variants, the Viggen
was designed to respond to many challenging requirements as a multi-role
(attack, reconnaissance and fighter) aircraft changing only the
payloads, while also possessing STOL capabilities.
Those requirements demanded a radical new design to embody all of those
features: a cranked-leading-edge delta wing with shoulder mounted
foreplane fitted with flaps to generate extra lift at slow speed and a
thrust reverser integrated with the rear fuselage.
Whit this aerodynamic configuration, the STOL requirement was achieved,
permitting the aircraft to use a number of dispersal site in the event
of war, as was also in the "NATO thinking" at that time.
A "military" version of the civilian used P&W JT8D engine was developed
by Volvo, adding a powerful afterburner. A double-tandem undercarriage
was provided to heavy and precise landings, even on ice.
The using of a central digital computer capable of controlling all the
functions including navigation, weapons and fuel, reduced the workload
for the single pilot. The Viggen's radar is a long range X-band type
produced by Ericsson.
The specialised variants of the Viggen are the AJ-37 for attack, the
JA-37 interceptor, the SH-37 for sea surveillance, the SF-37 for
photo-reconnaissance and the two-seat SK-37 for training.
It is a pity that such a beautiful aircraft as the
Viggen is not so well represented in all scales. In 1/72, we have a
decent kit dedicated to the AJ/JA/SF types from Heller, but the moulds
are old with raised panels. All the other kit in this scale, Airfix and
Hasegawa are only a bad reproduction of the Viggen prototype. There was
also a kit of the two-seat SK made by Matchbox.
In 1/144, we have a Viggen kit from Revell.
The 1980s saw the only 1/48 scale Viggen kit introduced by ESCI, with
two main boxings for the AJ and the JA variants.
As ESCI went out of business in the early 1990s, those kits became a
coveted "cult" item, and until last year they were very difficult and
expenses to find.
Now, in common with many other ESCI moulds, the Viggen kit is being
re-boxed under the Airfix label. At the same time, a nice decal sheet
was put on the market from Twobobs, following the hard to find one from
Flying Colours dedicated only to the double-grey camouflaged JA-37.
Airfix
(ESCI) AJ-37 Viggen Kit in 1/48
|
I used the AJ-37 kit from ESCI as the basis for my
project because I was lucky enough to find some "around the globe" over
the last few years.
The kit has raised panel lines, with very poor details in areas such as
the cockpits and undercarriage, and many mistakes around all the
airframes.
I started by rescribing all the plastic parts before starting the
assembly phases.
Specialist references books, magazines, 3-view draws and pictures are a
MUST. You can find Viggen references in "World Air Power Journal" issue
13, "Air International" volume 56 issue 2, "Jets" volume 1996 issue 7,
"Scale Aircraft Modelling" volume 14 issue 5, "Lotniczych" issue 16 and
finally an old issue from an out-of-business model magazine named "Aerei
Modellismo". This magazine was really useful with many technical
drawings and a details colour table, and finally with a 3-view scale
drawing of a "splinter" camouflaged aircraft.
Construction followed this sequence:
Nose
Starting from here we find the first "problem"...
the nose contour shape seems to be too long for the AJ variant compared
to my drawing. I obtained a better looking nose using some sandpaper.
Remember to place a weight inside the nose to balance the model.
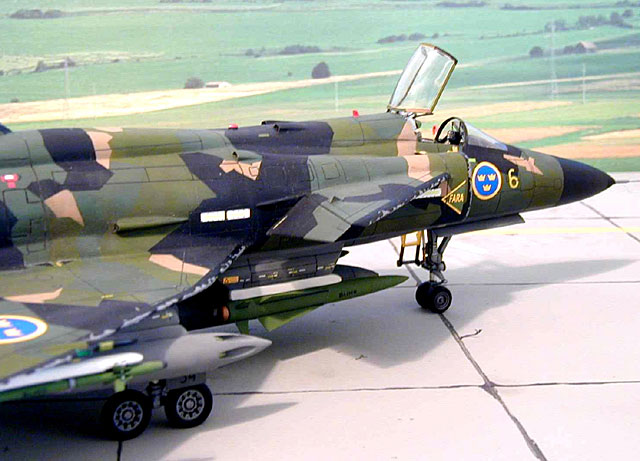
Cockpit
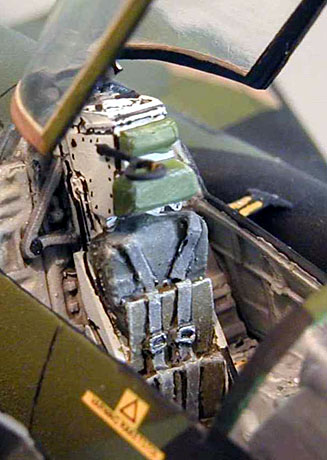 The
kit parts provided for this area includes a decal instrument panel, an
instrument coaming, a slick tube and an indefinable seat. Throw away
those pieces and scratch build a completely new cockpit using plasticard
and pieces from your spare parts store. An "oversized" control stick is
also provided in the kit. The
kit parts provided for this area includes a decal instrument panel, an
instrument coaming, a slick tube and an indefinable seat. Throw away
those pieces and scratch build a completely new cockpit using plasticard
and pieces from your spare parts store. An "oversized" control stick is
also provided in the kit.
A resin detail set for the Viggen is now produced by a Czech
manufacture, but it was too late for my model, and personally I
preferred mine. From this resin set I used the ejection seat that is a
very nice piece to reproduce this particular seat.
For the instrument panel, I assembled instruments from Reheat photo
etched sheets. Remember that the instrument panel layout change between
the AJ and JA types. The HUD is a photo etched modified one.
The cockpit colour is Very Light Grey (Humbrol 147) with Black
instrument details. Instrument panel cover is "dirty" Black.
The seat is Very Light Grey (Humbrol 147) with headrest in Light Green
(Humbrol 80) and seat cushion in Olive Drab/Dark Green (Humbrol 155 and
108). Straps are Medium Grey (Humbrol 106). The emergency handle is
Black. Other details as the seat attachment points to the bulkhead are
Aluminium (Humbrol 56).
Front Undercarriage
The front wheel bay part in the kit is deep enough
but simple. I replaced it with a new detailed part. The undercarriage
leg and wheels were replaced too with a new one.
Close up pictures of this section can be found in
many walkaround articles on the Internet.
The wheel bay is Aluminium (Humbrol 56), as for the
leg, with silver (Humbrol 11) details. Oil and hydraulic ducts are
Black.
Main Jet Intakes
The kit parts are too long and needs to be shorted.
You have also to reproduce the mobile shield part on the lower side. The
intake inside colour is Aluminium (Humbrol 56). The edge of the intake
is Black with a lot of peeling were the Aluminium colour came up.
Central Fuselage
The fuselage contour seams to be good, but the
fitting is poor and needs a lot of cyano and epoxy putty. I positioned
close the side airbrake and left open the couple under the fuselage.
Here, I added the oleo actuator parts and drilled the mobile speed
brake. The speed brake colour is Copper (Humbrol 54).
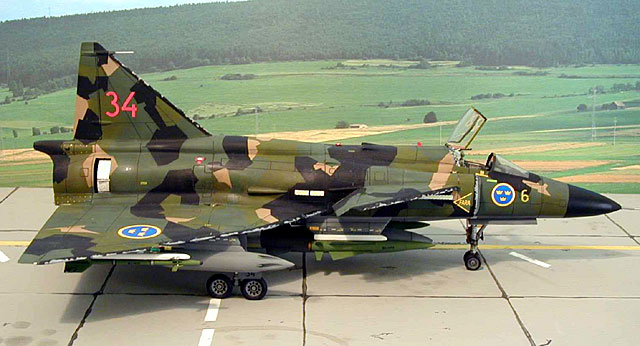
Wings and Foreplanes
The plastic wings were a little bit warped and
there are no reference attaching pins to the fuselage. Again a big
amount of dry fitting, cyano and epoxy putty also here are required. I
split the flaps from the foreplanes to be positioned down. A small
triangular fence was added on top of each foreplane. Under the rear
section of the right wing I added a semi-circular antenna blade in Light
Tan colour (Humbrol 148).
The edge of the wings and foreplanes is Black with a lot of peeling were
the Aluminium colour came up.
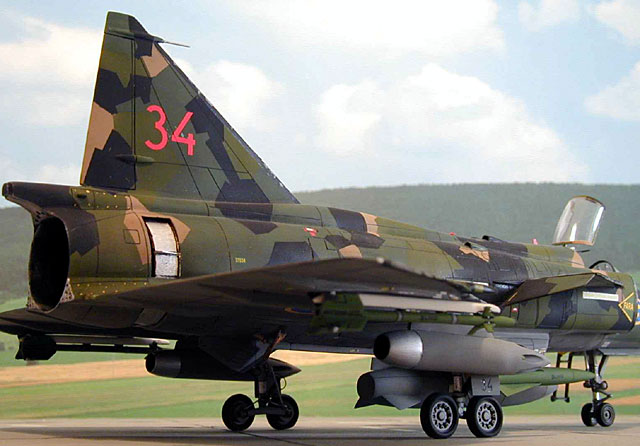
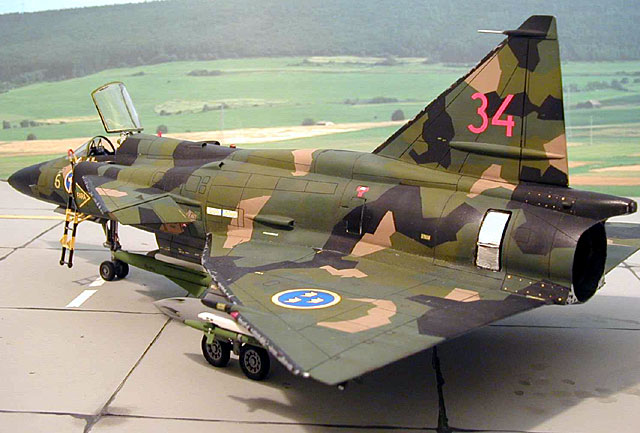
Vertical Tail
The piece is too short on top and needs to be
length with plasticard. Cyano and epoxy putty as you prefer where the
piece join the fuselage. Remember that on the real aircraft the tail can
be side rotate to facilitated the storage inside the mountain shelter.
The edge of the tail is Black with a lot of peeling were the Aluminium
colour came up. The tail fin on the AJ/SF/SH is completely different
from the one on the JA/SK.
Exhaust
The kit parts are too "basic". I borrowed the end
turbine part from the P&W included in the Italeri' F-16, together with
the duct, attached to the kit afterburner part, inside I placed some
small rectangular pieces of plasticard to simulate the petals. Two small
fence were added to the external sides.
The reverser petals included in the kit were cut,
detailed and placed in a mid-way position to let see the inside.
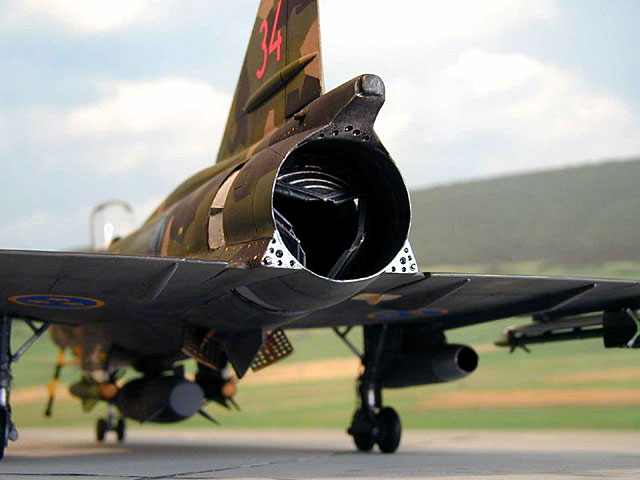
All the exhaust section was painted using metallic
and black colours, with a lot of dry-brushing. On each side of the rear
cone section I added a small circular intake.
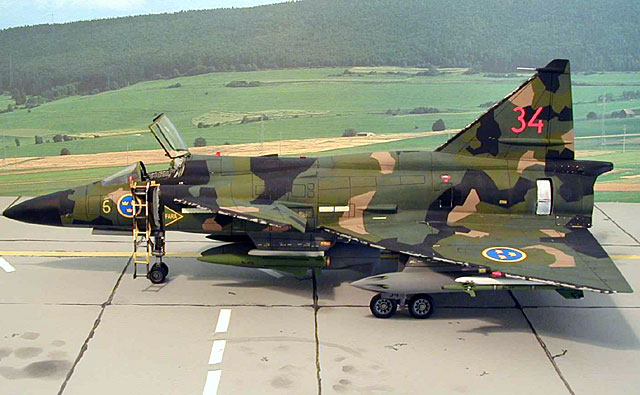
Pylons
I used the kit parts, with a lot of dry fitting
test and some reshaping, most on the external two. Attention, the old
ESCI kit dedicated to the AJ contains a pair of incorrectly shaped
fuselage pylons. The right shaped pylons are included in the JA box.
On the central fuselage pylon there is an oval
air-intake, where I added a strut in the intake.
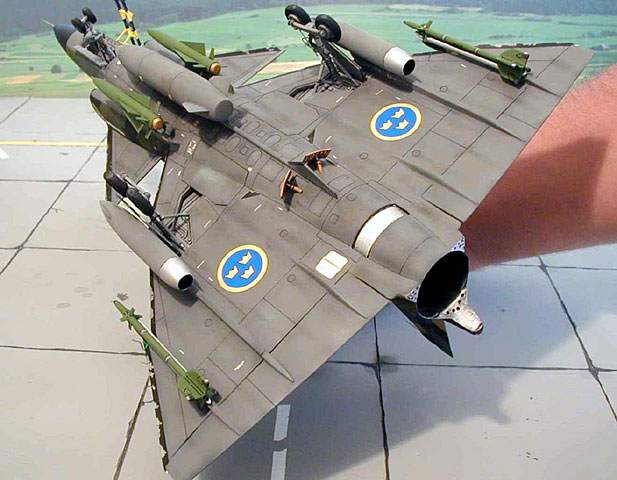
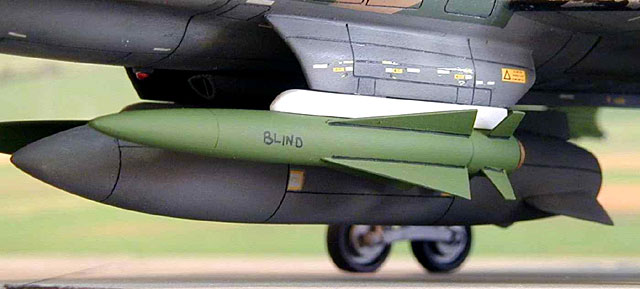
Weapons and Fuel Tanks
I armed my AJ-37 with training-weapon
configuration, so I attached the big Bofors 135mm rocket pods provided
in the kit under the mid wing pylons. Those rocket pods are painted in
Medium Grey (Humbrol 106) with Silver (Humbrol 11) rear section and
Litght Green (Humbrol 80). Under the external wing pylons I placed a
pair of AIM-9J taken form the Hasegawa weapon set, and a pair of launch
rails from a Monogram's AV-8B. Launch rails are White (Humbrol 130) and
the AIM-9J are Light Green (Humbrol 80). I used the two air-surface
RB-05 missiles provided in the kit, and placed under the two fuselage
pylons. On those missiles I replaced all the fins with new made with
thin plasticard. White launch rails were scratch build and added. Also
those missiles are painted Light Green (Humbrol 80) with Copper (Humbrol
54) rear section.
I write "drill" warning label with a black pen on the AIM-9J and RB-05
sides.
Under the central fuselage pylon I attached the
drop tanks provided in the kit, with three new refined fins. Tanks
colour is Medium Grey (Humbrol 106).
Main Undercarriage
Here the kit is crude, and scratch build wheel bay
should be required. As showed in many Viggen's photos, a little help
came when the aircraft is parked, with the two big doors in close
position. The other section of the wheel bay can be detailed with some
cabling and ducts. The undercarriage legs needs to be detailed with many
oleo and hydraulic actuators. Wheels needs to be replaced with others
from your spare storage.
Colour of the legs and wheels is Aluminium (Humbrol
56) with Silver (Humbrol 11) details.
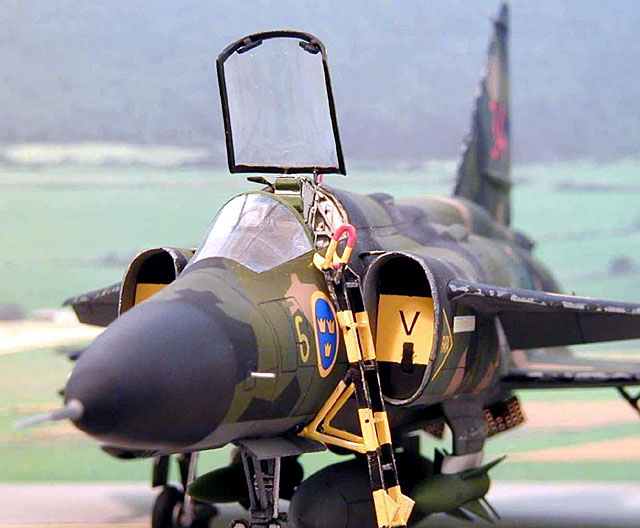
Canopy
In many of my ESCI Viggen boxes I found that the
clear windshield part has a "line" in the middle,not on the surface but
inside the plastic part, maybe a beginning of cracking. Anyway, with
many thanks to a roman modeller-friend, I get a vac formed new
windshield. It was not easy to place it on the kit, because the piece is
very thin and the possibility to crack the joint in the next painting
and decaling phases. Fortunately, at the end the result was very good.
The canopy came from the kit and I added a couple of back-mirrors and
the opening system. Inside colour is Black, with the external as for the
camouflage pattern. A thin Light Tan (Humbrol 94) line was painted
around the canopy to simulate the sealed.
Camouflage
It was from the beginning of this project that was
my intention to finishing my AJ-37 in the famous "splinter" camouflage.
I was not scared by the pattern but it was my goal to find "the best"
match for paints. At the end of many comparisons, I opted for the
following colours: Matt Black, Dark Tan (Humbrol 118), Dark Green
(Humbrol 114) and Light Green (Humbrol 226). Under surface was Medium
Grey (Humbrol 106).
All those colours are very matt, and looking at the pictures of the real
Viggens, can fade easily.
The camouflage pattern was made using pieces of Tamiya tape, starting
paint a base colour, for me was the Medium Grey. After masking the under
surface, I sprayed the Black approximately on the areas where the colour
should go. Again put Tamiya masking tape to cover the Black areas,
following the 3-view drawing I found on the old italian model magazine.
This time I sprayed the Dark Tan colour and repeat the masking step as
before. Leave the masking tape on the model until the completely
camouflage will be finished. I sprayed the Light Green colour, again
masking tape and finally the Dark Green.
Now, with the paint well dried, it's time to
discover what going on under... Let me said it was a big, big surprise
that none of the colours went over the other and the tape doesn't peel
off any chip of paints. I don't know if it was only a matter of lucky,
but the Tamiya tape worked perfectly, as for the Humbrol colours.
Radar radome is Black.
Pre-shading with airbrush and weathering with dry-brush and inks was
done as usual.
Decals
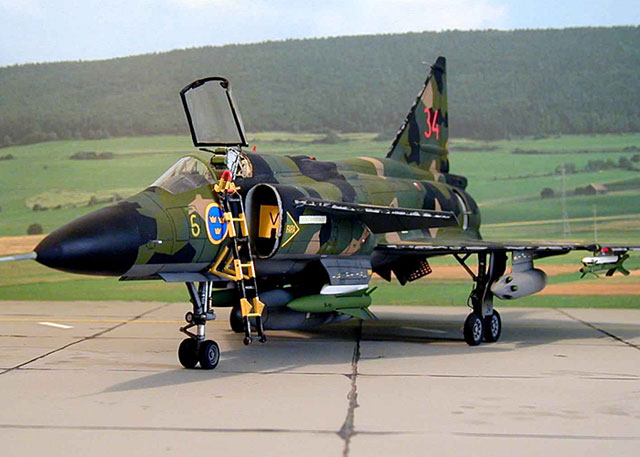
My model reproduced an AJ-37 Viggen of F6 swedish
squadron, based at Karlsborg in the 1992, with a "34" red code on the
vertical tail.
All the decals came from the new decal sheet produced by Twobobs, so is
perfect in colours, adhesion, and no silvering at all.
Future clear cote was given under and over the decal.
An unlucky result was the first cote of clear matt... leave a "white
dusk" over the wings attaching areas. After a cleaning job using an
eyeglass tissue most of this dusk disappear. Nose cone was satin
finished.
Details and Additions
An access ladder was scratch build and painted in
Black and Yellow. A couple of F.OD. were also scratch build, painted
Yellow and Black and placed inside the engine air intakes. A small
triangular Red antenna was put over the fuselage behind the canopy and a
Silver A.O.A. sensor on the left side of the nose.
Pictures were taken with my "Olympus" digital
camera.
This is another model that requires a lot of effort for an acceptable
result, but this will not stop me from starting a new one to reproduce a
JA-37... and a SF. Why not?
Many thanks to Fulvio, Luca, Roberto e Marco for help me in this
project.
CIAO!
Click on the thumbnails
below to view larger images:
Model, Images and Text Copyright ©
2003 by Piero De Santis
Page Created 04 August, 2003
Last Updated
17 March, 2004
Back to
HyperScale Main Page
|
 Home |
What's New |
Features |
Gallery |
Reviews |
Reference |
Forum |
Search
Home |
What's New |
Features |
Gallery |
Reviews |
Reference |
Forum |
Search