|
Satte Literschüssel (Werners
Motorbike)
by David Vanhoucke
|
|
|
Satte Literschüssel (Werners Motorbike) |

HyperScale is proudly supported by Squadron
Strolling around at one of
the many contests we attend to with our club I stumbled upon this Revell
release of the motorbike of Werner, a German comic hero. Being for the
German market only it was unavailable in Belgium. Lucky as I was, I was
able to buy both the box with the Werner figures and the motorbike.
The kits are very cheap and fun to build as such, but I wanted to have
something more, keen to have a full Alclad II model. Also, being an AMS
victim and tired of hearing: ‘huh, another model you won’t finish’ I was
very dedicated to finish this one.
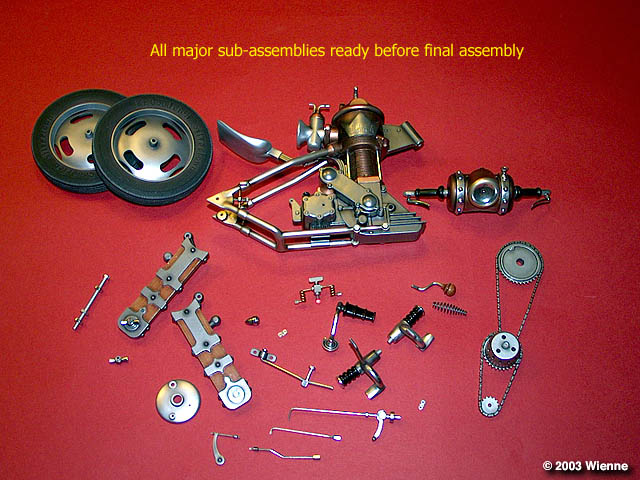
The break-up of parts and
assembly sequence is rather peculiar. If one follows the beautiful full
colour manual one inevitably runs into problems with seams impossible to
clean up. A bit of rethinking and lots of dry-fitting resulted in a number
of sub-assemblies that could easily be handled and finished separately.
Let’s start with the engine.

Click the thumbnails below to view larger
images:
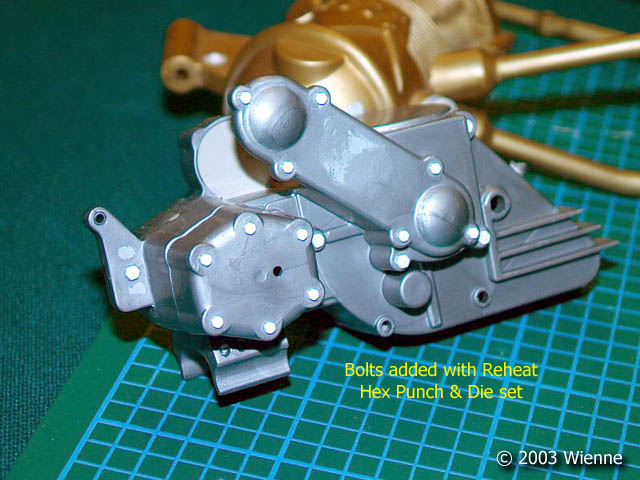
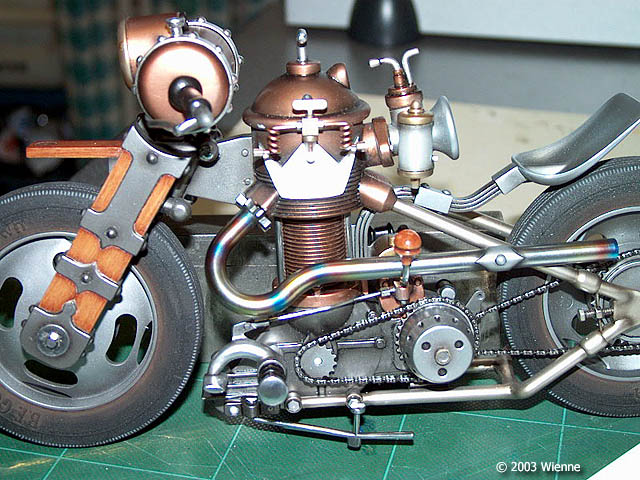
The engine block has a huge
opening on the top that I filled with Milliput. Hexagonal bolts were
added, made with a Reheat hex punch-and-die. The engine halves were then
assembled with the ungainly looking screws. These were hidden with bolts
after being filled with Milliput.
The oil-filling pipe was replaced with a piece of sprue. The
cylinder-frame halves were glued and cleaned up and the carburettor sawn
off to be rebuild later.
The gauge on the cylinder was replaced with thick plastic card in which I
drilled the instrument face opening to half thickness with a cutter drill.
Careful sanding produced the rim. The gauge on the fuel tank was added in
the same way. Still on the cylinder the chromed crown-shaped side plates
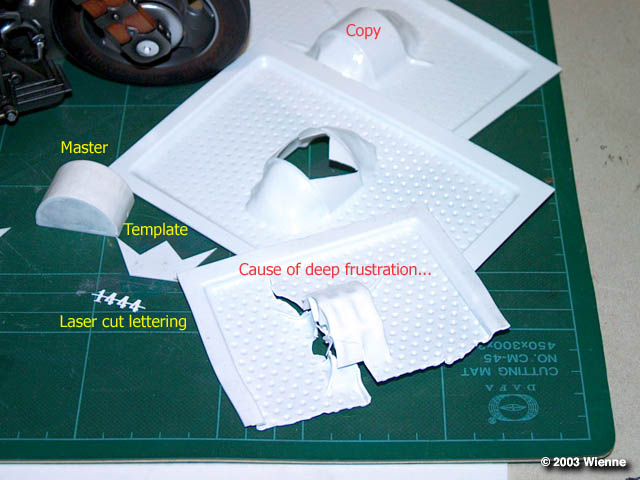
with ‘1444’ on it were removed to be rebuild separately.
Speaking of the side plates, these really had to be separate pieces
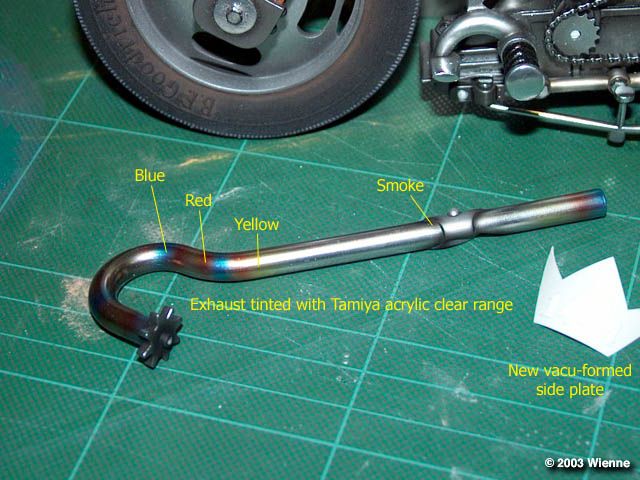
because of the chrome finish I wanted to apply. They were vac-formed over
a copy of the cylinder half on my homemade vac-form set-up.
The crown shape was traced using a template I had made previously with
Tamiya tape. The lettering was set in CorelDraw 9, exported to a DXF file
and cut with a laser. The letters were then glued to the plates with the
green Tamiya glue.
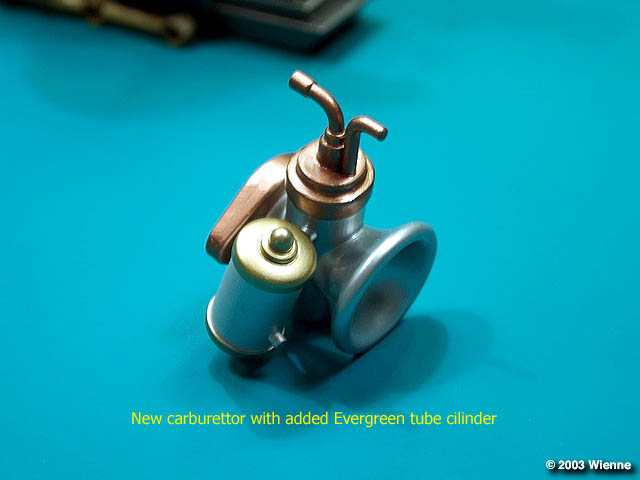
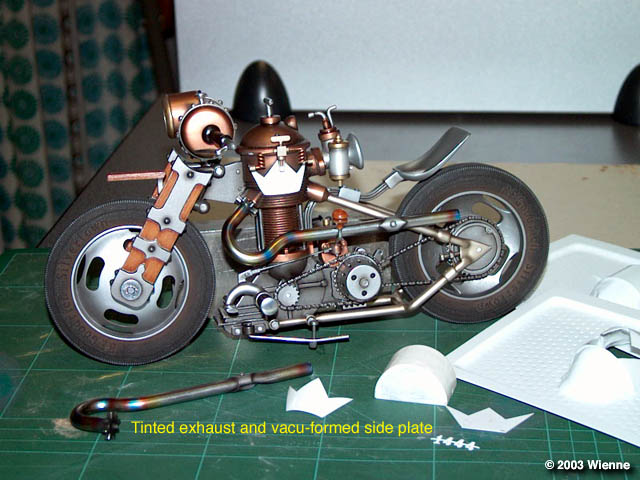
After cleaning up the seam the carburettor intake was machined out with a
round woodworking router bit. All the piping was replaced with rod and the
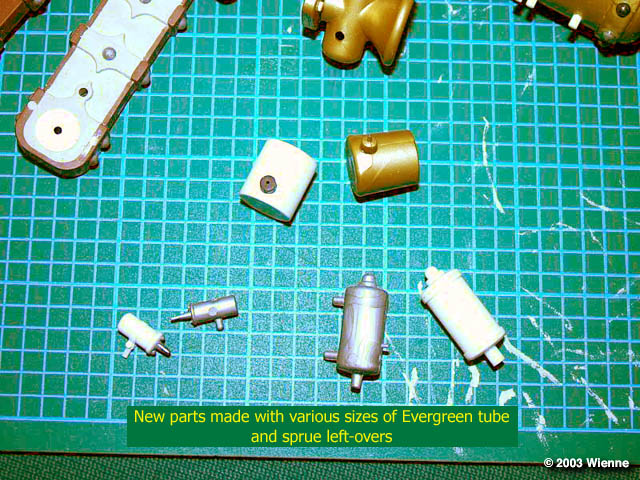
attached cylinder rebuild with Evergreen tube.
The oil tank on the engine block was also replaced with Evergreen tube
whose diameter I increased by gluing layers of plastic card around it. A
thick piece of sprue served as the pipe on it.
The fuel valve was a bit basic to my liking, so I completely rebuild it,
adding a control glass in the process and lots of Plastruct hexagonal rod.
The piping was done with copper wire recovered from a solenoid from which
I first removed the reddish varnish.
Click the thumbnails below to view larger
images:
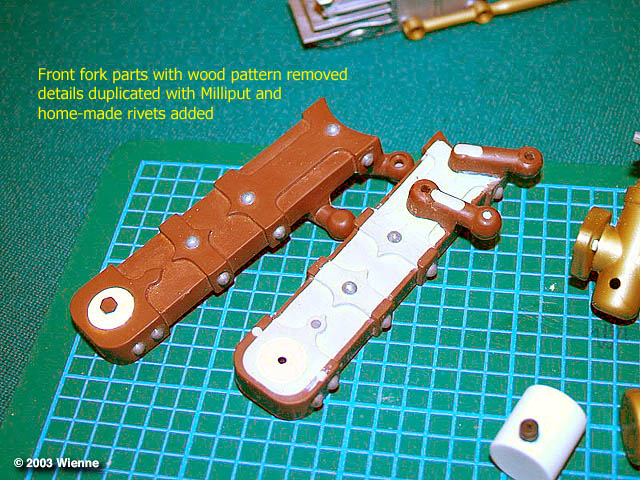
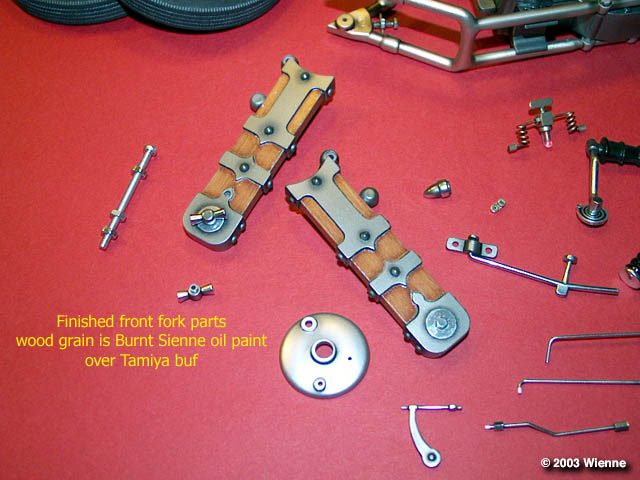
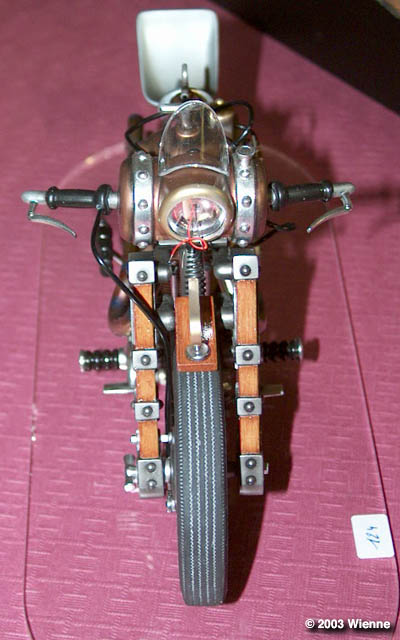
The hardest parts were the
front fork and fuel tank. The fork parts were hollow on the inside, had a
very nasty seam running over the rivets and were made of a very unpleasant
Playmobil like plastic material that peeled away during sanding. The wood
like pattern, being acceptable wasn’t on all faces, so it had to go. Heavy
surgery in sight.
The rivets on the fork were removed, the outer details duplicated in
Milliput casted in moulds made of Milliput. Sounds weird, but it works,
providing you cover the part to be duplicated with Talcum powder when
making the mould. Once the insides filled the copied details were glued
and sanded.
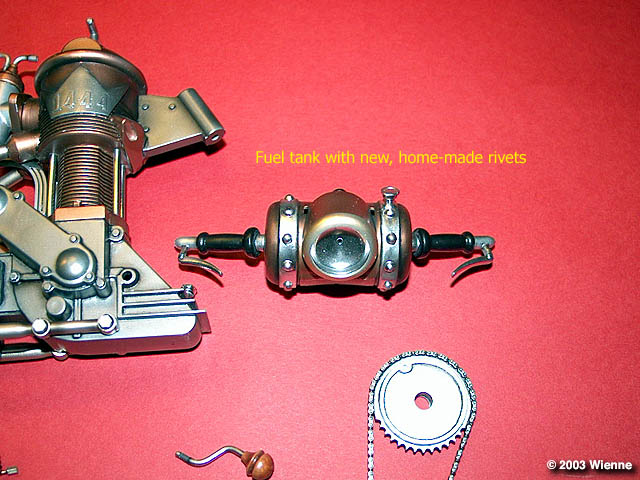
The fuel tank needed lots of reshaping due to its peculiar construction,
two intersecting cylindrical shapes. Careful filling and sanding gave an
acceptable result. The rivets were also removed.
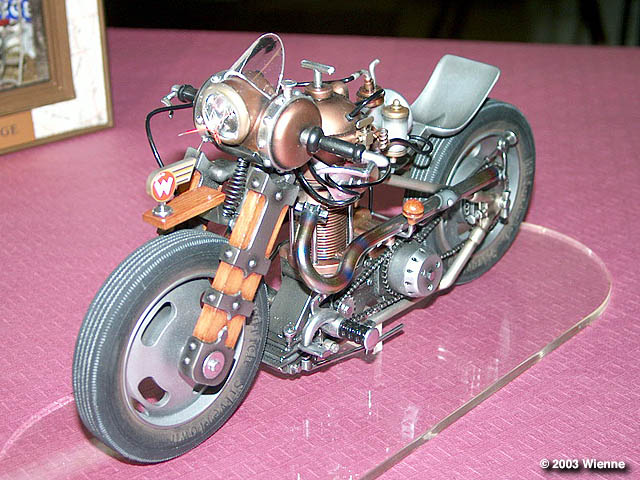
The rivets on the whole model were replaced using the sprue from the kit.
With a ball shaped router I made a hole in a piece of synthetic wood and
pushed the heated sprue in it. Time consuming business but worthwhile.
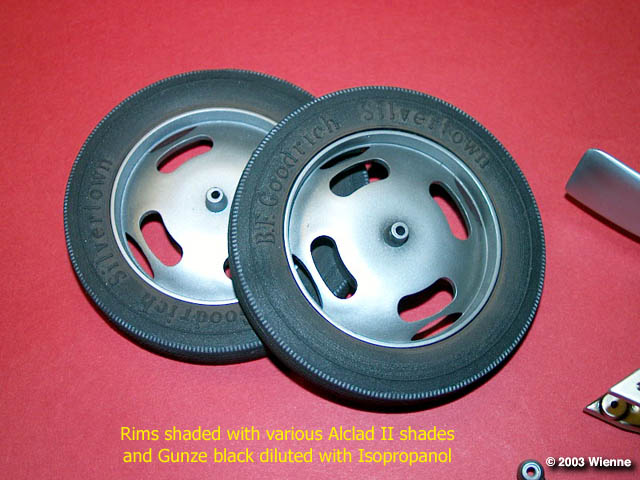
The wheel rims were just painted, shaded with Gunze black and finally
highlighted with lighter shades of Alclad II.
All the pushrods were replaced by plastic rod combined with Plastruct
styrene hexagonal rod.
In a few words this was the most time consuming part of the kit.
Painting and
Finishing Touches
|
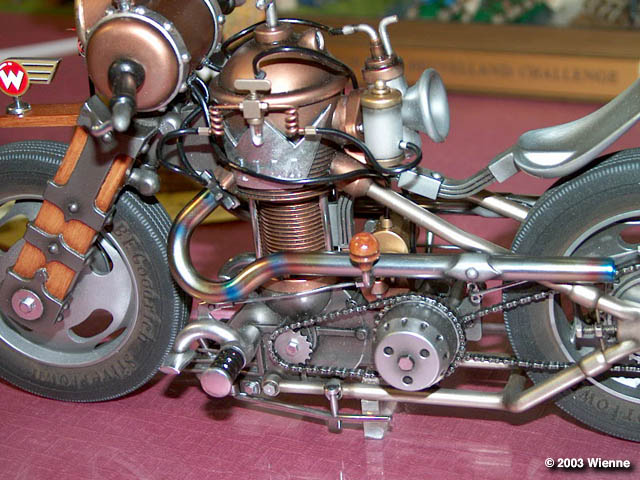
Painting was done with the
Alclad II paints. Having crossed (s)words on the Forum with Phil Brandt I
was very keen to do something with these paints.
I won’t go into the issue regarding the use of lacquer car primers; these
are simply not available to me. I used Mr Surfacer 1000 and Testors enamel
classic black thinned with cellulose thinner throughout, both applied by
airbrush. Not healthy for sure, but providing good ventilation and some
disposable Scotch 3M masks safe to use.
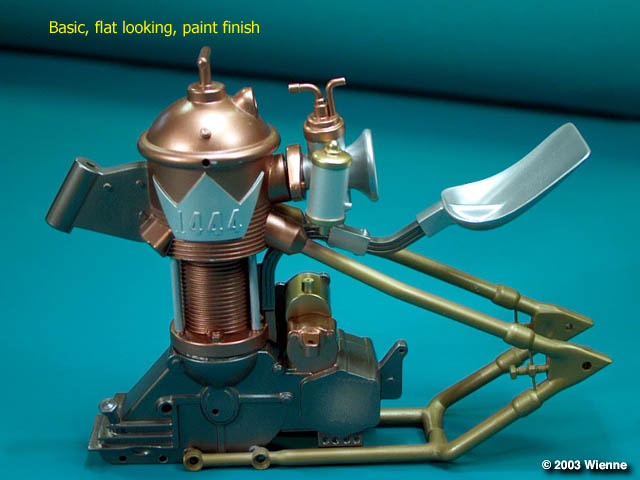
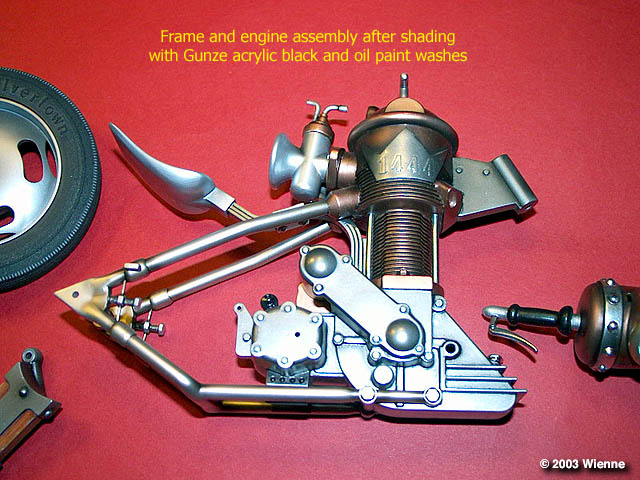
The resulting paintwork is flat and uninteresting, so it was time for some
shading experiments. Lots of trial and error resulted in the following:
Large shade areas were done with Gunze acrylic black, thinned with
isopropanol and applied by airbrush. Black and white are generally not the
best of colours for shading as they tend to kill the colour. On metal
finishes however these are acceptable. The smaller and more intense
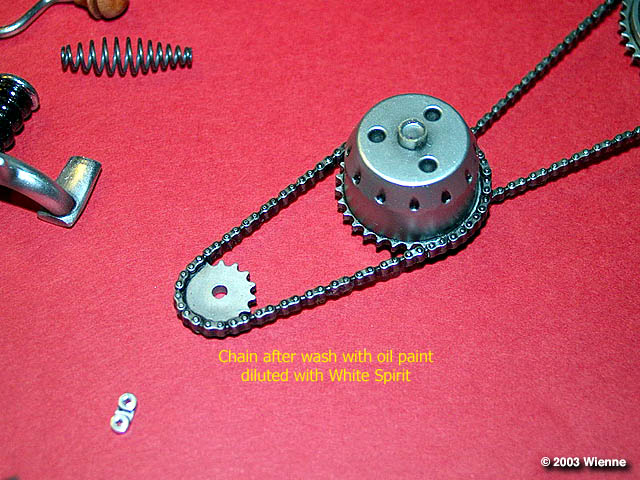
shadings are done with oil paints thinned with White Spirit applied by
large brush. This is a lot less aggressive than rectified turpentine.
Click the thumbnails below to view larger
images:
Slight dry brushing with
some regular Testor and Humbrol metal paints was applied when everything
was dry.
This works well on the regular shades but not on the Chrome and Highly
Polished Aluminium shades. Whatever I tried the finish was crazed within
moments of application of the aforementioned mixes. A desperate posting to
the Alclad site resulted in a very friendly reply advising the use of
Tamiya paints. The exhausts were thus done using the clear Tamiya acrylics
and some Gunze black, all thinned with distilled water. It was a tense
moment with gloves and lots of sweat.
The wood on the fork was done according Tony Bell’s Albatros D.III
technique found on this site. The whole was sealed with several coats of
Tamiya acrylic clear varnish.
The tires were soaked in white spirit. This softens the rubber and once
sanded gave a nice worn look. Light grey pastels mixed with white spirit
was run in the thread and a reddish brown hue was applied to the sides.
Decals and
Final Assembly
|
Decals are minimal, just the
two instrument faces. A drop of Future in the cavities, decal on and a
final sealing with Future did the trick.
Click the thumbnails below to view larger
images:
The clear parts were added
using Microscale Kristal Klear and the wires of the broken headlight glued
with superglue. All the screws provided in the kit are way too short and
were replaced, where possible, with plastic rod. Finally the display stand
was also drawn in CorelDraw and cut by laser in PMMA.
One can have a lot of fun if
willing to go through all the trouble of rethinking and rebuilding the
model. I enjoyed it, especially the fact I could make and add parts right
out of my imagination! This is really the nicest part of building these
imaginative kits!
Thanks to Wienne for taking all the pics, Phil Brandt for his advice on
Alclad II and the people from Alclad for their help.
David V
Model, Images and Text Copyright ©
2003 by David Vanhoucke
Page Created 21 November, 2003
Last Updated
17 March, 2004
Back to
HyperScale Main Page |
 Home |
What's New |
Features |
Gallery |
Reviews |
Reference |
Forum |
Search
Home |
What's New |
Features |
Gallery |
Reviews |
Reference |
Forum |
Search