|
Classic Airframes' 1/48
scale
GAF Canberra Mk.20
Part Two - Painting,
Markings & Finishing Touches
by Brett Green
|
 |
|
GAF Canberra Mk.20 |

Classic
Airframes' 1/48 scale Canberra will be available online from Squadron
For a
detailed examination
of the contents of Classic Airframes' 1/48 scale Canberra, see the
in-box review elsewhere on HyperScale.
Continued from Part
One
With the basic construction completed, I turned my
attention to some of the details required before painting.
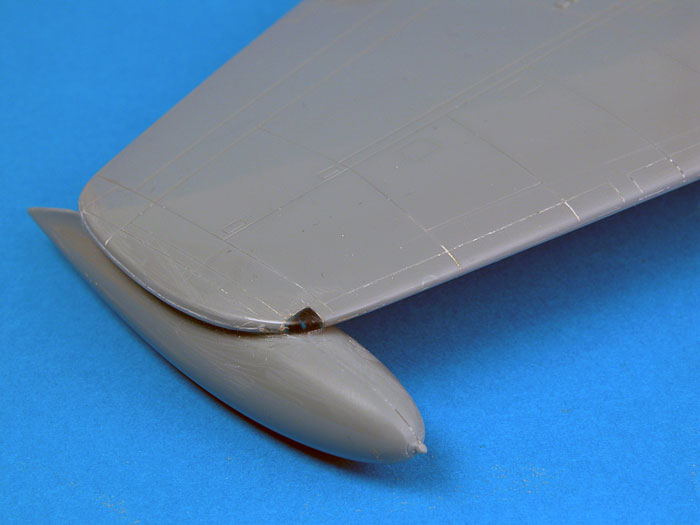
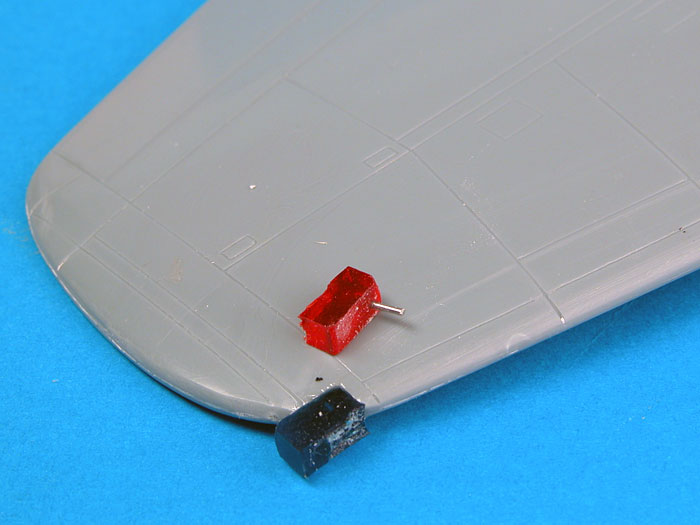
Clear parts for the wing navigation lights were not
available when my sample sprues were delivered, so I decided to add
these from Cutting Edge translucent coloured stock. I cut a small block
of red for the port side light, and green for starboard. Each of these
blocks was drilled out, and a short length of steel rod was inserted.
This rod served two purposes - it reinforced the join of the navigation
lights with the wing tips, and it also served as a lamp, visible through
the clear coloured plastic.
The blocks were secured to the wings using super glue,
then carved and sanded to shape. Once the approximately correct shape
had been obtained, the lights were sanded with Tamiya abrasive paper and
finally polished to a high lustre.
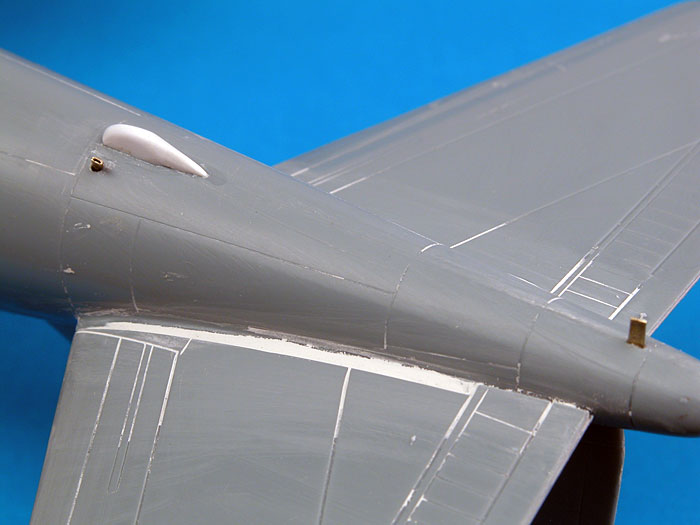
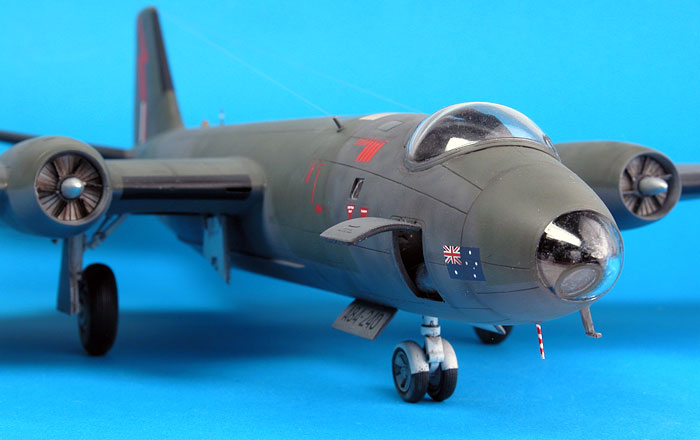
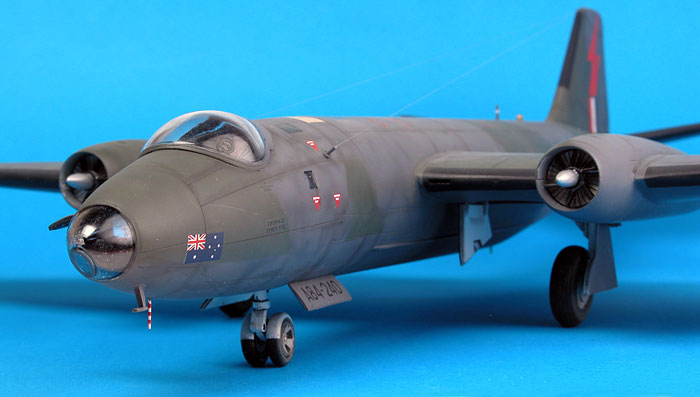
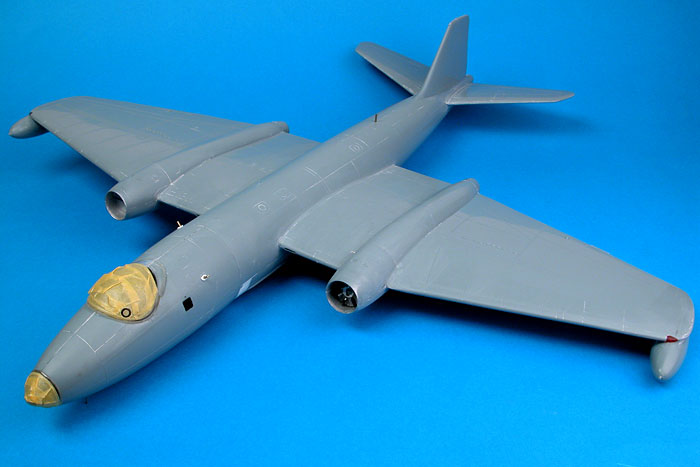
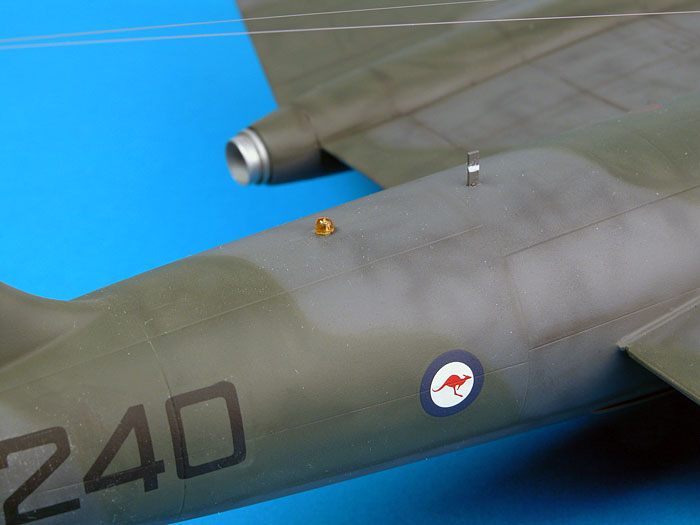
Avionics fit varied widely on Australian Canberras.
After consulting several references, it was hard to find two aircraft
with exactly the same configuration of aerials, antennas and probes.
I eventually settled on a configuration of two aerial
wires mounted on posts behind each side of the cockpit, three blade
antennas (one on top of the fuselage and two below), "disco lights" on
the top and bottom of the rear fuselage, dump tube next to the tail
skid, plus antenna and pitot tube underneath the forward fuselage.
Locating holes for the aerial masts, dump tube, disco
lights and blade antennae were drilled out. The aerial mounts and the
dump tube were formed from flattened brass tube with a base of scrap
styrene (although the brass masts passed through the mounts to ensure a
strong bond with the fuselage). Blade antennae were cut from flat brass
strip. These were glued in place prior to painting.
Click the
thumbnails below to view larger images:
I masked the canopy and the nose window using Tamiya
tape prior to gluing these to the fuselage. I started masking by
punching a small circle of tape using my Waldron Punch and Die set. This
was used to cover the clear-vision window on the port side of the
canopy. A larger circle was cut using a photo-etched stencil to complete
this finicky masking job. The remainder of the canopy was masked around
this clear-vision window.
The canopy fitted very well, but I noticed that the
clear nose cap was slightly larger in diameter than the front of the
fuselage. Next time I will slightly sand back the grey plastic nose to
avoid this small overlap.
I somehow managed to lose the resin tail skid, so I
carved a replacement out of styrene block. Naturally, no sooner had I
glued this part in place than the original item magically reappeared on
the modelling desk!
Only minimal filler was required. I used Milliput to
smooth a slight step between the nose and the main fuselage on the lower
port side. A combination of Liquid Paper and Gunze Mr Surfacer was
employed for some narrow gaps underneath the tail and the lower join
between the wing and the fuselage. Once all these were sanded smooth,
panel lines were rescribed as required and the model was ready for
paint.
Painting
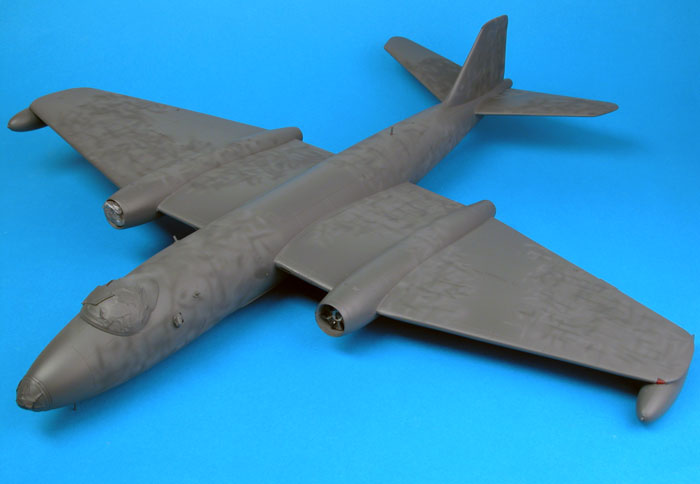
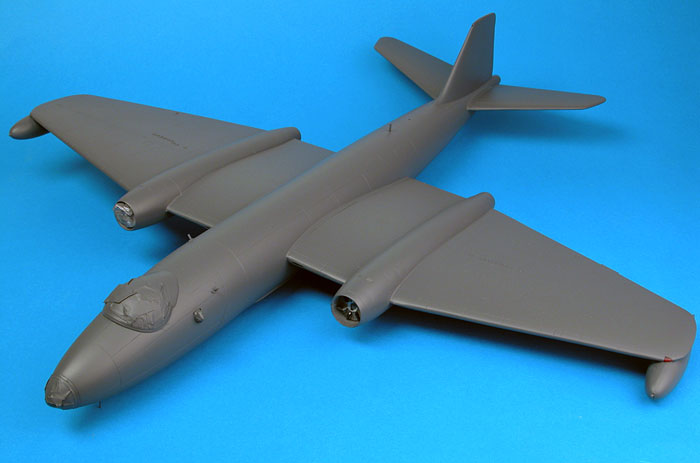
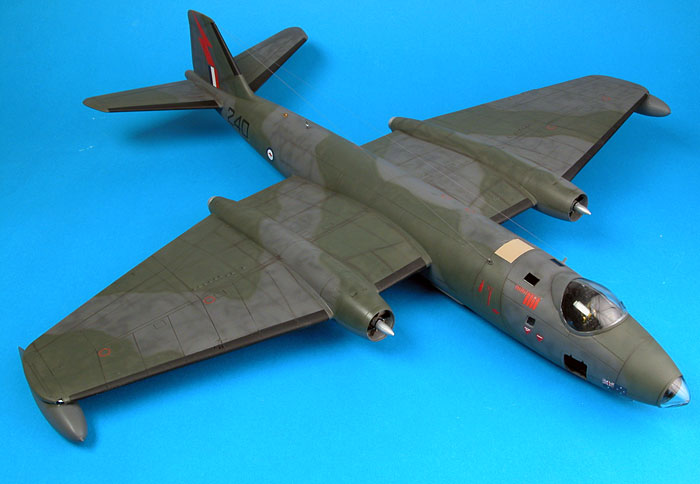
The broad wings of the Canberra need a lot of paint, so
I decided to save myself some time and apply a base coat direct from a
Tamiya Spray Can. The base camouflage colour, Extra Dark Sea Grey, on
these Vietnam-era Canberras is indeed quite dark. Perusing the range,
the closest colour I could find was actually Tamiya's interpretation of
RLM 75 Grey Violet. To my eye this looks too dark for its assigned
Luftwaffe colour, but it would do quite nicely for my purposes.
I applied the first coat, holding one wing, tilting the
model at different angles and spraying in smooth, wide overlapping
lines. Ten minutes to dry, then the next coat, this time holding the
other wing. In less than a half hour, my Canberra
Next I sprayed a random pattern of short stripes and
squiggles in a slightly paler shade of grey, followed by a slightly
darker shade of grey, using Tamiya acrylics in my Aztek A470 airbrush.
The purpose of this stage was to obtain a slightly irregular finish to
the paint job on this large canvas.
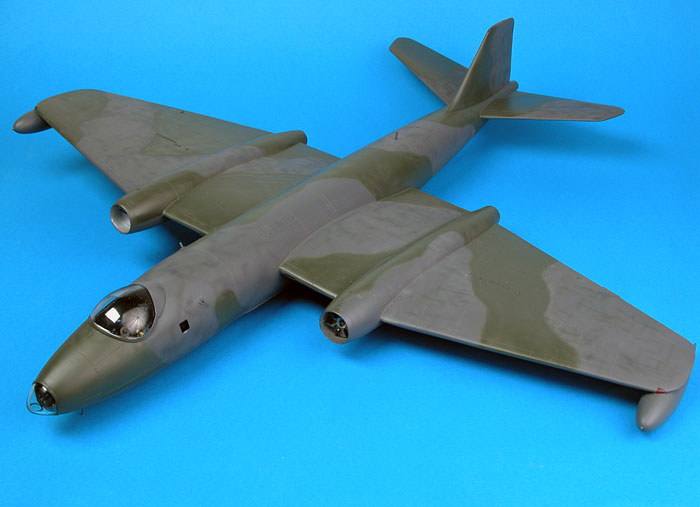
The second camouflage colour was represented by Gunze
RLM 80 Olive Green. This colour was weathered with Tamiya Olive Drab,
which was also sprayed along demarcation lines. These greens were
applied freehand (ie without the aid of masks).
Click the
thumbnails below to view larger images:
Decals
The model was prepared for decals with a two coats of
Future floor polish thinned with Alcohol. I used to have occasional
problems with Future running on the surface of a model, but thinning
with Future seems to have eliminated that issue altogether.
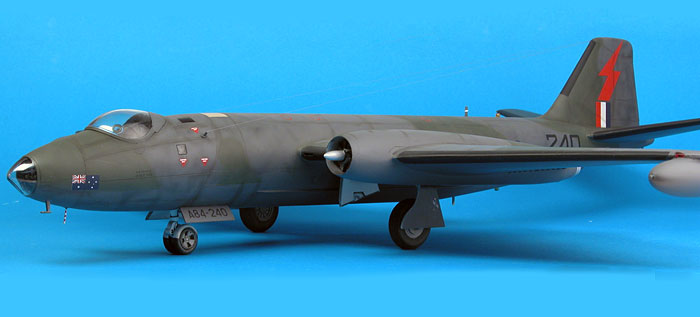
I used High Planes' recently relased sheet number 4806 -
RAAF Canberra Mk.20. I particularly wanted to finish my Canberra as a
Vietnam War bomber in service with the RAAF, and this sheet offered that
exact option.
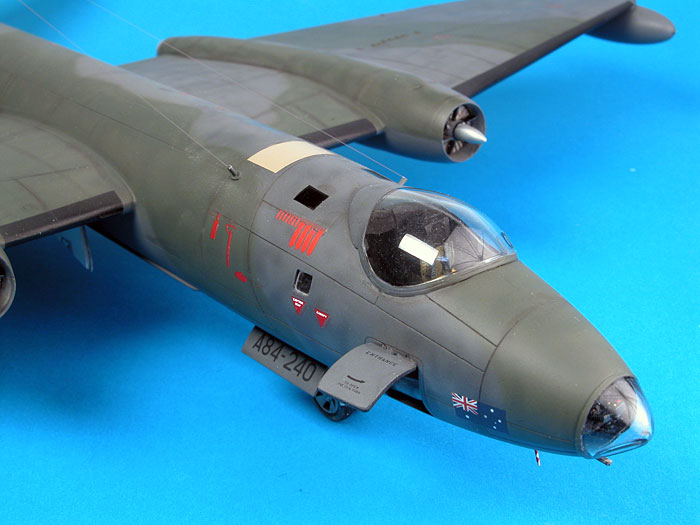
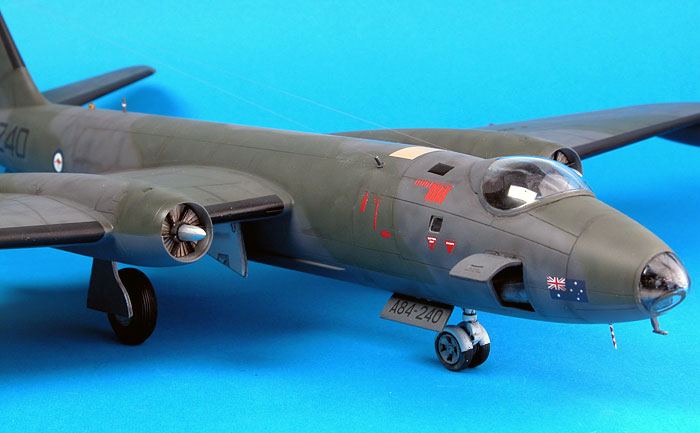
National markings, serial numbers, the Aussie flag, red
fuel filler position stencils and bomb log were used from this sheet. A
few of the larger markings with a lot of clear film had a tendency to
silvering when first applied, but this was quickly eliminated by lightly
slicing the film and applying MicroSol decal solution.
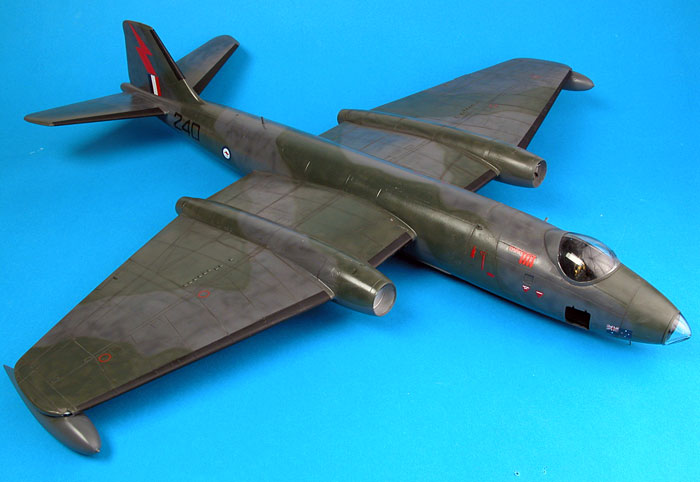
A number of other stencils were sourced from the Classic Airframes kit
decal sheet. These performed flawlessly.
Following the application of decals, the model was
readied for final detail painting and assembly.
I masked a rectangular patch behind the cockpit and
painted it Tamiya Buff. I imagine this must be some sort of dielectric
panel. The two rectangles immediately behind the cockpit are actually
windows, but glossy black paint did a fair job at representing these.
At this stage the canopy, nose cone and wing tip
navigation lights were masked again and the aircraft was sprayed with
two thin coats of Polly Scale Flat. This gave exactly the finish I was
looking for - almost dead flat, with just a hint of sheen.
Small details were added now.
The "disco lights" were cut from lengths of Cutting Edge
orange translucent stock. These short rods were sanded and polished to
the right shape. The finished lights were glued to the top and the
bottom of the fuselage.
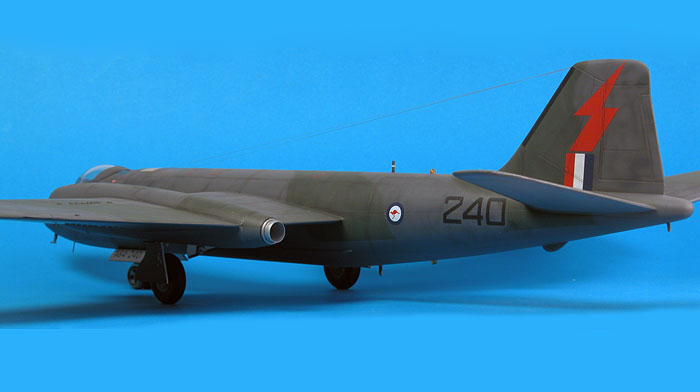
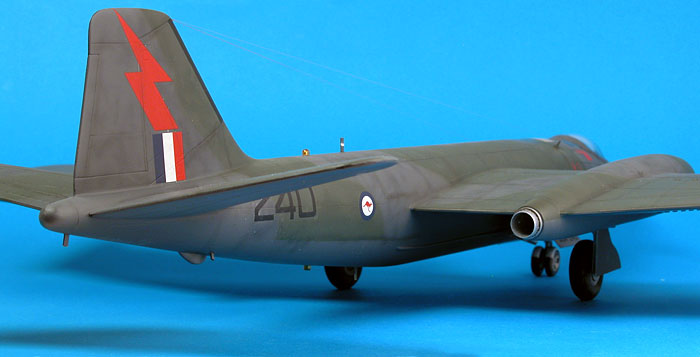
A white datum line was painted on each side of the top
blade antenna.
I managed to smudge the port-side
navigator's window early in construction, so I decided to replace this
with Krystal Kleer. When the painting was complete, I dipped a medium
sized brush in my bottle of Krystal Kleer and ran the laden brush around
the inside rim of the window. The brush was slowly and carefully drawn
toward the centre of the square window, joining the four sides in a
single membrane of Krystal Kleer. I slowly pulled the brush away from
the window, leaving a solid white square.
After being left to dry overnight, the
result was a nice glossy window .
E-Z Line was used for the two aerial
wires. This elastic material is ideal for aerial wires, as it can
stretch to many times its relaxed length, and will bend, not break, when
touched on a completed model. First, I glued to lengths of E-Z line
together and inserted them in the pre-drilled hole in the leading edge
of the fin. This was secured with super glue. A spot of super glue was
applied to the top of the left aerial mast and one of the pieces of E-Z
lines was stretched so that it touched the wet glue. I touched this area
with a toothpick that I had dipped in CA Accelerator. This created an
immediate bond between the mast and the line. The remaining overhang was
stretched and cut off with a sharp hobby blade.
The process was repeated fort he right
side.
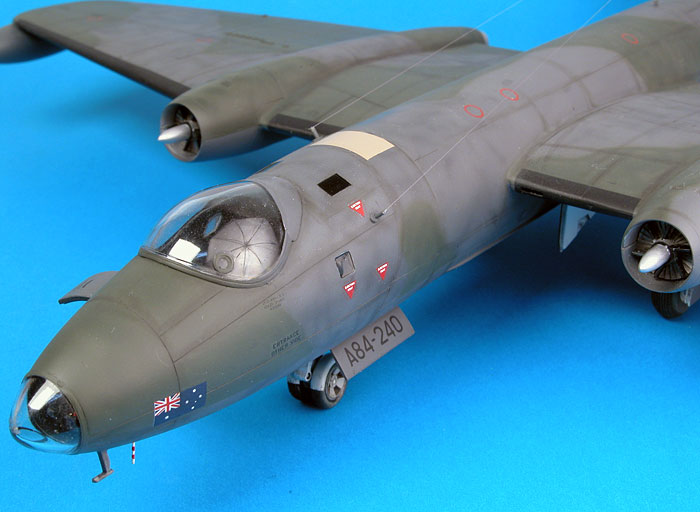
The pitot tube on RAAF Canberras was
mounted below the nose, not in the centre of the nose cone like other
Canberra variants. I borrowed a pitot tube from an Italeri Spitfire for
this purpose.
The lower nose antenna was painted in
a barber-pole finish of red and white.
The intake bullets supplied in the kit
are perfectly appropriate and accurate for Canberra B.2s fitted with the
Avon Mk.I engine, but the majority of RAAF Canberras were fitted
with an intake bullet of a different shape and size. I cut off the
intake bullets and replaced them with modified bombs from a 1/72 scale
model.
Classic Airframes' brand new 1/48
scale Canberra kit has been a genuinely fun project.
Detail is very good, and I was very
impressed with the speed of construction. In fact, I did rush this one a
bit. Next time I will spend a little more time and do a few things
differently. In particular, I will:
-
join
the nose and main fuselage sections of each half before installing
the cockpit and bringing the fuselage halves together,
-
sand
the front of the nose where it faces the clear nose cap to ensure a
step-free join,
-
put
more weight over the forward gear bay before closing the fuselage
halves
There have been a great many
interesting schemes applied to the Canberra in its six decades of
service, from overall Aluminium in the 1950s to Barley Grey in more
recent years. There can be few other aircraft that have seen such long
service with such a wide range of Air Forces worldwide. It would be
great to see more Canberra variants, and we will hopefully also see more
after-market options for decals (although both Model Alliance and High
Planes have decal offerings available today.
Thanks to Classic Airframes for the
sample.
Click the thumbnails below to view larger images:
Model,
Images & Text Copyright © 2006 by
Brett Green
Page Created 27 April, 2006
Last Updated
21 February, 2007
Back to
HyperScale Main Page |
 Home
| What's New |
Features |
Gallery |
Reviews |
Reference |
Forum |
Search
Home
| What's New |
Features |
Gallery |
Reviews |
Reference |
Forum |
Search