|
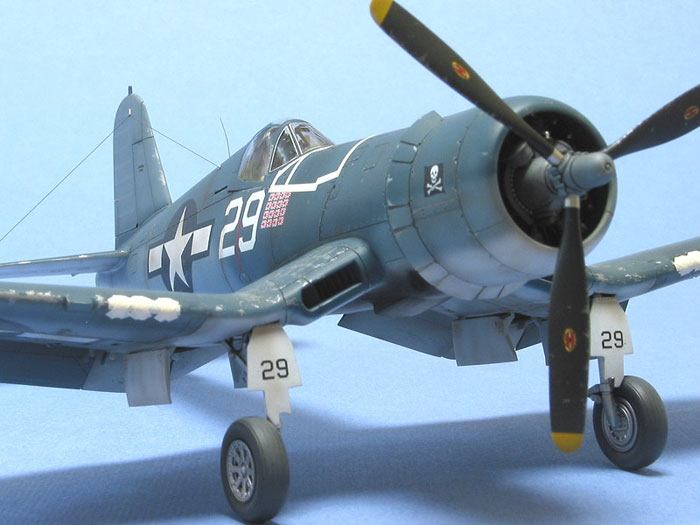
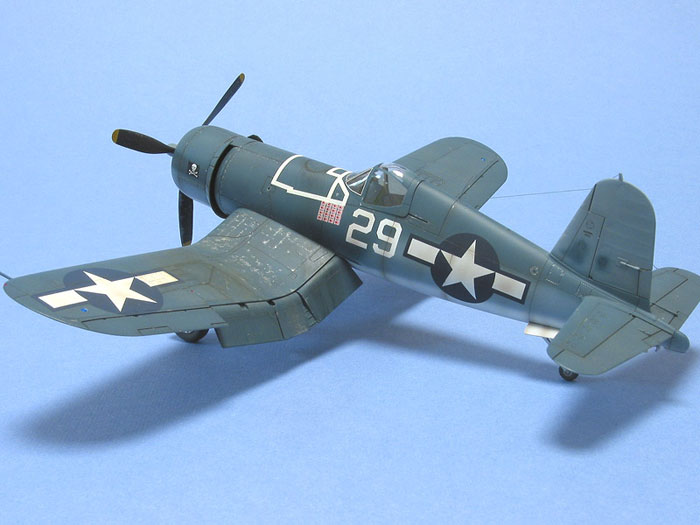
Tamiya's 1/48 scale
F4U-1A Corsair
Part One - Construction
by Tony Bell
|
 |
|
Chance-Vought F4U-1A Corsair |

Tamiya's
1/48 scale F4U-1A Corsair is available online from
Squadron
Tamiya first released their 1:48 F4U-1 Birdcage Corsair almost ten
years ago back in 1997, followed in the next couple of years by the -1D
and -1A kits. Typical of Tamiya kits, they are well engineered with good
(albeit a bit heavy in some folks’ opinion…) surface detail. The cockpit
is nicely detailed straight from the box, as is the engine.
The kit
provides dropped flaps and the option of posing the wings either folded
or flat. There are some minor issues with the kit, including the much-ballyhoo’d
boarding step in the right inner flap (which the kit instructions
indicate should be filled in - the horror!), and the slightly off
looking braces on the canopy sliding hood.
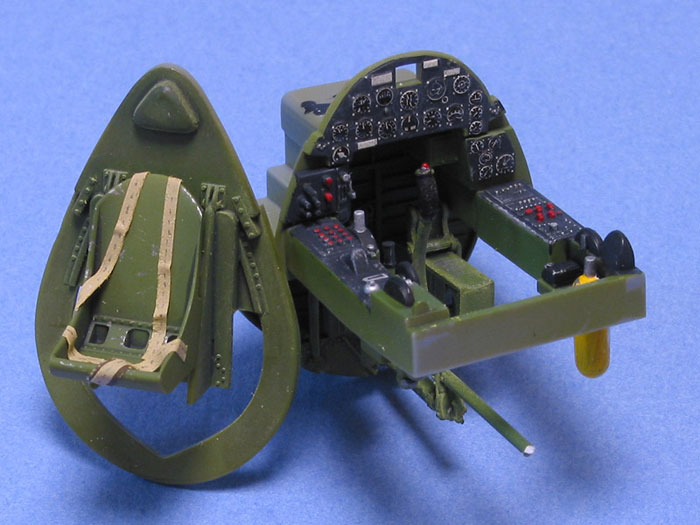
The Cockpit
Okay. everybody, say it with me:
“Construction-started-with-the-cockpit.”
And so it did with this model. As this was to be an out-of-the-box
build, I didn’t do anything extra to the cockpit, aside from thinning
the back and sides of the seat. The seat back is particularly thick, but
my 8” Bastard file made short work of it. I briefly toyed with the idea
of adding a map case to the right console and replacing the trim wheels
with disks of sheet styrene, but in the end I decided I would keep the
canopy closed and stay true to OOB.
I started off by airbrushing Tamiya semi-gloss black in the nooks &
crannies of the interior, being careful to keep it in the areas of
natural shadow. I did this on all the cockpit bits, the fuselage side
walls, wheel wells and landing gear doors - anything that was to be
painted Interior Green. I thinned the black about 80% with rubbing
alcohol and sprayed it at about 10-15 psi. I then mixed up a batch of
Interior Green from Tamiya paints and airbrushed the interior bits,
misting it on in light coats to allow the pre-shading to peek through.
I applied a mix of India ink and Future floor polish (although any
acrylic clear gloss will do) to all the I.G. areas in order to add depth
to the recesses, followed by an airbrushed coat of Polly Scale clear
flat. I brush painted the cockpit side consoles “scale” flat black (i.e.
dark grey) and then dry brushed everything with a medium green-grey
mixed from Payne’s Grey, Chrome Yellow and Titanium White artists’ oil
paints. Various switches and knobs were picked out in red, silver, white
and gloss black with a fine brush and Citadel paints. A silver
Prismacolor pencil was used to draw some scuff marks and chipping.
 The seat harness was made from strips of masking tape painted Tamiya
Buff, with the stitching was drawn on with a needle sharp pencil. The seat harness was made from strips of masking tape painted Tamiya
Buff, with the stitching was drawn on with a needle sharp pencil.
For
the instrument panel I simply trimmed the carrier film from the kit
decal and applied it with liberal amounts of Solvaset setting solution.
Once it was dry, I sprayed it with Polly Scale Flat and applied a small
dab of five minute epoxy to each gauge face for the glass.
The Engine
The engine is also very nicely detailed, in spite of the simple, three
part construction. The cylinders were brush painted with Citadel
“Gunbolt Metal”. The funny thing about this paint is that if you add
rubbing alcohol directly to in an attempt to thin it, it will turn into
a curdled, gooey mess. If on the other hand you dip the paint brush in
alcohol and then dip the brush in the paint and mix it up on a palette,
you end up with a very brush-friendly mixture that goes on smoothly and
dries quickly. Go figure. Chemistry was never my strong suit. I also
brush painted the rocker covers with Citadel “Chainmail Silver” and the
pushrods with “Chaos Black”. The black pushrods were subsequently
brushed with Future to make them glossy.
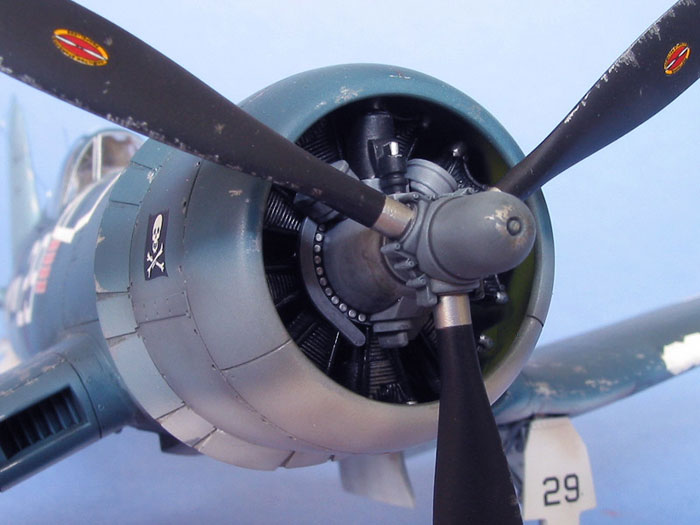
The reduction gear housing was airbrushed with Gunze Mr. Surfacer 1000
(a nice mid-grey) while the bolt heads were brush painted silver. The
whole engine was then treated to a wash consisting of Poly Scale clear
satin mixed with India ink.
Assembly
This was one of those models that put up a bit of a fight, in spite of
it being a Tamiya kit. The fuselage halves went together without a fuss,
and the cockpit didn’t even require any glue. I left the bottom seam
unglued so that I could spread it a fraction of a millimetre and achieve
a perfect fit with the middle lower wing piece.
Tamiya has engineered the fuselage halves in a modular fashion to make
them common with the Birdcage variant, with an insert just behind the
cockpit to differentiate between the versions. The insert seams fall on
panel lines, so careful attention to fitting and gluing is needed to
ensure that they are consistent with the moulded panel lines. The
instructions would have you glue the fuselage halves together first,
followed by the insert. I decided that, in the event of a less than
perfect fit, it would be easier to deal with one seam at the top of the
fuselage rather than two seams on the sides. I therefore assembled each
fuselage half separately, applying liquid cement from the inside. As it
turns out there was a slight gap on top which was easily filled with a
small amount of superglue.
The circular fuel tank panel just ahead of the cockpit had to be
rescribed after I sanded the fuselage seams, and the inner and outer
ring of fasteners surrounding the panel were tediously restored with a
micro drill bit chucked in a pin vise. I rescribed a couple of small
panels on the top of the fuselage using a scribing template and a sharp
sewing needle. One neat little trick I’ve learned when rescribing panels
is to brush a small amount of lacquer thinner in the newly scribed line,
let it dry and then sand with 1000 grit wet sandpaper. This avoids
pushing the plastic back into the groove and results in a very clean
line. I used a fine razor saw to restore the panel lines that crossed
the fuselage seam, and, while I was at it I used the saw to cut the
panel lines of the control surfaces and trim tabs perpendicular to the
trailing edges.
The wings were a bit of a pain in the butt (now I know why most Tamiya
Corsairs are seen with the wings folded). Not counting the flaps, the
wings are broken down into six main parts (upper right, lower right,
upper left, lower left, upper inside right, upper inside left and bottom
centre) and eight secondary parts. It was a challenge to get it all
lined up and level with the wings down, in spite of the Tamiya fit and
engineering of the parts.
My normal habit is to attach the wings to the fuselage and then use them
as the reference to align the horizontal stabs. With this kit it’s
better to do it the other way around, as the horizontal stabs have very
positive interlocking alignment tabs that make it impossible to screw
up. As it turned out I had to gently steam the right wing root and crank
it up a degree or two in order to line things up. To do this I filled a
saucepan with an inch of water and sealed the top with a piece of
kitchen foil. I brought it to a boil on the stove and poked a hole in
the foil with a pencil, producing a narrow jet of steam. I gently warmed
the plastic at the wing root while applying pressure and then quenched
the plastic under cold running water. I repeated this a few times until
the wings and stabs lined up.
The fit of the leading edge intake pieces was so-so, requiring some
filling (I used superglue) and rescribing to fair them in. I filled the
slight gap between the wing root and the fuselage with Mr. Surfacer 500
and wiped the excess away with a Q-Tip soaked in rubbing alcohol after
it had dried for about 20 minutes.
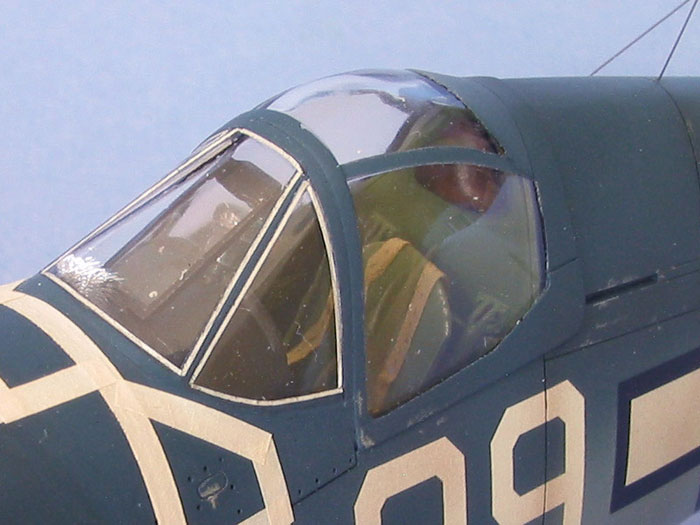
Although I usually dip my canopies in Future, the kit’s transparencies
were so clear and free of distortion that this time it was unnecessary.
I masked the canopy panel by panel with Tamiya tape by applying a piece
of tape and burnishing it down with a toothpick, making sure to work it
into the edges of the frames. Then, with brand new No. 11 X-acto blade,
I slowly and carefully trimmed the tape while holding it up to the
light, applying just enough pressure to cut through the tape. The braces
on the sliding hood look funny to my eye, curving inward and upward at
the front. Fortunately Tamiya provides two sliding hoods, with and
without the braces. I used the one without and simply masked it with the
braces in the correct position.
I attached the canopy with liquid cement applied sparingly with a fine
brush and filled the seam with Mr. Surfacer 500. By applying the
Surfacer with a fine brush and carefully sanding it with fine wet ‘n
dry, I was able to avoid damaging the canopy and the engraved panel line
detail.
Continued in Part Two
Model, Images and Text
Copyright © 2006 by
Tony Bell
Page Created 14 July, 2006
Last Updated
17 July, 2006
Back to
HyperScale Main Page |
 Home
| What's New |
Features |
Gallery |
Reviews |
Reference |
Forum |
Search
Home
| What's New |
Features |
Gallery |
Reviews |
Reference |
Forum |
Search