|
Tamiya's 1/48 scale
F4U-1A Corsair
Part Two - Painting and Finishing
by Tony Bell
|
 |
|
Chance-Vought F4U-1A Corsair |

Tamiya's
1/48 scale F4U-1A Corsair is available online from
Squadron
Continued from Part One
Painting
After washing the model with dish detergent and letting it dry over
night, I sprayed the canopy frames black and then primed the model with
an airbrushed coat of Mr. Surfacer 1000 cut 50/50 with lacquer thinner.
As usual, this revealed several small booboos - file marks, scribing
slips, missed seams, etc. - which were fixed and spot primed. I then
pre-shaded the panel lines by airbrushing them with Tamiya semi-gloss
black thinned 80% with pure rubbing alcohol.
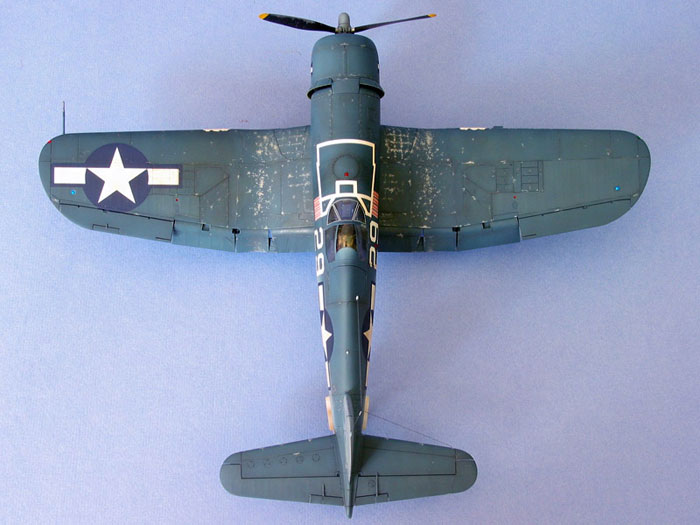
The underside white was a 50/50 mix of gloss and flat Tamiya white. The
intermediate blue was Tamiya XF-18 Medium Blue mixed with about white,
while the non-specular sea blue was mixed from equal parts XF-17 Sea
Blue and XF-8 Flat Blue, with a bit of XF-53 Neutral Grey and XF-62
Olive Drab mixed in. Both of these mixtures were given a dollop of
Future to give them an eggshell sheen and avoid the almost chalky
texture that Tamiya paints tend to take on when thinned with alcohol and
misted on in light coats.
I free hand airbrushed the colours, working from light to dark. The
paints were thinned about 75% with rubbing alcohol and sprayed in light
coats to gradually build up the colour density until the pre-shading
just barely peeked through trying to strike just the right balance
between heavy-handed and a solid colour.

Next I mixed a lighter and a darker shade of each of the blues by adding
white or XF-17 Sea Blue, respectively. I thinned these about 95% with
alcohol and sprayed random patterns at low pressure, keeping the lighter
shades generally more towards the middles of the panels and spraying the
darker shades more along the panel lines. I then mixed a dark brownish
grey shade of paint (the “schmutz” shade, as I like to call it), again
with Tamiya acrylics, thinned it 95% with alcohol and sprayed random
patterns around the areas where grime would accumulate, such as the wing
roots, the ammo bay covers, engine panels, etc.
Decals and Weathering
To prepare the surface for decals, I airbrushed the entire model with
Future cut about 15% with Tamiya thinner. I find that doing so vastly
improves the evenness of the coverage and avoids the pooling/fisheye
effect that I sometimes get with Future.
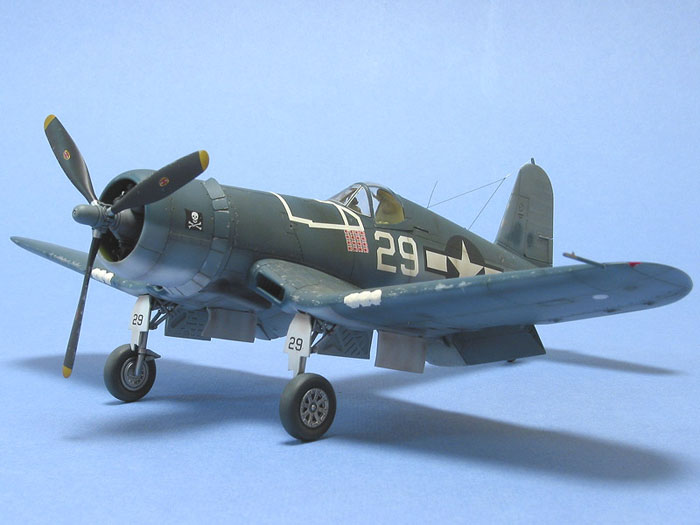
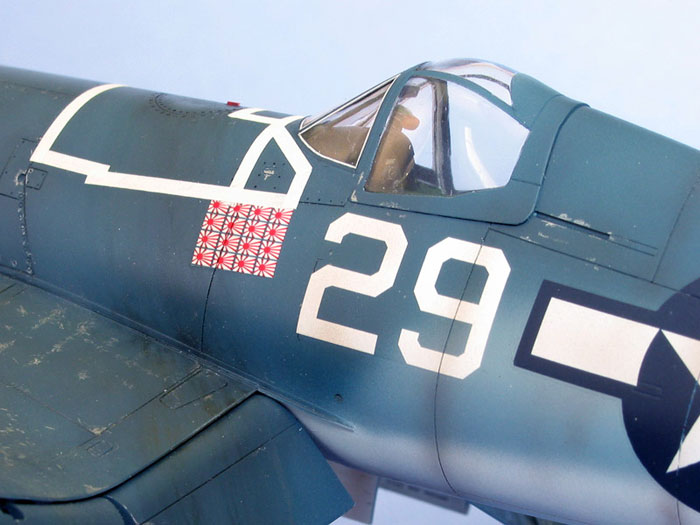
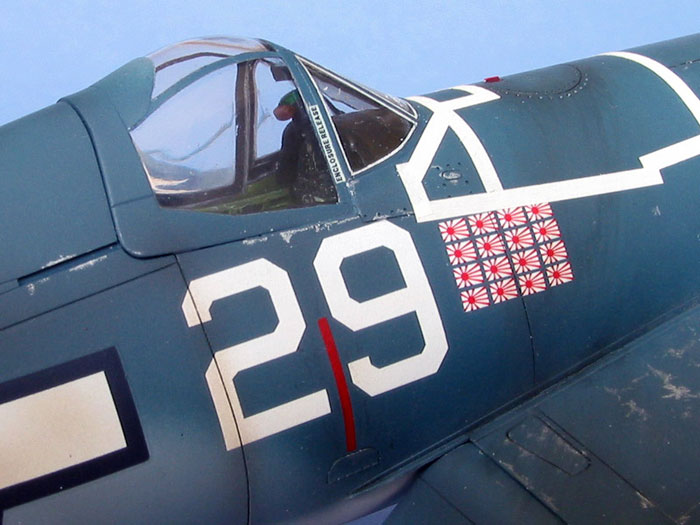
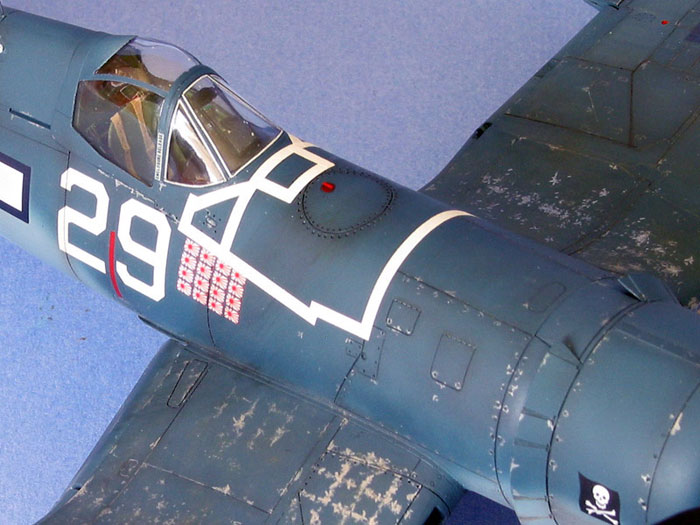
Being the iconoclast that I am, I decided to do Lt Ira Kepford’s VF-17
aircraft, because hey, you just never see it on the contest tables.
That’s sarcasm, in case you missed it. Actually, I chose Kepford’s mount
for the same reason that most people probably do: the cool Jolly Rogers
emblem on the cowl and the big block of kill markings. That and the fact
that there exist several clear photographs of the aircraft from
different angles, making it easy to get the painting and weathering just
right.
The markings came from the Sky Model sheet number 48042, which includes
markings for approximately five hundred Corsairs (thirty four,
actually). The decals are printed by Cartograf, and consequently feature
perfect registration, excellent colour density and thin carrier film.
Unfortunately the Stars ‘n Bars national insignia are useless as the
Bars are ill-proportioned. It appears as if they are centred on the
circle, whereas they should actually be thinner and slightly offset
towards the top. The other issue I discovered was that although the
photos of Kepford’s aircraft clearly show kill markings on both sides,
the sheet only includes one decal. Fortunately there are plenty of
miniature Japanese flags on the sheet, so I was able to piece together a
second 4X4 scoreboard for the other side.
The Sky Model decals went on without a hitch, responding well to
Solvaset and conforming nicely to the details. I took a chance and
decided to use the Tamiya national insignia, in spite of their apparent
thickness on the sheet. I have to say I was pleasantly surprised with
them as they worked very well with Gunze Mr. Mark Softener and a few
sparing applications of Solvaset along the panel lines. I take back the
bad things I’ve said about Tamiya decals all these years.
 Once all the decals were on and had dried for a couple of days I sealed
them in with another coat of Future and applied a “schmutz” coloured
wash of artist’s oil paints (Payne’s Grey and Burnt Umber) thinned with
turpentine to the recessed panel lines and details. After the wash had
dried for a few hours I wiped away the excess with a paper towel
moistened with a small amount of clean turpentine. I then sealed
everything in with an airbrushed coat Polly Scale clear flat thinned
with distilled water and strained through a piece of old nylon
pantyhose. Once all the decals were on and had dried for a couple of days I sealed
them in with another coat of Future and applied a “schmutz” coloured
wash of artist’s oil paints (Payne’s Grey and Burnt Umber) thinned with
turpentine to the recessed panel lines and details. After the wash had
dried for a few hours I wiped away the excess with a paper towel
moistened with a small amount of clean turpentine. I then sealed
everything in with an airbrushed coat Polly Scale clear flat thinned
with distilled water and strained through a piece of old nylon
pantyhose.
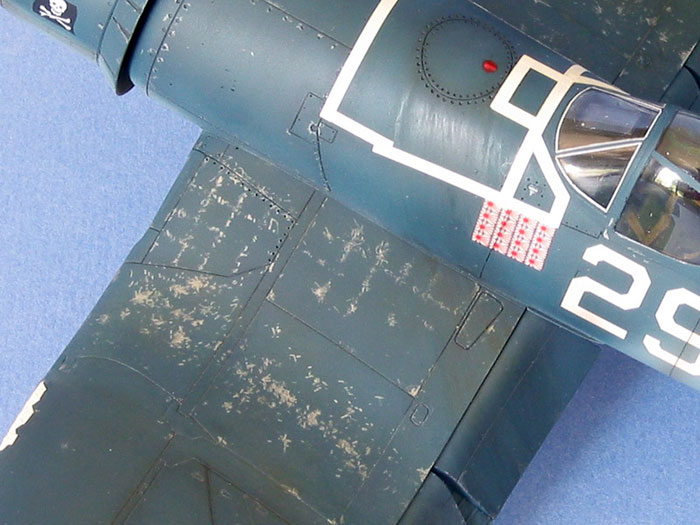
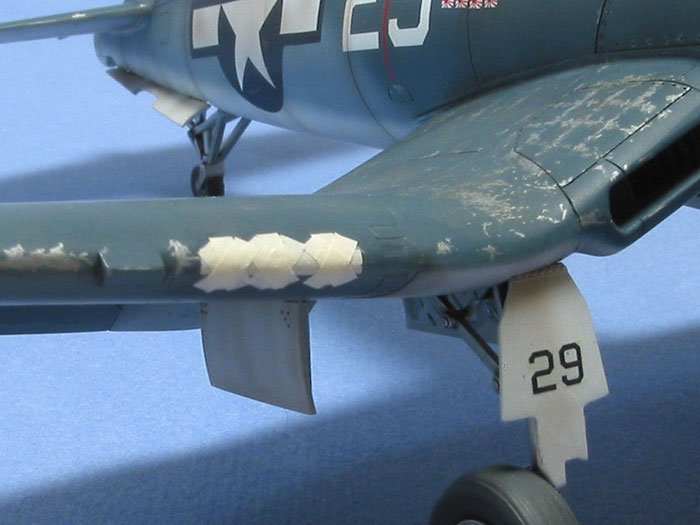
Using reference pictures as a guide, I drew the paint chipping on with a
silver Prismacolor pencil. The great thing about this method is that if
you make a mistake (like “chipping” the fabric wing panel - oops), you
can simply wipe away the offending marks with a damp Q-tip. The chips
were done by using Brett Green’s method of lightly and repeatedly
tapping model with the pencil to build up the wear areas without them
looking like scribbles. Another coat of Polly Scale clear flat sealed
things in for the next steps.
The fuel stain on the fuselage was the same artist’s oils “schmutz” wash
mixture which I had left out to evaporate over night. I applied it with
a soft No. 6 sable brush and touched it up with another clean brush
dipped in mineral spirits. The wings were dirtied up with a 50/50 mix of
MiG Pigments Europe Dust and Light Dust applied dry and fixed in place
by jabbing at them with a soft brush moistened with mineral spirits.
After I finished with the MiGs, I went back and added a few more “fresh”
paint chips with the coloured pencil.
Once the topside weathering was all done I gently ran a new X-acto blade
around the masks to break the paint and removed the canopy masks. This
is always one of my favourite tasks as the model really starts to look
finished at that point. In many close up photos of the Corsair canopy
I’ve noticed a light coloured seal around the windscreen Perspex panels,
which I attempted to duplicate with very thin strips of white decal
stock. Man, what a pain in the butt. It took me two or three attempts at
each strip, as each time the strip would either break or curl up on
itself. To top it all off, I don’t like the look of it at all; it’s far
too pronounced for my tastes. To tone it down a bit I mixed up a medium
grey wash of Citadel acrylics (“Chaos Black” and “Skull White”) and
carefully applied several filters to the seals with a fine pointed
brush. Better, but still less than perfect.
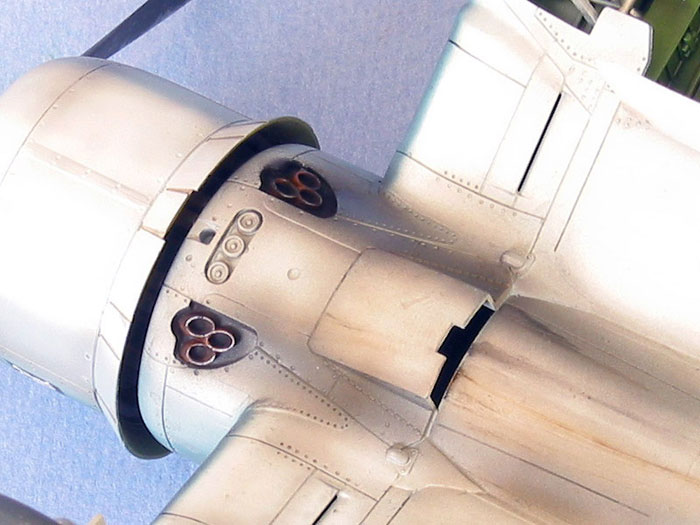
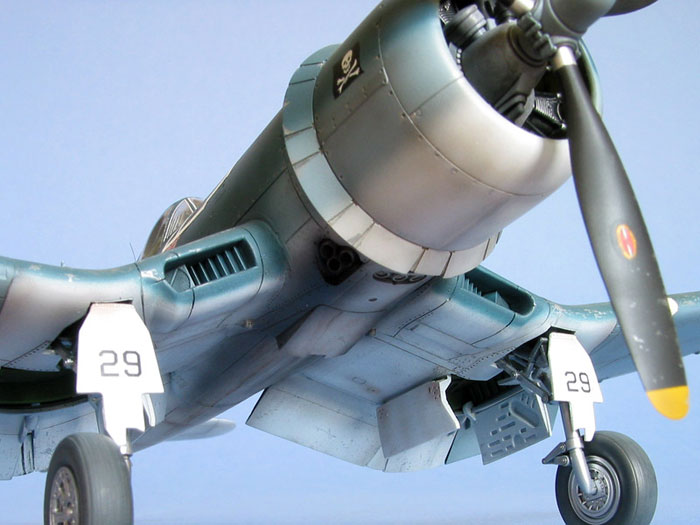
The underside was weathered with dabs of oil paint streaked back with a
paintbrush slightly moistened with thinner, and exhaust stains were
airbrushed on with highly diluted Tamiya - you guessed it - “schmutz”.
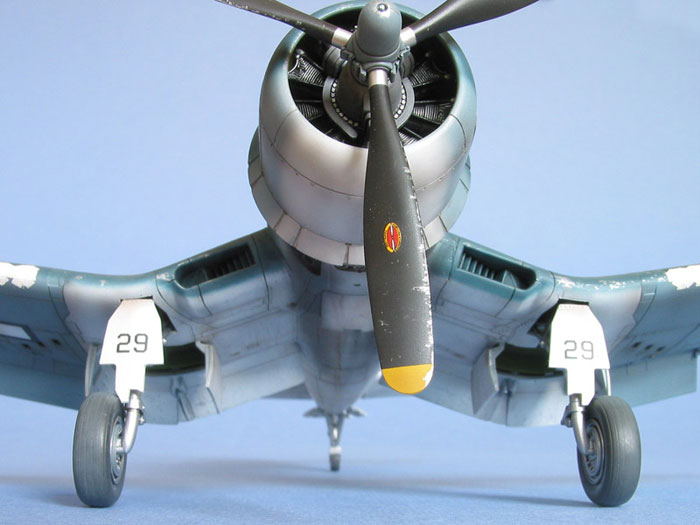
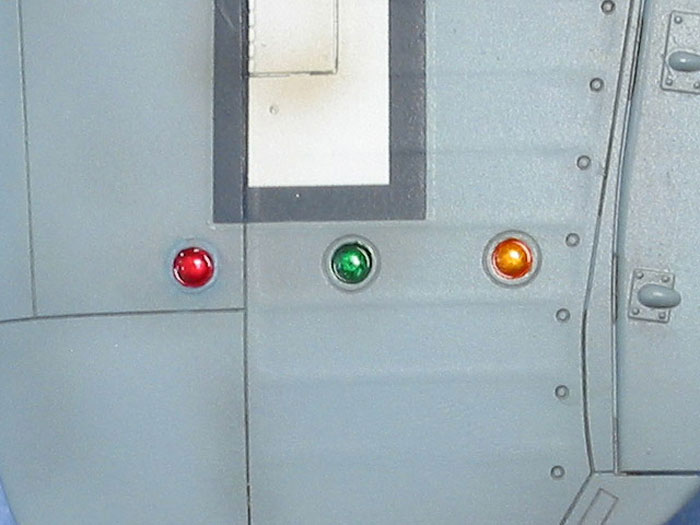
The IFF lights under the port wing were first painted silver, followed
by clear red (Gunze), clear green (Tamiya) and amber (Gunze clear red
plus clear yellow). The wingtip position lights and the blue formation
lights on top of the wing were painted likewise, while the landing light
recess was painted silver and the clear lens fixed in place with Future.
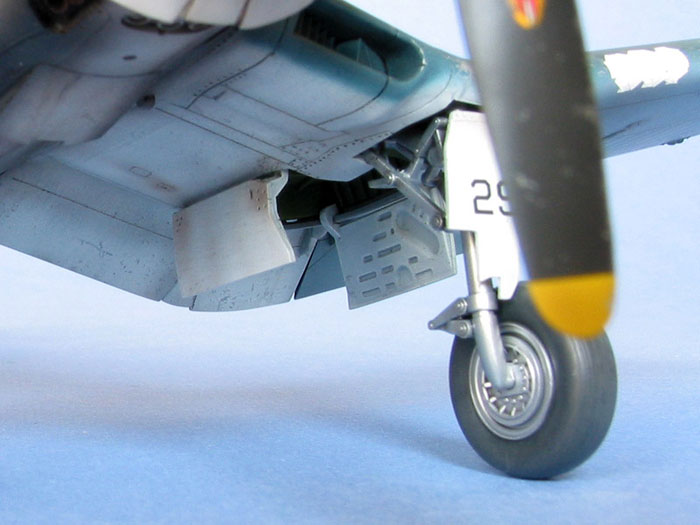
The landing gear doors were first “pre-washed” with a mix of Future and
India ink and then painted Tamiya flat white with Future and thinned
with alcohol, allowing the shading to peek through. I then dry brushed
them with white artist’s oils and airbrushed some streaks with the
heavily thinned Tamiya schmutz colour.
After priming the landing gear legs and wheel hubs with Future, I
sprayed them with Alclad II aluminum and picked out the details with a
wash of Polly Scale semi-gloss and India ink. The tires were brush
painted with Aeromaster tire black and the treads were airbrushed with a
light dusting of heavily thinned Tamiya buff. I attached the gear legs
and wheels with five minute epoxy and carefully aligned everything
before the glue set.
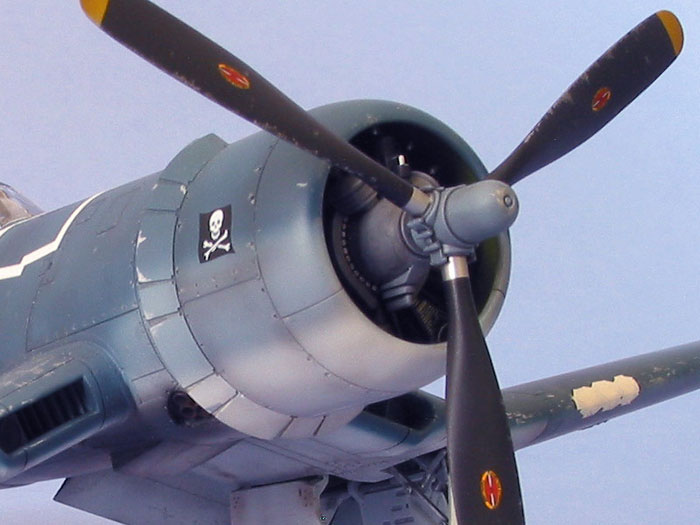
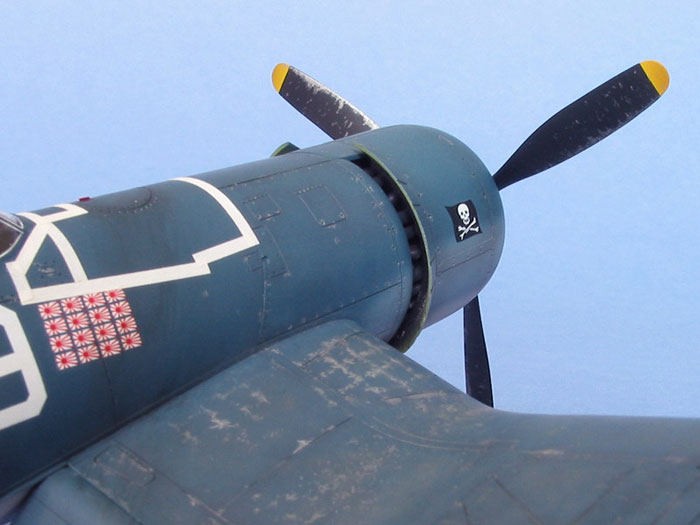
Now, in pictures of Kepford’s aircraft in flight the bases of the blades
look to be the same colour as the hub, but I believe this is an artefact
of motion blur. There is another photo of VF-17 pilot "Bitz" Bitzegaio
standing in front of his aircraft, in which the hub is clearly depicted
and the bases of the blades are clearly natural metal. I extrapolated
this to Kepford's mount and painted the prop accordingly. The Hamilton
Standard logo decals came from a spare Aeromaster sheet and the paint
chips were drawn on using the Prismacolour silver pencil. The detail on
the hub was picked out by brush painting it with a mix of Polly Scale
flat and ink.
One more note about the propeller. Although VF-17 flew the -1A Corsair
at the time the pictures were taken, the aircraft actually had the later
-1D style of props fitted. These props were smaller in diameter and
broader in chord than the ones used on the -1A. I could have raided my
Tamiya -1D kit for the prop or I could have replaced it with the correct
resin prop from Ultracast, but in the end I chose the simple (OK, lazy)
route and stuck with the inaccurate -1A prop.
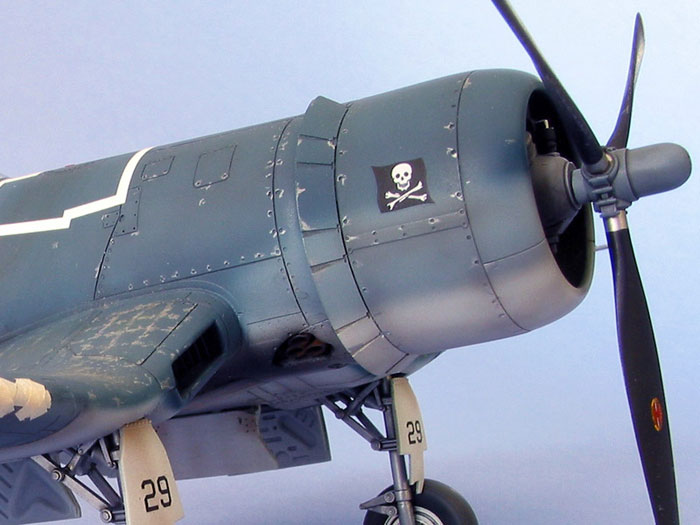
The tape over the gun ports and around the fuel tank was made from
strips cut from a piece of cigarette paper that had been airbrushed off
white and attached with diluted white carpenter’s glue.
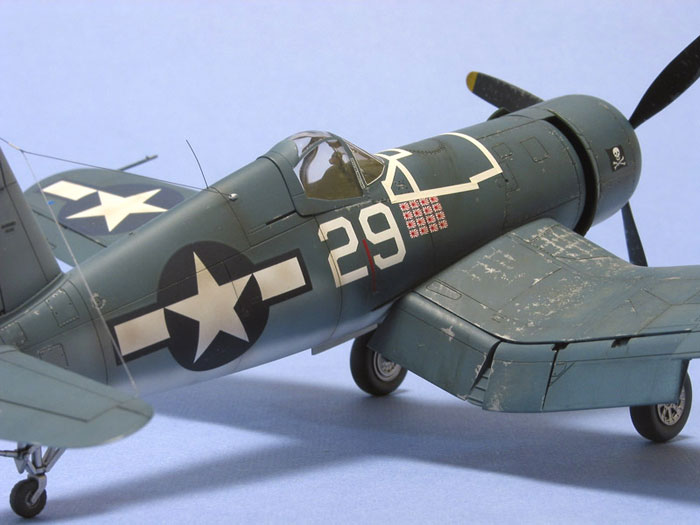
The final detail to be added was the antenna. Referring again to
pictures of the real thing to get the configuration correct, I made the
antenna wire from monofilament nylon thread brush painted with Humbrol
Metalcote steel thinned a bit with lacquer thinner and fixed it in place
with superglue. The insulator is a small section of styrene tubing
heated over a candle and stretched like sprue.
Due to the complicated nature of the foldable wings, this model wasn’t
quite as much a shake ‘n bake as other Tamiya kits have been for me in
the past. It is, however, still a Tamiya kit with all that implies. It
can be built up into a very respectable model straight from the box, and
yet there are heaps of aftermarket accessories out there for those who
are so inclined.
Although very well printed, the quality of the Sky Model decals was
diminished somewhat by the inaccurate national insignia and the lack of
kill markings for both sides of the aircraft.
Click on the thumbnails
below to view larger images:
Model, Images and Text
Copyright © 2006 by
Tony Bell
Page Created 14 July, 2006
Last Updated
13 July, 2006
Back to
HyperScale Main Page |
 Home
| What's New |
Features |
Gallery |
Reviews |
Reference |
Forum |
Search
Home
| What's New |
Features |
Gallery |
Reviews |
Reference |
Forum |
Search