|
The FFA P-16
Scratchbuilt in
1/32 Scale
by Frank Mitchell
|
 |
|
FFA P-16 |

HyperScale is proudly
sponsored by Squadron.com
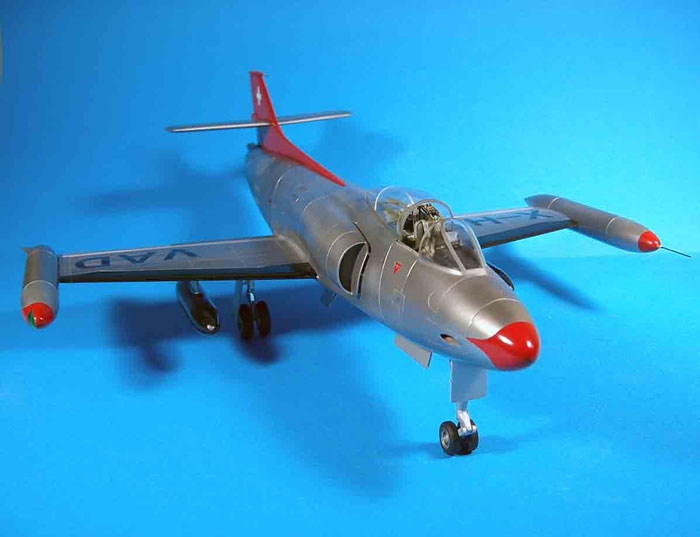
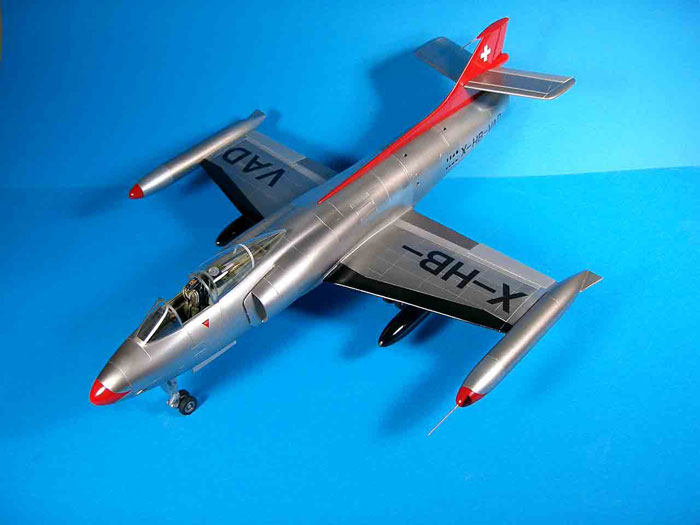
To me, this is one of the best looking aircraft to
come out of the postwar period, Hunter included. The Swiss Federal
Aviation Factory (FFA) P-16 was the second of two jet fighter prototypes
developed in Switzerland during that period, and is my nomination for
The-Best-Airplane-Never-To-Make-It-Into-Production. The P-16 was
tailored to the needs of the post-war Swiss forces in that it was a
transonic design, optimized for the ground-attack role and ability to
fly in and out of short strips in narrow, high- mountain valleys. It had
a low aspect-ratio wing, large wingtip fuel tanks, and extensive
high-lift devices: full-span leading edge flaps, large trailing edge
Fowler flaps, and interlinked, drooping ailerons. Probably the one thing
that most know about the airplane is that its wing and landing gear were
(and are) used, in modified form, for the Learjet business aircraft.
The first prototype flew in April 1955. Despite an
outstanding performance (in many ways equaling the A-10), and a heavy
armament of two 20mm cannon, an internal Matra rocket launcher with 44
68mm rockets, and twelve hard points under the wings, the production
contract was cancelled due to two crashes, neither the fault of the
aircraft. This resulted in a decision to buy the smaller and less
capable Hunters. However, two factory-financed additional aircraft were
built and flew with civil licenses. After finally giving up hopes for
production, these two prototypes were parked outdoors for many years and
were ultimately combined to produce a single museum display aircraft.
Having previously built the first of the Swiss
prototypes, the FFA N-20, (http://hsfeatures.com/features04/n20fm_1.htm),
I decided that I should do the other one as well. A major part of that
decision was the fact that Mike Kirk, my provider of Swiss information,
outdid himself for this latest effort. Mike is an IPMS-type living in
Switzerland, and therefore has access to the museum containing the real
airplanes (only one of each survives). I must give full credit to him
for coming up with a lot of stuff that made the model much better than
it would have been without it.
For those who might be interested, there are a
number of other sources of interest, including a couple of books, and
there are even CDs dedicated to each of these aircraft. The main
references are listed at the end of the article.
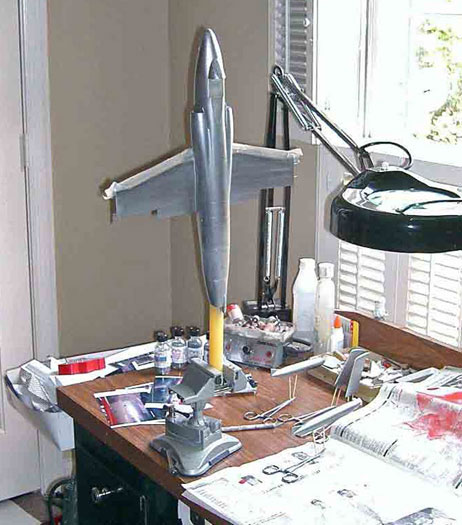
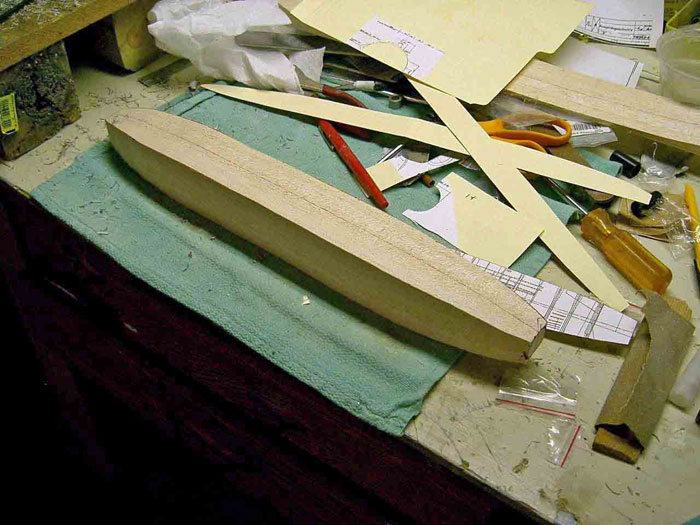
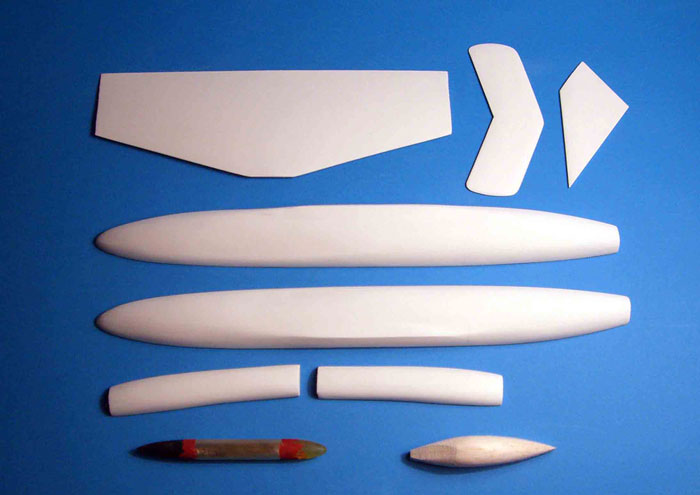
The model was built pretty much in my usual way;
i.e., molds carved from balsa and vacuum-formed. Parts of the wood were
left inside the styrene skin for strength and because it is a lot easier
to attach wings, tail, landing gear, etc.
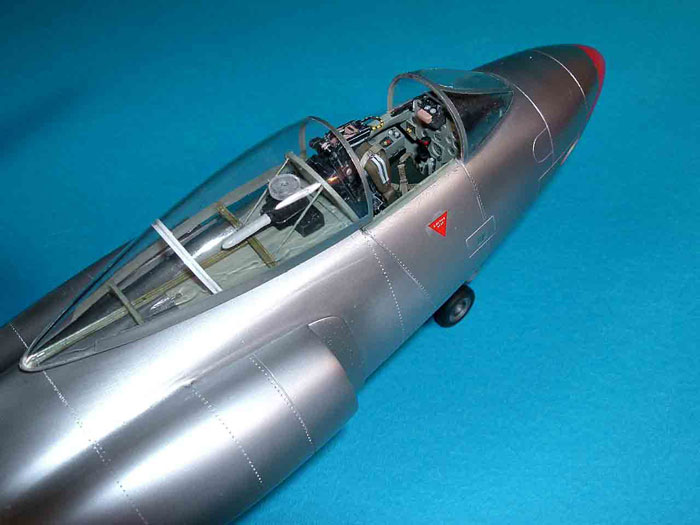
The photos are reasonably self-explanatory, so I
will just point out a few highlights.
If I have a secret weapon in modeling (which I
don’t really believe anyone has), it is the time and effort it takes to
prepare a solid and flat “building board”. That allows accurate and
symmetrical additions and cuts. It is the best and easiest way I know to
make sure that wings, tails, tanks, any holes that need to made, etc.,
are square, in the right places, and in the same places on both sides.
The board is shown in several of the photos. I buy a half sheet of
high-quality cabinet grade ¾” plywood that is straight and flat, cut it
into sections appropriate for the model, and then use a drill press to
make sure that the mounting post is vertical. I find that I can
generally get two models out of each piece of the board, so maybe six
models for each half piece.
All the molds for the model were carved at one
time, along with the parts for a couple of other models. This meant that
there was just one massive mess of wood chips and shavings to clean up
and just one lengthy vacuum-forming session (and therefore only one
episode of my wife watching me make a disaster of the kitchen; I can’t
move the oven to the model room).
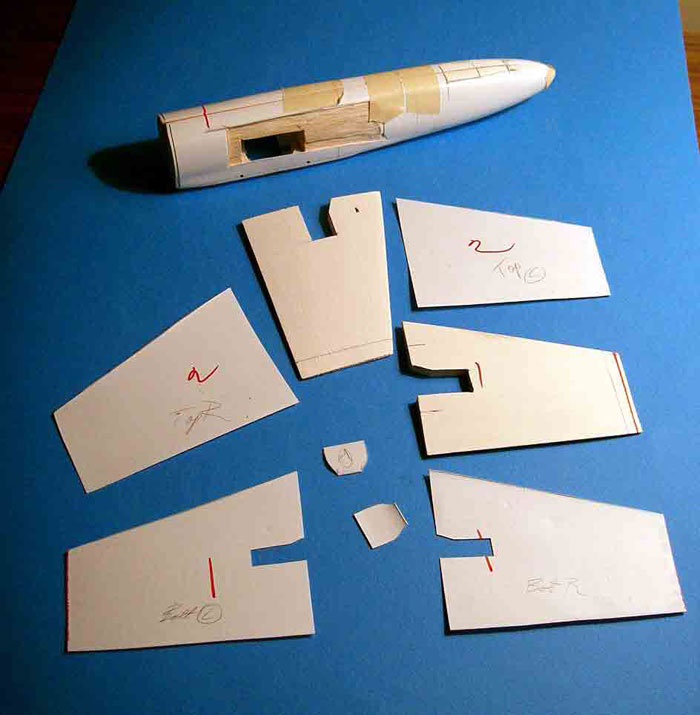
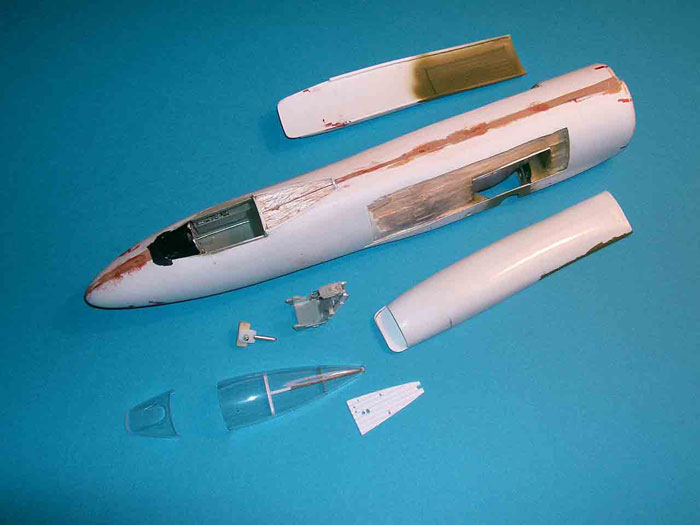
The intakes were done first, because they were the
one part I was most concerned about. As is seen in the photos, separate
molds were made for right and left and each was vacuumed-formed.
Slightly curved inner panels were glued in place. They were then fitted
to the fuselage through “windows” cut into the outer skin. Fortunately,
they are narrow enough that when you look into them, they just appear to
curve towards the engine.
I had to cut the fuselage mold in two because it
was too long for my molding frame, but if that is done only after all
the other mold-finishing steps are complete, everything fits back
together pretty well.
Sections of the balsa forward fuselage core were
removed to add detail to the cockpit, wheel wells, engine intake trunks,
etc. I knew that this was going to be a tail-sitter, so I cut up a large
auto wheel weight and glued pieces into holes drilled in the balsa ahead
of the cockpit.
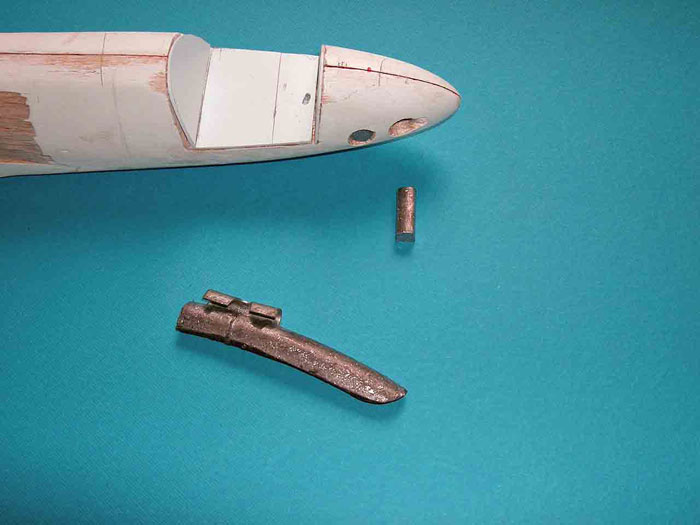
The plastic outer shells were then epoxied to the
core.
The same techniques were used for the wings and
tail, and the control surfaces were cut and re-positioned after the wing
was otherwise complete.
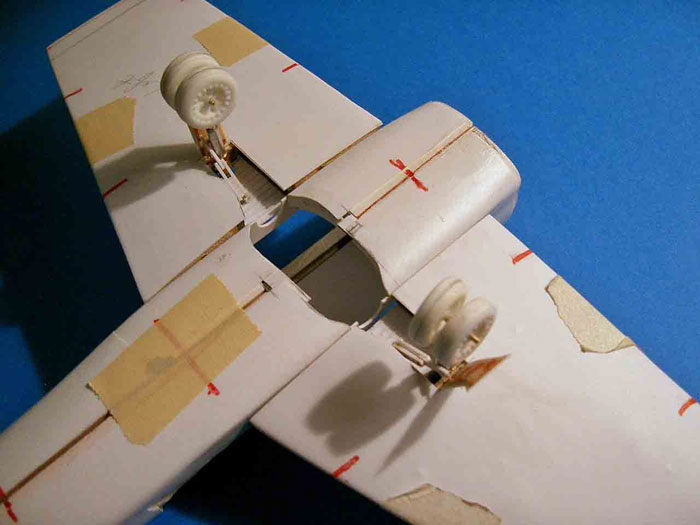
The main landing gear was made from brass and
aluminum tubing with wheels cast from resin using an RTV mold. The
forward gear main leg was carved from basswood with other parts formed
from styrene. The remainder of the detailing was typical for any model,
but I did use the excellent Eduard colored photoetch sets for the
ejection seat detailing.
After construction was semi-complete, the usual
routine of priming, sanding, priming, scribing, etc., was done and
rivets were applied with a Rosy The Riveter and a regular old pounce
wheel.
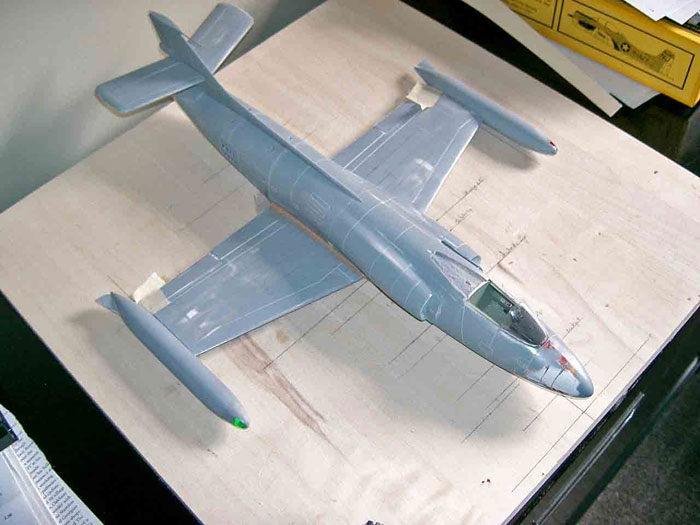
Assembly was carried out on the building board and
filled epoxy used for the fillets and to fill gaps where necessary.
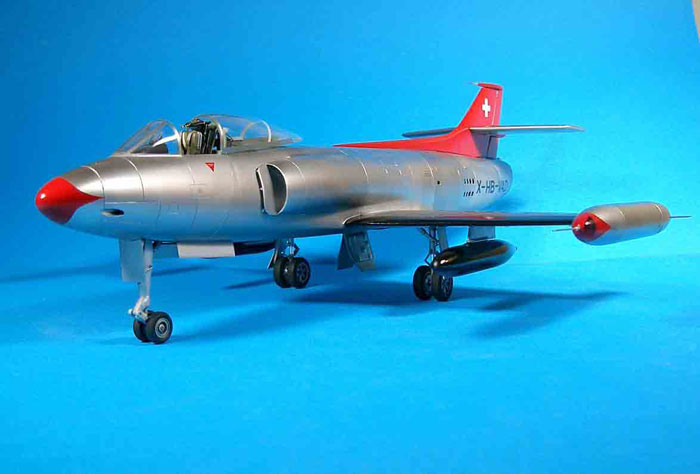
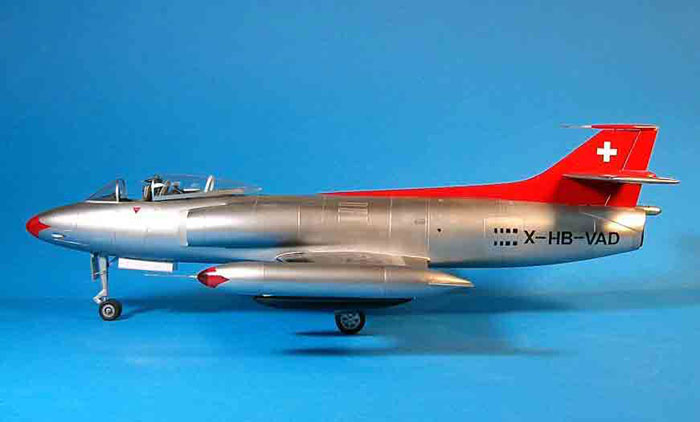
Paint was Alclad using various tints of Testor's
enamel, which was also used for the gloss red and gloss black.
Markings were made on the computer and printed on
clear decal film.
While taking the pictures of the completed model, I
could not resist taking photos of both Swiss jets together; I have
designated them as my Swiss Duet. There won't be a trio however, as
these two were the end of the line for indigenous Swiss fighter
development.
-
Strehler H. Der
Schweizer P-16. Available from
http://www.military-books.ch/shop/p-16.htm . In German (which I
can’t read). Full of good stuff, if a bit expensive.
-
A CD: P-16.
Same author as the above, and invaluable for anyone modeling the
aircraft. Available from
www.physikcd.ch. (Also in German, and about $36.00). A CD on the
N-20 is available from the same source.
-
The Aircraft of
the Swiss Air Force since 1914. A great book (in English) with
lots of three-views and a bunch of not-all-that-well-known aircraft.
Published in 1975, which was about when I got mine, but it has
become dog-eared over the years. Still Available (I think).
There have also been some articles over the years
in RAF Flying Review, Air International, Aviation Week, and
others.
Click on the thumbnails
below to view larger images:
Model, Images and Text Copyright ©
2006 by Frank Mitchell
Page Created 22 June, 2006
Last Updated
21 June, 2006
Back to
HyperScale Main Page |
 Home
| What's New |
Features |
Gallery |
Reviews |
Reference |
Forum |
Search
Home
| What's New |
Features |
Gallery |
Reviews |
Reference |
Forum |
Search