|
JRutman Production’s 1/32
scale
Tank Ta 152H-1
by
Ian Robertson
|
 |
|
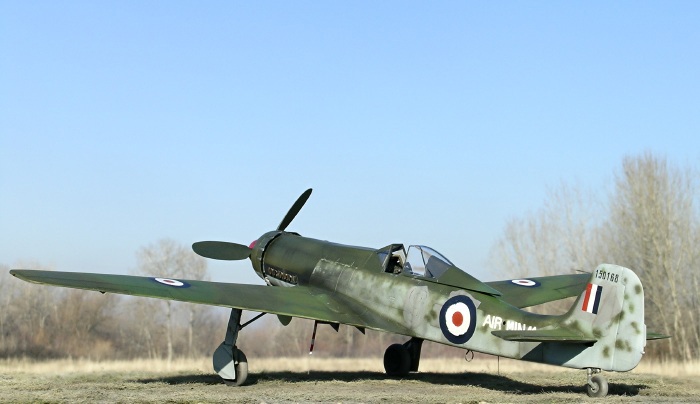
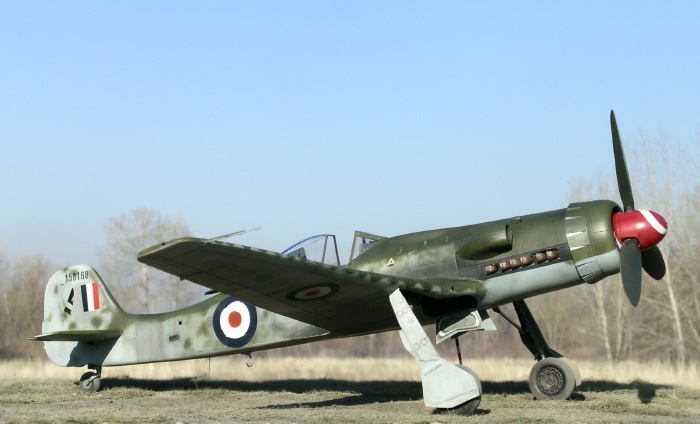
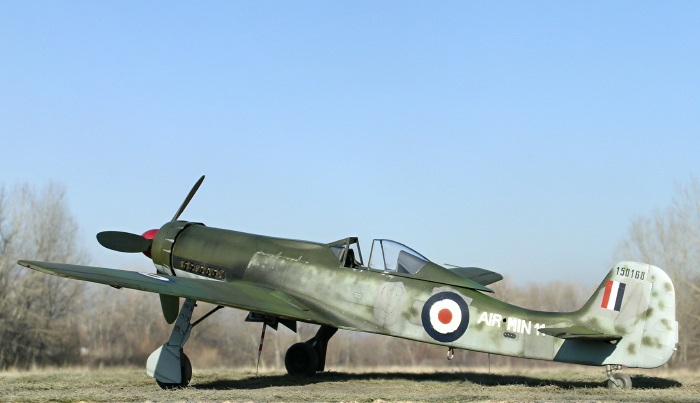
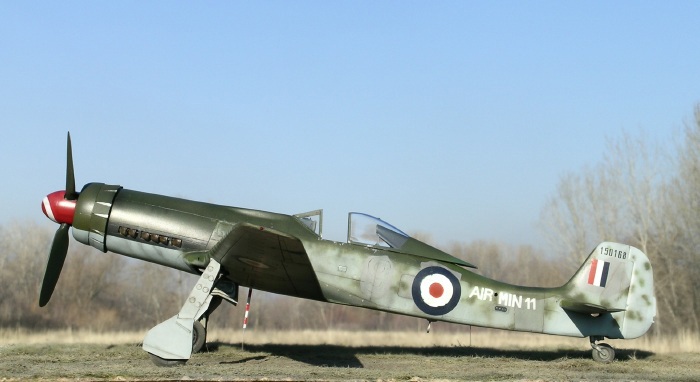
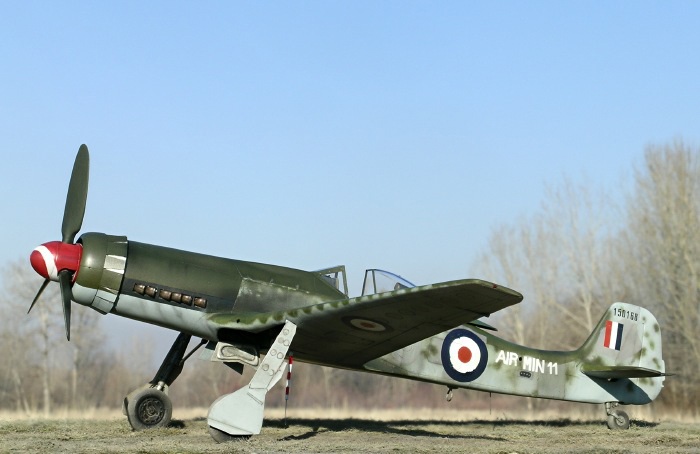
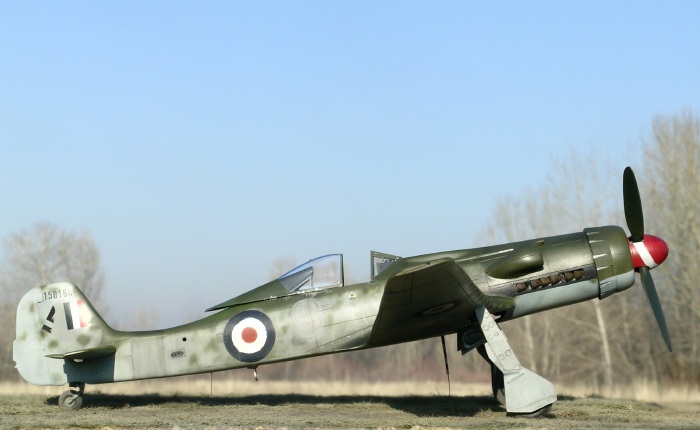
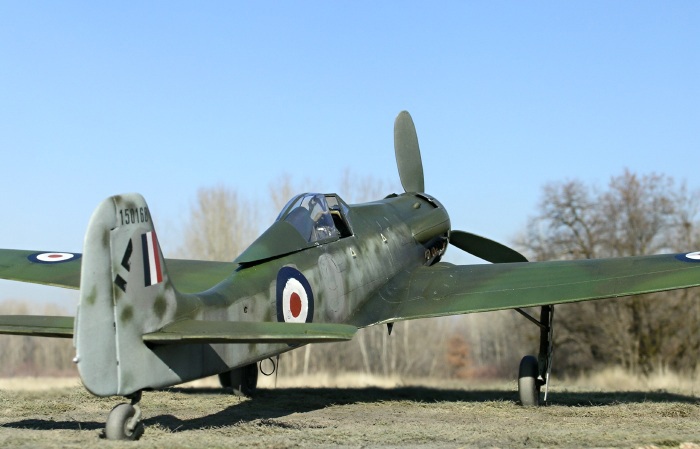
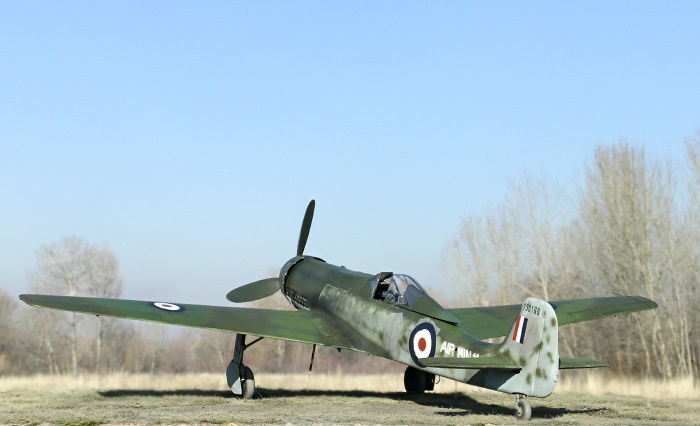
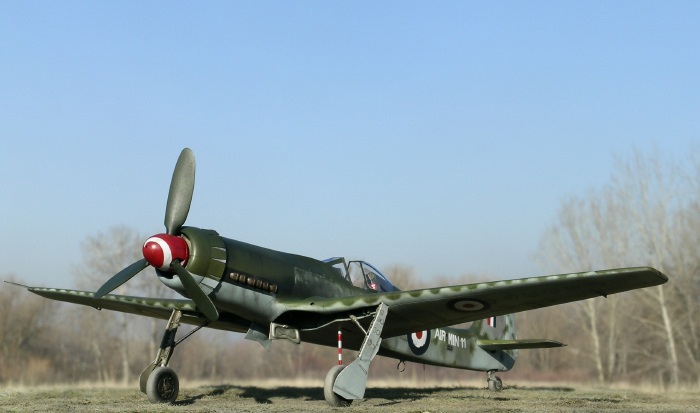
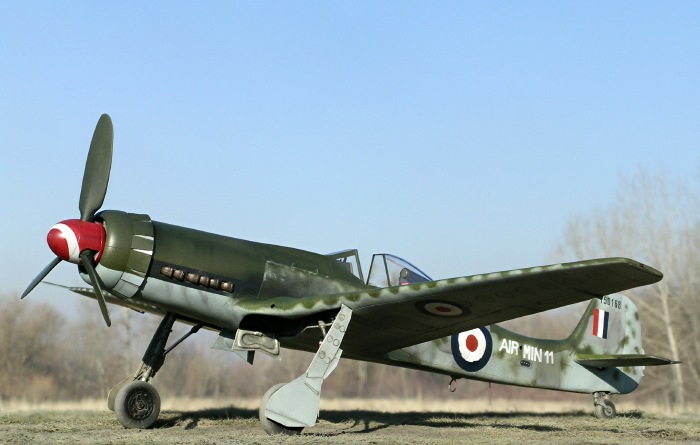
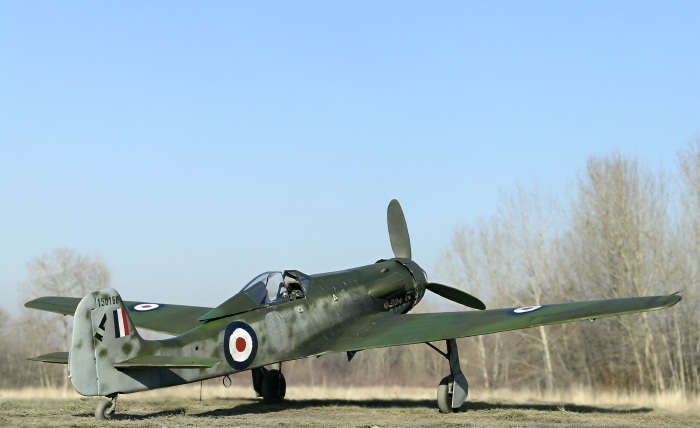
Tank Ta 152H-1 "Air Min
11" |

HyperScale is proudly supported by Squadron.com
Historically, the Ta.152H was a minor player in WWII, arriving too
late and in too few numbers to be of consequence to Germany’s failing
war effort.
Although the Ta.152H was designed for interception of high-flying
Allied bombers and reconnaissance aircraft, it never really had the
opportunity to serve in that role. Instead, the aircraft was used
primarily in escort and protection missions for low level attacks on
advancing Allied troops. With its tight turn radius, high speed, fast
climb rate, and smooth handling characteristics, the Ta.152 was on par
or superior to the best Allied piston engine aircraft of the time,
including the P-51D, P-47, Hawker Tempest, and Yak-9. Certainly the
pilots that flew the Ta.152H had a very favorable impression of the
aircraft’s capabilities. One pilot, Ofw. Willi Reschke (Stab/JG 301),
remarked that “The Ta.152 was my life insurance in the last weeks of the
war.”
Reschke flew his final combat sortie of the war on April 24, 1945 in the
Ta.152H-1 “Green 9” (W.Nr. 150168). Tasked with airfield protection and
escort duties for Fw.190D-9s dispatched to bomb and strafe Russian
positions near Berlin, Reschke claimed two Yak-9s shot down, bringing
his final tally in the war to 27. Reschke himself was shot down eight
times during the war.
At the end of the war “Green 9” was handed over to the British at Leck
and later flown to England for testing. The aircraft was repainted in
RAF markings and designated as "Air Min 11". Of interest to modelers is
the color of the spinner. All the profiles I could find show Reschke’s
aircraft, both before and after capture, with a light green spinner and
white spiral. However, according to Jerry Crandall of Eagle Editions, an
article in the November 1945 issue of “Aeroplane Spotter” magazine
stated that “Green 9” (W.Nr. 150168) had a black spinner with white
spiral when it was turned over to the British. Yet photos of “Air Min
11” taken at Farnsborough in late 1945 show a spinner that is definitely
lighter than black. This discrepancy in color was explained many years
later during a conversation between Jerry and Captain Eric Brown, the
test pilot who flew “Green 9” following its capture. According to
Captain Brown, the British repainted the spinner red with a white spiral
when the RAF markings were applied. It is with this interpretation in
mind that I depicted Ofw. Willi Reschke’s captured Ta.152H-1 “Air Min
11”.
The Model
Rutman’s 1/32 Ta.152H is a resin kit that includes a number of white
metal parts, photo etch, and a vacuform canopy. The instructions are
rudimentary (but sufficient), and no decals are provided. While I found
the resin castings to be quite good, considerable cleanup and
preparation of parts was required. This model was the first resin kit I
have attempted, although I did have previous experience with Rutman’s
conversion for the 1/32 Fw190D-13 (
http://hsfeatures.com/features04/fw190d1332ir_1.htm ). Both the D-13
conversion and the Ta.152 kit are for experienced modelers only, but
have the potential to become very nice models.
Throughout construction I glued the resin parts using gap filling CA
glue. Construction order was pretty much left up to the modeler. In
fact, the instructions are a series of hand drawings with the statement
“All of you have your own techniques, so I will just show you where it
all goes!”. Like I said, experience is recommended.
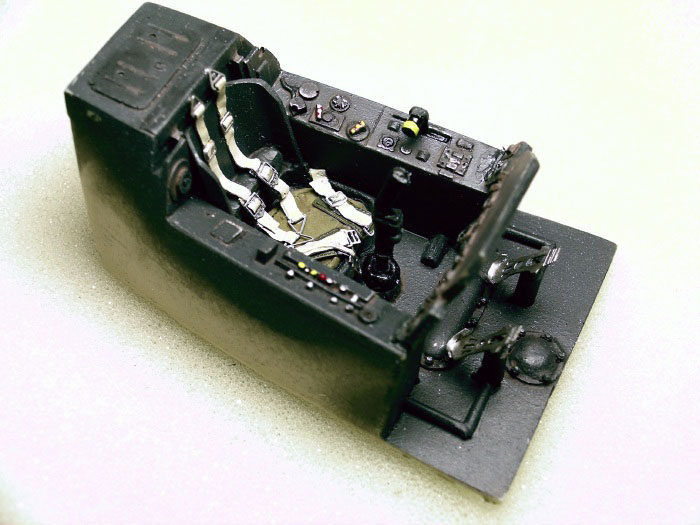
Cockpit, Engine, and Fuselage
I followed the same basic steps used for most aircraft models,
beginning with the cockpit. This part of construction was very straight
forward. A large resin cockpit tub is provided, along with a seat,
control stick, instrument panel, and some photo etch. I made my own
seatbelts from lead foil with buckles from MDC. The cockpit was painted
RLM66 with Polly Scale acrylic.
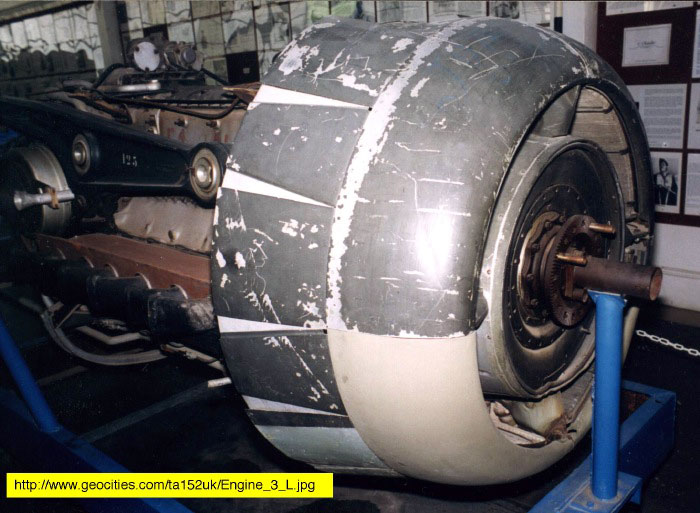
Once the cockpit was complete I focused on the engine. The Jumo 213E
engine of the Ta.152, as in the Fw,190D-9, was visible through the wheel
well. Rutman provides a solid resin piece to simulate the Jumo engine,
but in my kit it was a very crude representation. Therefore, I opted to
use the engine assembly from a Hasegawa 1/32 Fw.190D-9 kit.
I fitted and glued the completed cockpit and replacement engine into the
right fuselage half. Before gluing the fuselage halves together I added
the exhausts stacks from the inside. Don’t forget this step! Once the
fuselage halves were together I cleaned up the seams using gap filling
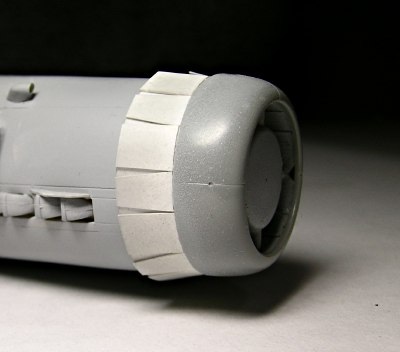
CA glue, and I attached the supercharger intake. The intake was hollowed
out with a dremel tool before attaching it to the fuselage.
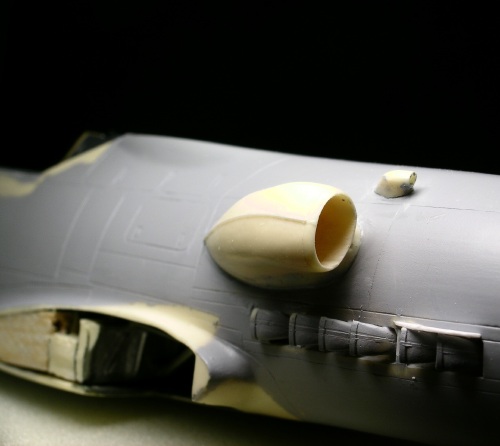
Cowl Flaps
I chose to display the cowl flaps open. Although the kit provides
etched metal flaps for this purpose, they had “nightmare” written all
over them for me (photoetch is my least favorite medium to work with).
After careful examination of photographs of Ta.152 cowl flaps (see
below), I measured the circumference of my model’s cowl and set out to
measure and cut my own flaps from Evergreen plastic sheet.
Attaching the cowl flaps to the model was straightforward. I think it
was a wise decision to go with the styrene. During subsequent handing of
the model the cowl flaps were banged around but did not break. I doubt
that metal flaps would have been so resilient.
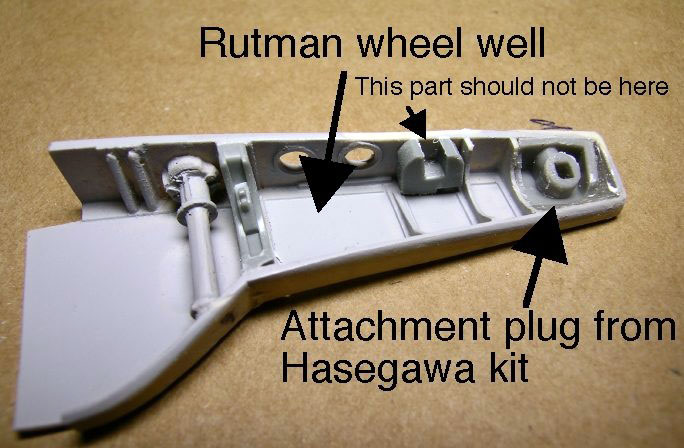
Wheel Wells and Undercarriage
As everyone building a Fw.190 or its derivatives knows,
the undercarriage is unusual in that the struts rake forward and inward.
On kits that provide attachment plugs for the struts there is little
difficulty positioning them. However, the Rutman kit offers no such
luxury. Thus, the modeler is left to his own devices to position and
secure the white metal struts into each wheel well.
Rather than reinvent the wheel, or in this case the strut attachment,
and having already cannibalized a Hasegawa Fw190D-9 kit for its engine,
I decided to make use of the wheel wells and struts from the D-9 kit.
Specifically, I used the D-9’s main struts in place of the Rutman struts
(the same struts were used on the Ta.152 and Fw.190), and I cut the
attachment plugs from the D-9’s wheel wells and carefully inserted them
into each wheel well of the Ta.152 (see below).
Note that using the D-9 wheel wells in place of the
Ta.152 wheel wells is not appropriate because they share little in
common with each other. Similarly, don’t use the radius rods from a
Fw.190, since this mechanism was switched from an electric drive in the
Fw.190 to a hydraulic drive in the Ta.152. I used the metal radius rods
provided by Rutman on my model.
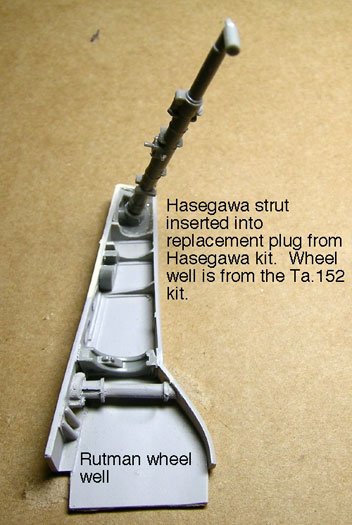 The
image below shows a Ta.152 wheel well with a Hasegawa strut inserted
into the transplanted Hasegawa attachment plug from the D-9 wheel well. The
image below shows a Ta.152 wheel well with a Hasegawa strut inserted
into the transplanted Hasegawa attachment plug from the D-9 wheel well.
Wings
A weakness of all Ta.152 kits that I’m aware of is the shape of the
wings. Careful observation of the aircraft from photos reveals that
while the leading edge of the Ta.152’s wings were straight, the trailing
edge had an inverted gull design. In my opinion no kit, including
Rutman’s, has captured this subtle yet important feature of the Ta.152’s
wings. However, until a better kit comes along this deficiency is
something modelers will just have to live with unless they are willing
to scratch build new wings. For me the error did not spoil the overall
appearance of the model, although it fuels my hope for a new tooled
styrene Ta.152 in 1/32 that addresses the issue correctly. Anyone,
anyone?
The initial rendition of Rutman’s 1/32 Ta.152 kit included vacuform
wings with rather heavy surface details. My kit was the newer version
with resin wings and finer surface detail. A potential drawback of resin
wings is their weight, and time will tell whether the wings on my model
will begin to sag.
The first step in working with the wings was to clean them up. The resin
on the interior surfaces of the upper and lower wing halves was
excessively thick on my kit, so I used a dremel tool (while wearing a
dust mask) to shave away many layers of excess resin. If this is not
done the wings will be far too thick, especially at the trailing edge
and outer wings.
Considerable effort was also needed to properly fit the modified wheel
wells into the wings. Excess resin in the upper and lower wing halves
had to be shaved away before I could get the wheel wells positioned
properly and the wings back together.
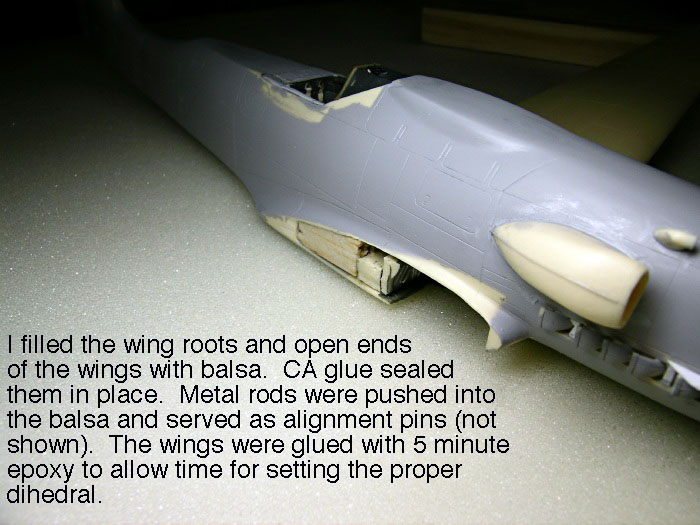
Once the left and right wings were together, I was faced with the
dilemma of how to attach them to the fuselage and achieve proper
dihedral. Basically you are left to deal with a butt joint and minimal
contact area between the wing and fuselage. I decided to plug the open
wing roots and the open ends of the wings with balsa wood (see photo),
and seal the pieces in with CA glue. I then pushed a couple of metal
rods dipped in CA glue into the balsa in the wing roots, leaving them
sticking out so that they could serve as alignment rods when I attached
the wings to the fuselage. Following a great deal of test fitting and
adjustments, I glued the wings to the fuselage. Rather than use CA glue
to do this, I used 5-minute epoxy because that allowed me time to fiddle
with dihedral before the glue set.
Canopy
The kit provides a fine resin framework for the front windscreen as
well as some clear acetate to cut an fit into the frame. I balked at the
fragility of this design and opted to cannibalize the front windscreen
from my Fw190D-9 kit. While there appears to be minor differences in
framing between the D-9 and Ta.152, I did not find the differences
substantial enough to worry about.
I also opted to use the Hasegawa D-9s blown rear canopy and headrest
assembly rather than fiddle with the Rutman vacuform canopy and resin
headrest. I could see little difference in profile between the two
parts, so I went with the parts that were easier to use.
Gear Covers
Rutman provides a mix of resin and photoetch for the main gear cover.
I decided to scratch build my own gear covers using Evergreen plastic
sheet.
 When
I began this project I intended to complete the model as Reschke’s
“Green 9” in full German markings using Mike Grant Decals (
http://mikegrantdecals.com/ ).
However, as I researched the aircraft I only came across photos of “Air
Min 11”, and became intrigued by the possibility of painting my model in
RAF markings. It’s not something I would normally opt for, but once in a
while a change of pace can be fun. Once I settled on the RAF scheme I
found suitable markings on Cutting Edge sheet #32065, which features two
captured He.162s. Although this sheet also includes a decal with the
words “Air Min”, the letters were too small for my model. Therefore, I
used dry transfers and modified them slightly by hand painting to match
photos. When
I began this project I intended to complete the model as Reschke’s
“Green 9” in full German markings using Mike Grant Decals (
http://mikegrantdecals.com/ ).
However, as I researched the aircraft I only came across photos of “Air
Min 11”, and became intrigued by the possibility of painting my model in
RAF markings. It’s not something I would normally opt for, but once in a
while a change of pace can be fun. Once I settled on the RAF scheme I
found suitable markings on Cutting Edge sheet #32065, which features two
captured He.162s. Although this sheet also includes a decal with the
words “Air Min”, the letters were too small for my model. Therefore, I
used dry transfers and modified them slightly by hand painting to match
photos.
According to Jerry Crandall, Aeroplane Spotter magazine (see
introduction) described “Green 9” as being two shades of green over
light blue, suggesting RLM82/83 over RLM76. I painted my model in this
scheme using Polly Scale acrylics. I used Polly Scale’s RLM76 and RLM83
(which is incorrectly labeled as RLM82) out of the bottle, and I mixed
my own version of RLM82 lichtgrun using 1 part RLM82, 1 part Pullman
Green, and 1 part RLM67. The reason I mixed my own RLM82 is that Polly
Scale’s interpretation of the color is far too bright in my opinion. I
tried to match the color to that of White Ensign’s RLM82.
Once the base German camouflage was applied I used RAF colors (dark
green and medium sea grey) to repaint the areas where German markings
would have been painted out. Note that on the starboard side of the tail
the swastika remained partly visible following repainting, but the red
and yellow bands of JG301 appear to have been obscured (perhaps showing
through somewhat), as were the crosses and “9s” on each side of the
fuselage. On my model I wanted to leave a hint of the aircraft’s
original identity, so I applied the black outline “9” decals provided by
Mike Grant, sprayed them over with medium sea grey, and then wet sanded
lightly to reveal traces of the original outlines. I then dry brushed
small amounts of RLM25 within the outlines.
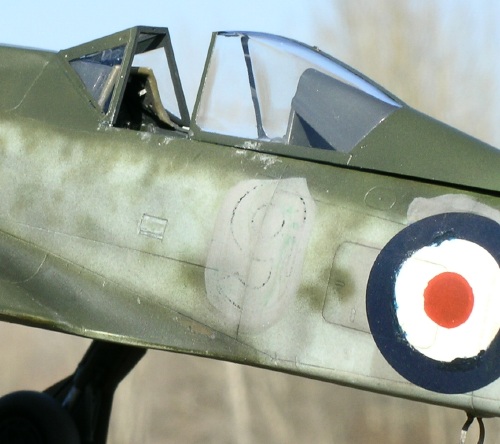
Photos of “Air Min 11” show that the roundels on the fuselage were
heavily retouched by hand painting, leaving less than perfect circles.
Therefore, after applying the Cutting Edge roundels I touched them up by
hand to recreate this “sloppy” effect. I also increased the size of the
interior red dots to match photos – the red dots on the Cutting Edge
decals were considerably smaller.
As noted in the introduction, the spinner was red with a white spiral.
This was not a simple project, but it was rewarding and my modeling
skills jumped up a notch in the process. Most of the construction was
done during the summer of 2005, but once the wings were attached I
needed a break and did not return to finish the model until early 2006.
The end result is an impressively large model that stands out among an
assortment of 1/32 Fw.190As and Ds. I recommend the kit to anyone
itching to build a 1/32 Ta.152H and/or tackling a resin kit. I would
certainly like to build another 1/32 Ta.152H, but for the time being
I’ll cling to my hope that some manufacturer will produce one in
styrene. Besides, I still have the Rutman 1/32 Ta.152C and Fw.190D-11
conversion to build.
Photographs of the completed model were taken outdoors in natural
sunlight with a Nikon Coolpix 5400 digital camera. The “unsharpen mask”
tool of Adobe Photoshop was used to restore some of the clarity and
crispness lost during image compression.
1) Jerry Crandall (personal communications)
2) Forsyth, R. 2005. Jagdwaffe Vol 5, Section 3: Defending the Reich
1944-1945. Classic Publications.
3) Harmann, D. 1999. Focke-Wulf Ta.152. Schiffer Publishing.
4) Murawski, M.J. & P. Neuworth. 2003. JG301 “Wilde Sau”. Kagero.
Click on the thumbnails
below to view larger images:
Messerschmitt Bf 109
Modelling Manuals 17 |
|
|
|
|
US Price: $17.95
UK Price: £12.99
Publisher:
Osprey Publishing
Publish Date:
January 25, 2002
Details: 64 pages; ISBN: 1841762652 |
|
|
Model, Images and Text Copyright ©
2006 by Ian Robertson
Page Created 26 March, 2006
Last Updated 28 March, 2006
Back to HyperScale
Main Page
|
 Home
| What's New |
Features |
Gallery |
Reviews |
Reference |
Forum |
Search
Home
| What's New |
Features |
Gallery |
Reviews |
Reference |
Forum |
Search